FallTech Beam Anchors User Manual
Page 9
17
4. Inspect this Beam Anchor, and all components of your Personal
Fall Arrest System in accordance with Section 8 of this manual.
Be sure to consult, and adhere to the instructional
materials, labels and warnings accompanying the other
components of your PFAS as well.
5. Depress the thumb-latch or thumb-latches and slide the jaw or
jaws out enough to allow the beam flange to fit between the
jaws.
6. Position the Ratcheting/Sliding Beam Anchor over the beam so
that both jaws extend over the flange.
7. Depress the thumb latch or latches and move the jaw or jaws
toward the D-ring (which should be centered on the beam) until
they make contact with the beam flange. Release the thumb
latches and ensure that the thumb latches have fully engaged
the teeth on the bar.
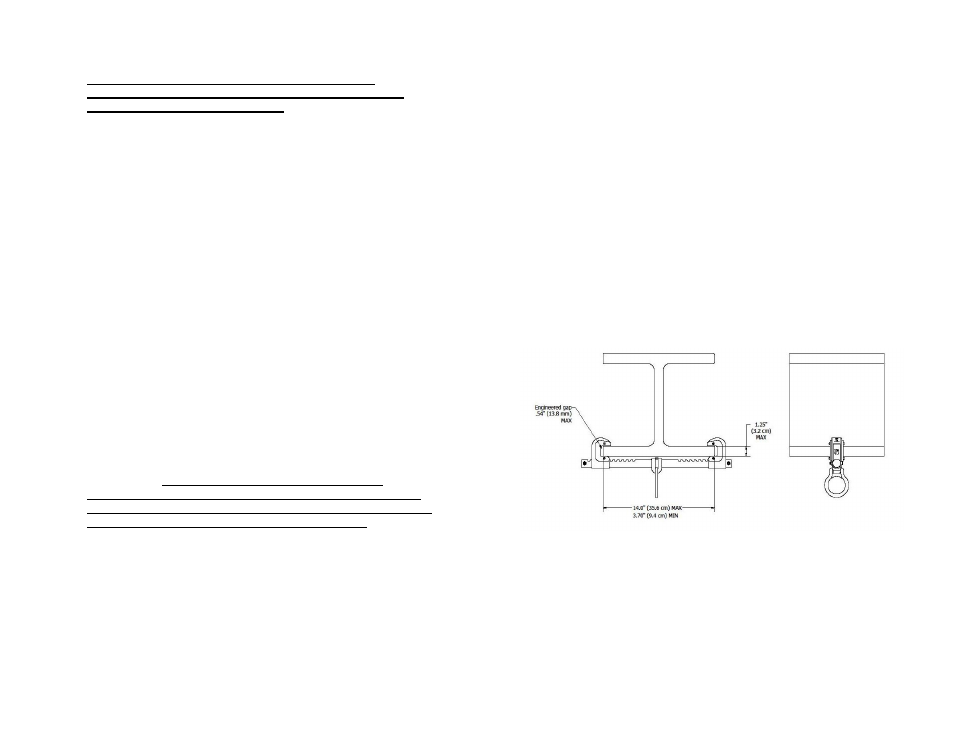
8. Check to make sure that the maximum total clearance between
the jaws and the beam flange is no more than half an inch (or
one tooth-spacing on the bar).
9. Check your installation to ensure that the Ratcheting/Sliding
Beam Anchor cannot come off of the beam at any point along
the intended path of movement or at beam joints or ends.
10. Ensure your Full Body Harness is properly donned and adjusted
and that your connecting device is securely attached to your
back D-ring. Tie-off to the Ratcheting/Sliding Beam Anchor with
your connecting device.
11. Proceed cautiously with your work. Do not run, jump or over-
reach. While moving, the Ratcheting/Sliding Beam Anchor
should slide on the beam, allowing you greater mobility. If it
does not slide smoothly, then check to ensure the D-ring on the
Beam Anchor is centered on the beam. Also check for jagged
edges, fasteners, paint build-up welding spatter or other
obstructions. Any type of obstruction or any sudden
movement may cause the Beam Anchor to seize-up on the
beam, causing you to lose your footing. Move with care and
deliberation at all times while working at heights.
12. Do not allow your connecting device to pass under your arm or
between your legs – severe injury or death may result. Also
avoid sharp edges which may damage your connecting device in
the event of a fall.
13. If the beam to which this anchor is attached is sloped or vertical,
the Beam Anchor must be positioned next to a stop which will
prevent the Beam Anchor from sliding or moving in the event of a
fall. Joints between beam sections must be flush and must have
a maximum gap of ½”.
14. If you are tied-off at the foot-level, or in a manner that will allow
more than six feet of free fall, ensure that your connecting device
18
is rated for extended free falls. Also ensure that the gate of your
carabiner or snap hook which is attached to the beam anchor
does not make direct contact with the edge of the beam flange,
with any part of the Beam Anchor, or any other obstruction.
Such contact could force a roll-out or accidental disengagement.
If in doubt, you may use a FallTech #7214 Choker to extend your
connection. Attach the 7214 Choker to the D-ring on your Beam
Anchor, and then attach your connecting device to the D-ring on
the Choker. This will help to keep your connector gate away
from any potential hazard.
Once the above steps have been taken, the user will have access to
their work area while walking and moving at normal speeds. It is
important not to make sudden or dramatic movements! When using this
device, care must be taken to be aware of the work environment and any
hazards, obstructions or obstacles that may exist. Be careful of any and
all fall hazards and also be aware of slipping and tripping hazards as
well.
Fig. 3.1
Correct Installation of Ratcheting/Sliding Beam Anchor
3.6: Installation and Use – Detent-Pin Beam Anchors
1. Select the appropriate FallTech Ratcheting/Sliding Beam Anchor
based on the work conditions and specific hazards (See Section
3.2 for recommendations).
2. Read, understand and comply with manufacturer’s instructions
for each component of your Personal Fall Arrest System (Full-
Body Harness, Connecting Devices, Anchorage Connectors,
etc.). Be sure to choose components that are compatible with
this Beam Anchor. If you have questions about product or