Yokogawa FD30 Immersion Adapter User Manual
Page 5
IM 12J6K4-E-E
8
IM 12J6K4-E-E
9
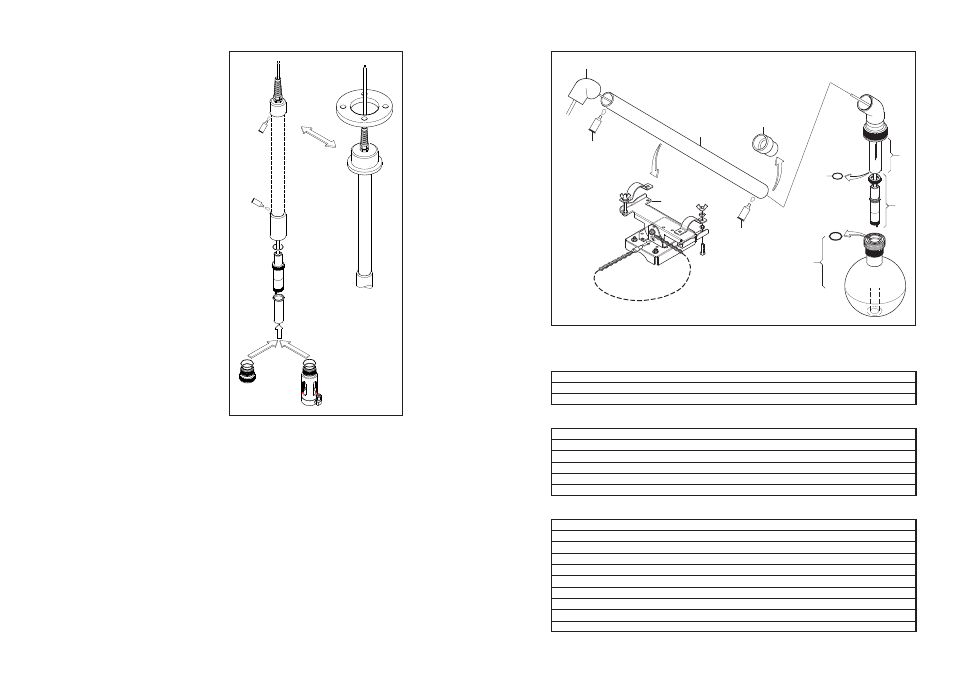
5.2.4 Mounting the sensor cleaner (/JC
option)
• After fixing the sensor with the cleaning
cage it is possible to screw the cleaner
tubing on the cage using the swage
lock coupling material provided with the
cleaner.
• It is recommended to fix the tubing to the
holder using tie wraps.
• Keep some flexible length of tubing for
ease of maintenance.
The cleaner can be used for both water and
air. It is recommended to use a solenoid
valve of the normally closed type with
matching connections. The solenoid valve
can be switched with the wash contact of
the EXA DO-converter.
5.3 Installing the floating ball fitting
5.3.1 Checklist
The floating ball fitting with sensor for
Dissolved Oxygen will be delivered in parts
and has to be assembled before it can
be used. Check if all standard parts are
delivered, see Figure 4. Please note that
items (4), (5) and (2 + 6) are optional and, if
not specified with the order, these parts will
not be delivered. The position ring (9) will
only be received when PB30-00. is ordered.
This part is only needed when 11/2" pipe
will be used in stead of 50 mm.
5.3.2 Installation
Mount the floating ball not exactly vertical, but under a slight angle, so that air bubbles do
not 'stick' or adhere to the membrane.
5.3.3 Assembling the floating ball fitting (ref to Figure 4)
• Attach the mounting bracket (1) to wall or pipe; clamps are already fixed to the bracket.
• Install the main support arm (2) (in case of PB30-00... the customers pipe), in the
mounting bracket (1) and adjust its length to the desired length.
• Use the supplied adhesive (7) to stick the lower support to the main support arm (2).
When a 11/2" pipe is used, the position ring (10) must be mounted in between them to
compensate for the difference.
• Attach (not for PB30-00...) the 90° elbow (6) to the upper end of the main support arm
and cement it with adhesive (7).
• Guide the cable assembly (4) through the main support arm.
• Position the complete sensor (4+5) in the lower support.
• Place the lower support (3) into the ball (8) by screwing the fixing nut hand-tight.
• Connect the leads of the cable to the EXA DO converter.
7
2
9
6
7
8
3
4
10
1
Figure 4
6. Spare parts
6.1 Model FD30V27 Immersion Fitting
Item
Description
Spare part no
6
5 x O-ring
K1500FX
8
5 x O-ring
K1500FY
6.2 Sensor Cleaner (/JC option)
Item
Description
Spare part no
1
5 x O-ring 37.7 X 2.6 for mounting sensor in fitting
K1500FY
2
Holder
3+4
Nozzle parts
K1500AZ
7
10m tubing (1/4 “) for jet cleaner
K1530UL
3,4,6
Spray nozzle for jet cleaner
K1530UK
6.3 Model PB30 Floating Ball Fitting
Item
Description
Spare part no
1
Mounting bracket
K1530DQ
2
Main support arm
3
Lower support arm with O-ring
K1530QA
4
DO30G sensor
See DO30G
6
Elbow 90º
7
Tube PVC adhesive
8
Floating ball assembly with O-ring
K1530SA
9
Position ring
10
O-ring 25.3 x 3.2 Viton 70º shore
K1500AV (5x)
Figure 3