English – Pfister 0X8-310A User Manual
Page 3
6
7
8
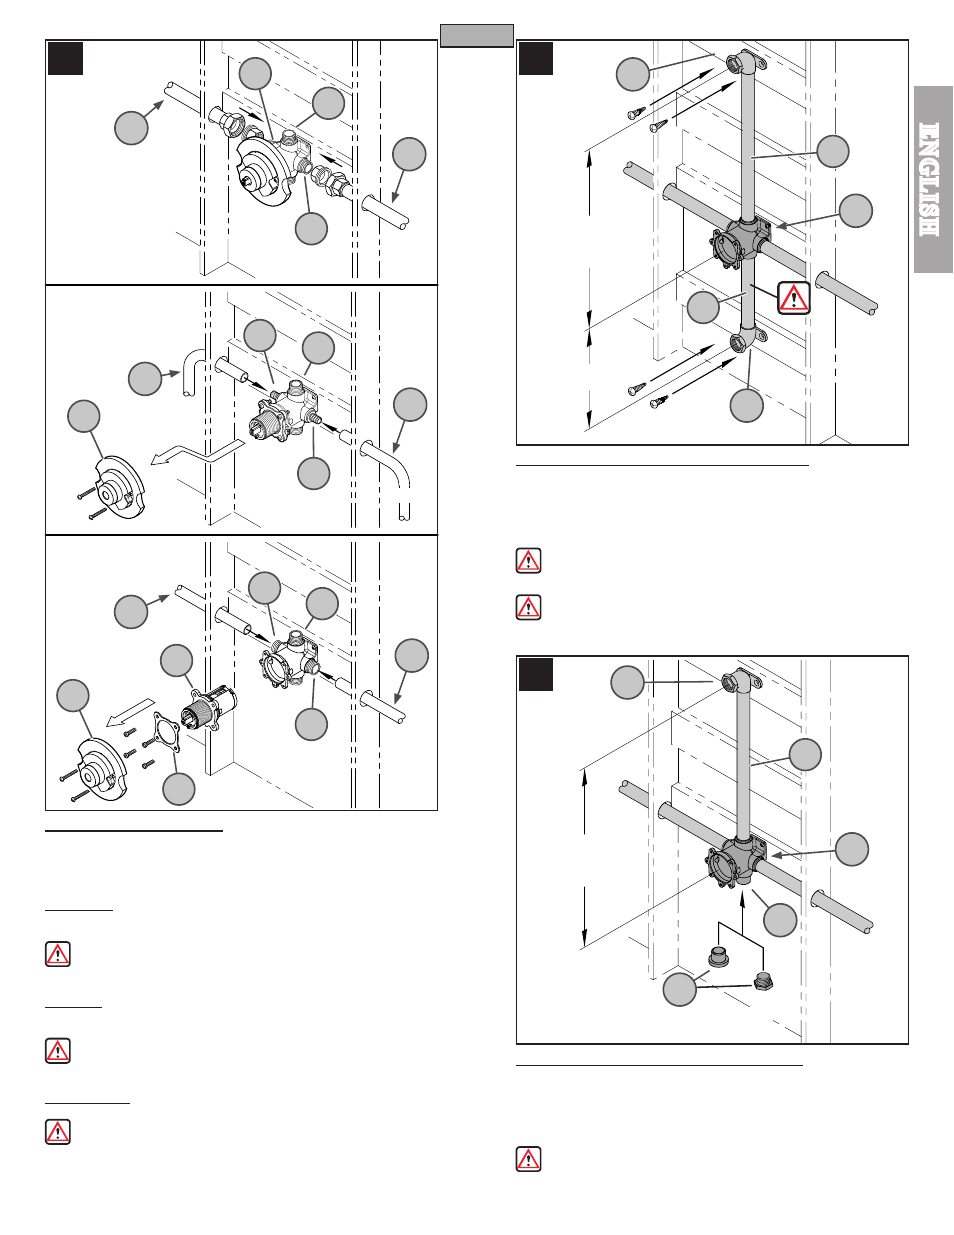
6 SUPPLY CONNECTIONS
Proper fittings for your valve body type are required.
Connect water Supply Lines (6A) to Valve Body Inlets (6B). Hot water supply lines
go into left inlet. Cold water supply lines go into right inlet. (Supply lines are not
included). Please follow manufacturer’s instructions when installing supply lines.
IRON PIPE: Valve Body Inlets (6B) and Outlets (6C) are designed to
accommodate 1/2-14 NPT pipe. Use thread sealant or PTFE Plumber’s tape
on all threaded fittings, according to manufacturer’s instructions.
CAUTION: For iron pipes, it is not recommended to reduce outlet pipe
diameter.
PEX PIPE: Valve Body inlets (6B) are designed to accommodate a 1/2” PEX
pipe and outlets (6C) are designed to accommodate a 1/2” copper pipe.
Remove Plaster Guard (6D).
NOTE: For PEX, be sure to use correct fitting for crimping and / or the
correct tool for cold expansion.
COPPER PIPE: Valve Body inlets (6B) and outlets (6C) are designed to
accommodate a 1/2” copper pipe.
WARNING: Remove Plaster Guard (6D), Backup Plate (6E) and Cartridge
Assembly (6F) prior to soldering any inlet or outlet connections. Failure to do
so can result in water damage. For valves with integral stops, open valve stems
prior to soldering (see step 12).
7 TUB & SHOWER OUTLET CONNECTIONS
Connect Shower (7A) and Tub (7B) Outlet Pipes to Valve Body (7C). Connect
Pipe Elbows (7D) (not included) to ends of both pipes. We recommend using
drop elbows (7D) (not included). Securely fasten to framing or other solid
support. The height for outlet pipes is measured from the center of pipe elbow
to center of the valve body, as shown.
WARNING: For Iron Pipe Connections or threaded fittings, use thread
sealant or PTFE Plumber’s tape according to manufacturer’s instructions.
WARNING:
Use only 1/2” Iron or Copper Pipe between valve
and tub spout (No PEX)! Do not reduce the inner pipe diameter!
8 SHOWER ONLY OUTLET CONNECTIONS
Connect Shower Outlet Pipe (8A) to Valve Body (8B). Plug Bottom Outlet (8C)
with Pipe Plug (8D). Connect Pipe Elbow (8E) (not included) to end of the pipe.
For copper pipe outlets, we recommend using drop elbows (8E) (not included).
Securely fasten to framing or other solid support. The height for the outlet
pipe is measured from center of pipe elbow to center of valve body, as shown.
WARNING: For Iron Pipe Connections or threaded fittings, use thread
sealant or PTFE Plumber’s tape according to manufacturer’s instructions.
3
ENGLISH
ENGLISH
6A
6A
6A
7D
8E
IRON PIPE
PEX PIPE
COPPER
PIPE
HOT
HOT
HOT
COLD
COLD
COLD
6A
6A
6A
7C
7D
48”
8” Min
8B
8C
8D
30” Min
This Part Is Supplied For
Shower Only Installation
6B
6C
6B
6B
6B
6C
6B
6C
6B
6D
6D
6E
6F
7A
7B
8A