Val-Matic 3 Way Plug Valve User Manual
Page 5
M
T
lu
e
T
3
T
m
O
r
P
f
in
r
c
a
A
p
If
d
t
b
a
V
m
w
P
e
f
p
a
w
d
fo
s
s
T
o
r
h
1
in
s
r
t
CAUTION:
should be
hammer.
MAINTENA
The Cam Cen
ubrication o
exercising an
The exercising
360 degrees t
The recomme
months or ann
Over the life
regular adjust
POSITION AD
factory-set to
nto the seat
require adjust
consult the fa
arrow should
Adjustable ind
precise positio
f the valve is
due to wear,
he left or rig
bolt on the ac
and moved di
Valves that h
may require
wear. See the
PACKING A
equipped with
factory-set fo
pressure ass
adjustment. H
wear, a smal
develops, mo
follower (18)
stop the leak
shim or replac
THRUST BEA
of the plug a
raising and lo
has a 5 degre
1/16 in. will p
nterference.
should first b
right to see if
hen a thrust b
Opening an
e done slow
ANCE
ntric
®
Plug Va
or maintenan
nd occasiona
g is achieved
to verify smoo
ended interval
nually if the v
e of the valv
tments may b
DJUSTMENT
seal with p
t. Reverse p
tment of the
actory. The
d point to th
dicator screws
oning of the p
s found to le
the plug pos
ht until a sea
ctuator cover
rectly under t
have been in
inspection of
e Disassembl
ADJUSTMENT
h a set of V-
or drop-tight
isted and do
However, dep
l adjustment
ve shims (29
and tighten
. If the leak
ce the packing
ARING ADJU
against the s
wering the pl
ee taper, so e
provide an ad
If leakage in
e rotated 1-2
the leak stop
bearing adjus
nd Closing o
wly to prev
alve requires
nce other t
al inspection
d by fully rotat
oth operation.
l for exercisin
valve is regula
ve, inspectio
e needed as
T: The stand
ressure push
ressure appl
thrust bearin
closed posi
he port to
s in slotted h
plug.
eak in the clo
sition should
al is made.
r should then
the target arro
service for s
f the plug fo
ly Instructions
T: The to
-shaped pack
service. Th
oes not norm
pending on lin
can be mad
9) from under
the follower
persists, rem
g.
USTMENT: T
seat can be
lug in the valv
very vertical a
dditional .005
the valve occ
2 degrees to
ps. If the lea
stment is nece
of the valve
vent water
no scheduled
than regular
of the plug
ting the valve
.
ng is every six
arly operated
n and some
given below.
dard valve is
hing the plug
ications may
ng assembly
tion indicator
be shut off
oles allow for
osed position
be moved to
The indicator
be loosened
ow.
several years
or damage or
s on page 8.
op shaft is
king which is
e packing is
mally require
ne media and
de. If a leak
to above the
bolts (19) to
move another
The tightness
adjusted by
ve. The seat
adjustment of
in. of rubber
curs, the plug
o the left and
ak still occurs
essary.
d
r
.
e
x
.
e
s
g
y
;
r
.
r
n
o
r
d
s
r
s
s
s
e
d
k
e
o
r
s
y
t
f
r
g
d
,
The
posit
seat
1. Ro
su
2. L
n
3. C
r
To d
1. Ro
su
2. Ti
th
3. C
ro
If lea
has
drain
dam
F
thrust bearin
tioned with
ing interferen
otate the low
upport plate.
Lock the supp
uts (12) again
Check for lea
rotate through
decrease the s
otate the upp
upport plate.
ighten the low
he support pla
Check for lea
otate through
akage continu
been adjus
ned, and the
age or debris
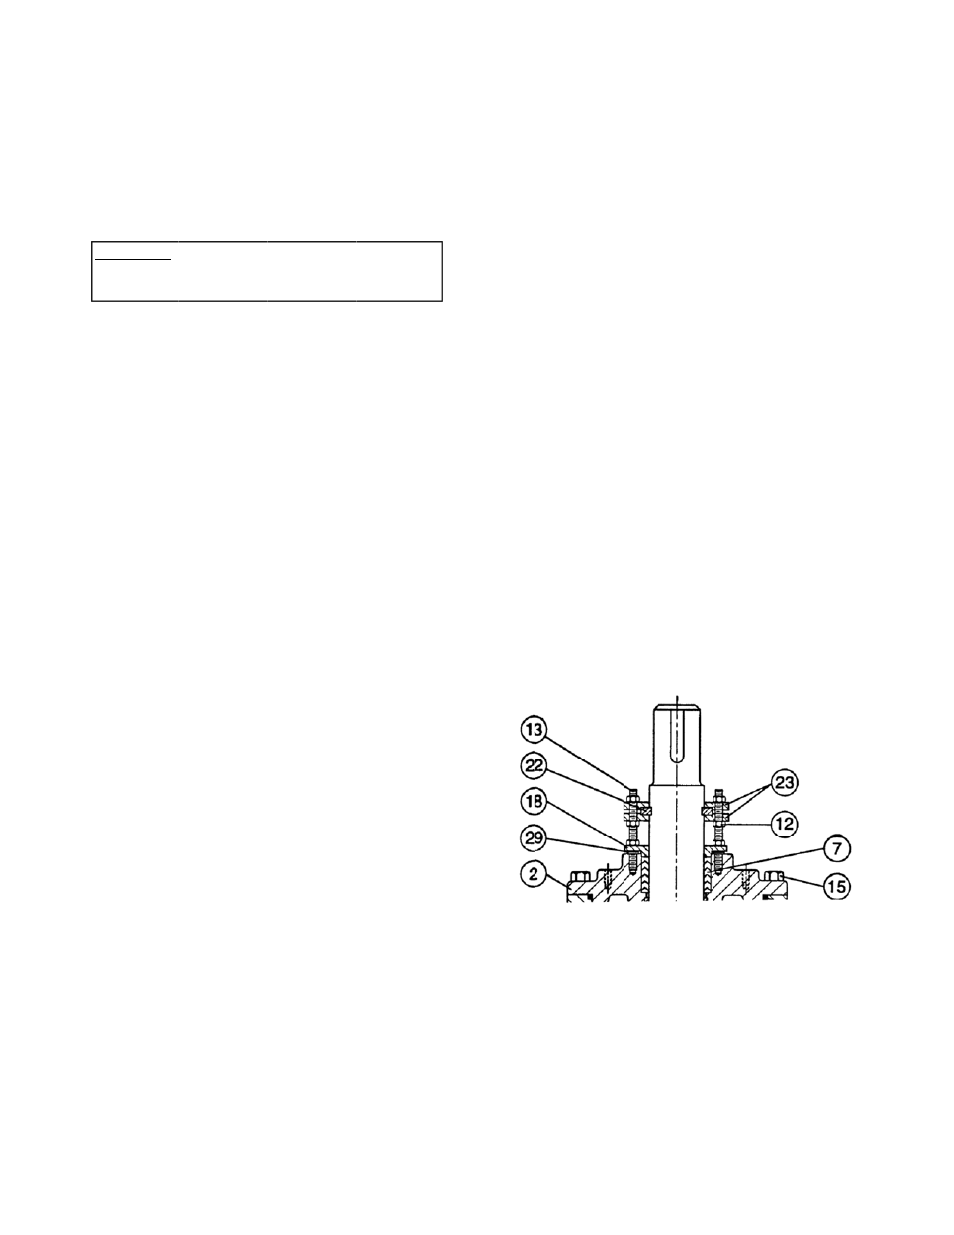
FIGURE 4. T
ng support pla
hex nuts (1
nce, lower the
wer nuts (12)
port plate dow
nst the top su
kage and ve
h the seat sm
seating interfe
per nuts (12)
wer nuts unti
ates touch the
kage and ve
the seat smo
ues to occur a
sted, then t
cover remov
s in the valve.
THRUST BEA
ates (23) are
2). To incr
e plug:
1/2 turn away
wn by tightenin
upport plate (2
erify that the
moothly.
erence, raise
1/2 turn away
il the plug is
e upper nuts.
erify that the
oothly.
after the thrus
the valve s
ved to inspec
.
ARING ASSE
e vertically
rease the
y from the
ng the top
23).
valve will
the plug.
y from the
lifted and
valve will
st bearing
hould be
ct for plug
MBLY