Cougar™ push pull gun - operating instructions, Warning, Safety precautions – Lincoln Electric IM10032 COUGAR K2704-2, K2704-3 User Manual
Page 11
Safety Precautions
WARNING
• Do not touch electrically live
parts or electrode with skin
or wet clothing
• Insulate yourself from work
and ground.
• Always wear dry insulating
gloves.
ELECTRIC SHOCK
can kill.
• Keep your head out of fumes.
• Use ventilation or exhaust to
remove fumes from breathing
zone.
FUMES AND GASES can be
dangerous.
• Keep flammable material
away.
• Do not weld on containers
that have held combustibles.
WELDING SPARKS can
cause fire or explosion.
• Wear eye, ear and body
protection..
ARC RAYS can burn.
WARNING: Electric shock can kill. Fumes and gases can be
dangerous to your health. Arc rays can injure eyes and burn
skin. See additional warning information under "Arc Welding
Safely Precautions" on inside of front cover of operating manual.
When inching, (the electrode and drive mechanism are always
electrically energized and remain energized several seconds
after the gun trigger is released.
Setup Procedure
Selecting Electrode Wire
Several alloy types of filler metals are available, and the best
choice depends on the type of base metals and the desired
characteristics of the weldment, such as ductility and strength,
corrosion resistance, sustained service temperature, and anodic
treatment color matching. In addition, several wire sizes are
available, and the choice here will depend upon several fac-
tors, including base metal thickness and the arc transfer process
used. Consult your local dealer or appropriate AWS publication
for help in selecting an appropriate alloy type and wire size. Also
refer to, "Procedure Settings" later in this chapter, for wire sizes
used with typical base metal thicknesses and procedure set-
tings.
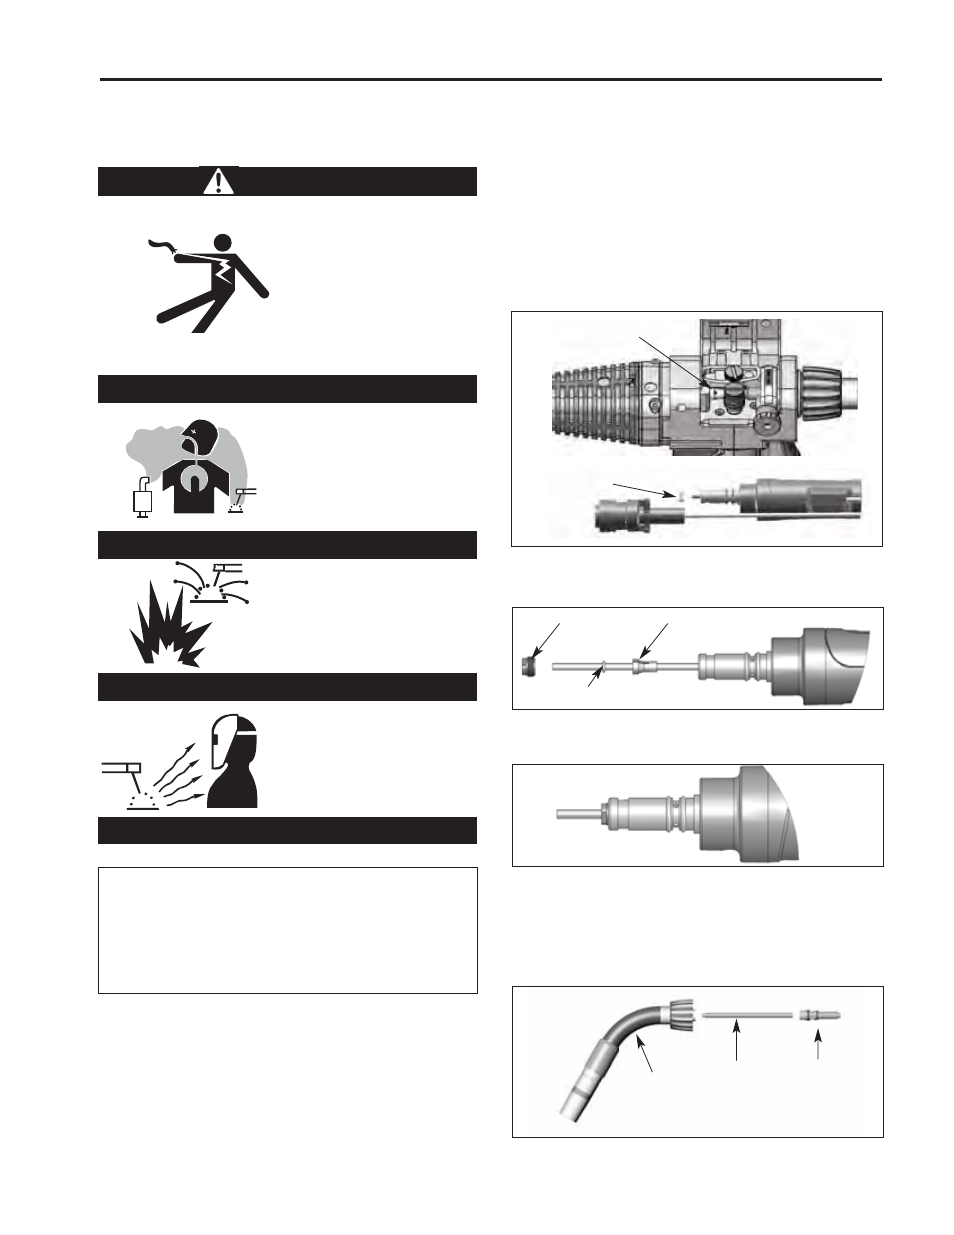
Installing Conduit Liner:
1. Laying torch out straight remove positioning nut, then insert your
liner, tapered end first, all the way into torch until it stops. NOTE:
You should see the liner through the holes in the inlet guide this
will help make sure liner is fully installed.
2. While torch is still laying out straight adjust your O-Ring and col-
let so that they will fit up inside of the power-pin when positioning
nut is installed.
3. Reinstall the positioning nut securely, then trim rest of liner
flush with positioning nut, accordingly to fit up to drive rolls.
Installing Barrel Liner
1. Unscrew barrel inlet guide
2. Unscrew barrel liner from inlet guide
3. Reverse procedure with new liner. Be sure to install liner with
tapered end toward contact tip, and liner is fully threaded into
inlet guide.
Positioning Nut
Collet
O-Ring
COUGAR™ Push Pull Gun - OPERATING INSTRUCTIONS
5
Inlet Guide with Liner
Inspection Hole
Liner Positioning
Nut
Torch
Barrel
Neck
Liner
Barrel
Inlet
Guide