Operating instructions, Installing the rope – WARN 9.0Rc User Manual
Page 8
WARN INDUSTRIES * 9.0 RC WINCH
11
OPERATING INSTRUCTIONS
Spooling In Under Load
Never exceed winch’s rated
line pull.
Power-in the rope evenly and
tightly on the drum. This prevents
the outer wraps from sinking into
the inner wraps, binding, and
damaging the rope.
Avoid shock loads when
spooling, by pulsing the control
switch to take up rope slack. Shock
loads can momentarily far exceed
the winch and rope ratings.
Spooling In Under No Load
Spooling with an Assistant: Have
the assistant hold the hook strap
putting as much constant tension
on the rope as possible. While
keeping tension, the assistant
should walk toward the winch while
you operate the control switch
spooling in the rope. Release
the switch when the hook is a
minimum of 6 ft. (2 m) from the
fairlead opening.
Spool in the remainder for
storage as directed below.
Spooling Alone: Arrange the rope
to be spooled so it will not kink or
tangle when spooled. Be sure any
rope on the drum is tightly and
evenly layered. Spool enough rope
to complete the next full layer on
the drum. Tighten and straighten
the layer.
Repeat process until the
hook is a
minimum of 6 ft. (2 m)
WARNING
Always keep
hands clear
of winch rope,
hook loop, hook
and fairlead
opening during
installation,
operation, and
when spooling in
or out.
WARNING
Always use
supplied hook
strap whenever
spooling winch
rope in or
out, during
installation or
operation to
avoid injury
to hands and
fi ngers.
WARNING
Always wear
heavy leather
gloves when
handling winch
rope.
WARNING
Never touch
winch rope
or hook while
someone else
is at the control
switch or
during winching
operation.
OPERATING INSTRUCTIONS
Cont.
from the fairlead opening.
Spool in the remainder for
storage as directed below.
Spooling Remainder for Storage
When the hook is within 6 ft. (2 m)
of the fairlead, disconnect the hook
from the anchor or load. Hold onto
the supplied hook strap and hold
tension on the winch rope. Slowly
power-in the winch by “pulsing”
the power-in switch on the remote
control until the hook is within 3 ft.
(1 m) of the fairlead. Stop winching
in and attach the hook to a suitable
anchor point on the vehicle.
DO NOT POWER THE HOOK
INTO THE FAIRLEAD. This could
cause damage to the fairlead. Once
the hook is suitably attached to the
vehicle, power-in the remaining
slack in the winch rope by “pulsing”
the power-in switch on the remote
control until there is minimal slack
in the winch rope.
Overloading/Overheating
This winch is rated for
intermittent duty. When the motor
approaches stall speed, very rapid
heat buildup occurs which may
cause motor damage.
Double-line rigging (see
The Basic Guide to Winching
Techniques) will reduce the
amperage draw, and reduce heat
buildup in the motor. This allows
longer continual use.
WARN INDUSTRIES * 9.0 RC WINCH
12
INSTALLING THE ROPE
WARNING
Always
prestretch rope
and respool
under load
before use.
Tightly wound
rope reduces
chances of
“binding”, which
can damage the
rope.
WARNING
Never touch
rope or hook
while someone
else is at the
control switch or
during winching
operation.
Spooling
THE FOLLOWING STEPS ARE
VERY IMPORTANT AND IF NOT
PRECISELY FOLLOWED THE
LIFE OF THE WINCH AND ROPE
MAY BE COMPROMISED.
1. Mount the Warn Aluminum
Hawse Fairlead to the winch mount
using the supplied hardware.
Always mount the fairlead with the
labels in the upright position (labels
on top and clearly visible). Insert a
1/2” x 2” bolt through each of the
two fairlead mounting holes and
through the winch mount. Place
a 1/2” fl at washer onto each bolt.
Install a 1/2” lock nut onto each bolt
and tighten to 65 ft. lbs.
5. Tighten the 3/8-24 button head
bolt to 38-42 ft. lbs. Turn the winch
clutch level to the “engaged”
position.
6. It is now necessary to spool the
remaining rope onto the winch
drum. Choose a FLAT location
that is large enough to run out the
entire length of rope. Attach the
hook end of the rope to a suitable
anchor point and back the vehicle
away from the anchor point leaving
approximately 6 ft of slack rope
lying on the ground. Before getting
out of the vehicle, set the parking
brake, place the vehicle in gear or
park and turn the vehicle off.
7. Connect the remote control to
the winch. Standing approximately
8 ft away from the winch, power in
the winch until there is 6-8 wraps
onto the winch drum. Disconnect
the remote control from the winch.
Hold tension on the rope with one
hand; carefully push the rope to
the side of the drum the rope is
attached to so there are no gaps
between each coil on the drum.
Be sure to check that the rope is
winding off of the bottom of the
drum, not the top, or the automatic
load holding brake will not function
properly. (If the rope is winding
off the top you have powered the
winch “out” instead of “in” on the
remote control)
8. If there is still rope laying on the
ground, back the vehicle away until
the rope is off of the ground.
9. The following steps should be
done using two people for proper
safety. If you attempt to tension
your rope alone be sure to always
engage the parking brake, place
the transmission in gear and turn
the vehicle off every time you exit
the vehicle to inspect the winch
rope. Never exit the vehicle with a
load on the winch rope. Tensioning
2. Slide the abrasion sleeve over
the rope from the end opposite the
hook. Slide the sleeve back to the
hook end of the rope.
3. Apply Lock Tite 271 or equivalent
product to the supplied 3/8-24 x
3/4” long button head fastener.
4. Install the new synthetic rope
using the button head fastener
supplied and the machined rope
washer. Insert the synthetic rope
through the aluminum fairlead and
around the winch drum from the
bottom. Insert the button head bolt
into the machined rope washer
and place the synthetic rope on the
machined rope washer. Install the
button head bolt in the 3/8-24 hole
in the side of the winch drum. See
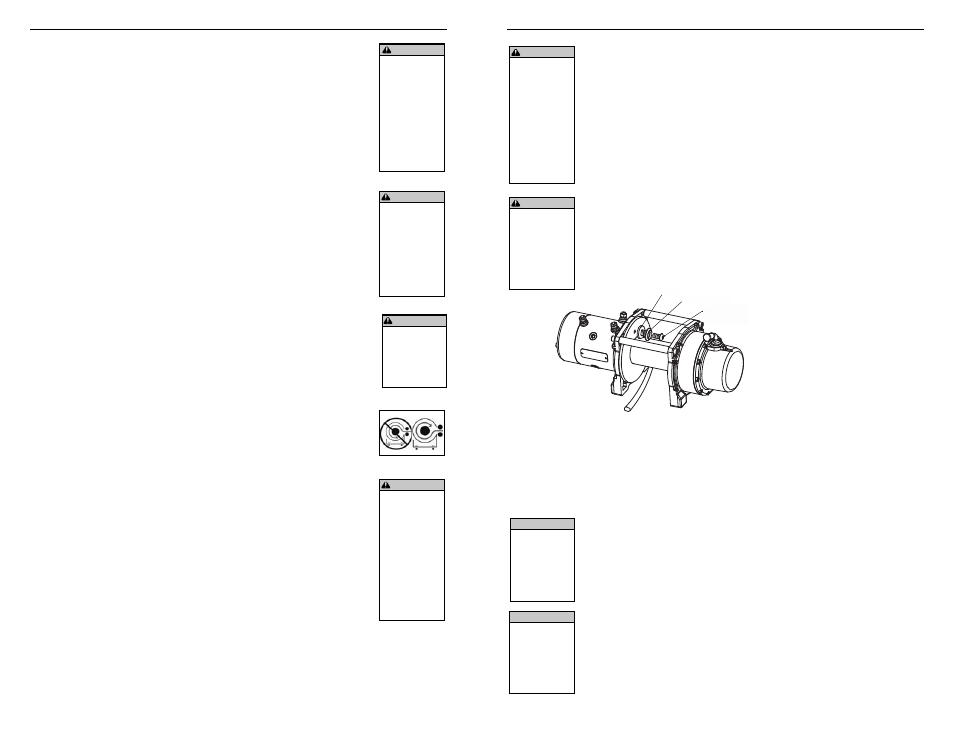
Figure for detail.
NOTICE
Never install
more than 50’
of 3/8” synthetic
rope. Damage to
the winch may
result.
NOTICE
Always replace
rope every 12
months with new
WARN synthetic
rope ONLY. P/N
71717.
Rope
Rope Washer
3/8-24 x 3/4”
Button Head
Bolt