Tyrex TY5300 User Manual
Page 10
10
(3) Continue to allow the motor
to run. The next screw will be
automatically fed into place when
the tool is depressed against the
work surface.
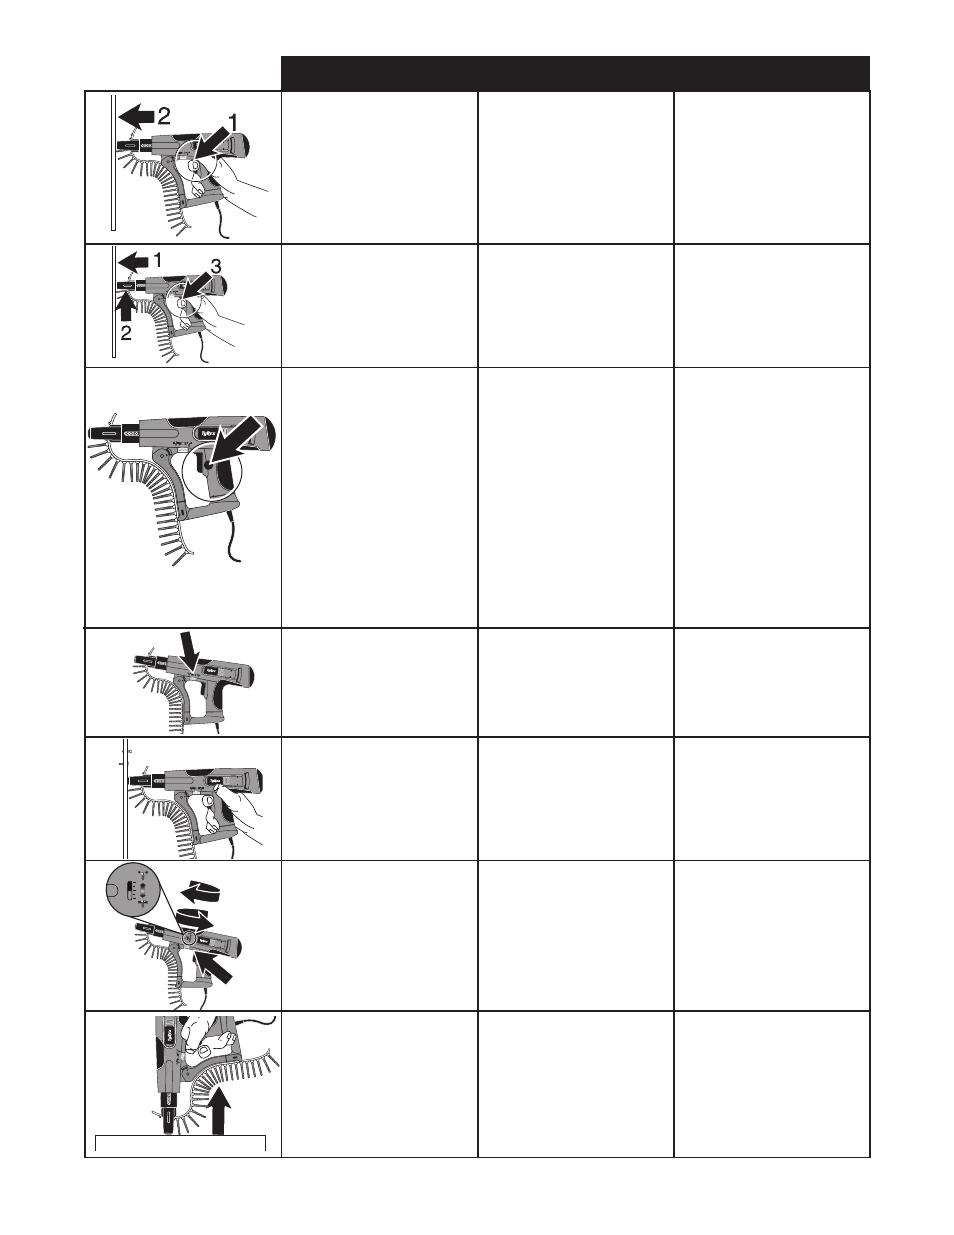
This tool is equipped with a depth
control adjustment
.
Test drive one screw before finaliz-
ing the depth to ensure appropriate
countersink.
Adjust the countersink by turning
the depth adjustment thumbwheel:
Refer to the graphics on the tool for
proper direction.
(3) Continúe haciendo funcionar
el motor. El siguiente tornillo se
alimentará automáticamente
cuando se ejerza presión contra la
superficie de trabajo.
(3) Appuyez de nouveau sur
la gâchette pour permettre au
moteur de tourner. La vis suivante
sera automatiquement alimentée
à sa place dès que vous appuierez
l’outil sur la surface de travail.
Esta herramienta está equipada
con un ajuste de control de pro-
fundidad.
Cet outil est équipé d’un système
de réglage de la profondeur.
Inserte un tornillo de prueba
antes de llegar al máximo de la
profundidad a fin de asegurar que
se cuenta con la profundidad de
embutido apropiada.
Faites un essai avec une vis avant
de procéder au réglage final de la
profondeur afin de vous assurer
que la pénétration est correcte.
Para ajustar la profundidad de
embutido, haga girar la perilla de
ajuste de profundidad. Consulte la
dirección de giro correcta en los
gráficos ilustrados en la herra-
mienta.
Réglez la pénétration en tournant la
molette de réglage de la profon-
deur : Référez-vous au graphique
figurant sur l’outil pour trouver la
bonne direction.
This tool has a depth-sens-
ing clutch. When the screw is
countersunk to the pre-set depth,
it automatically disengages and
makes a click or racheting sound.
This is normal and signals comple-
tion of the drive.
Esta herramieenta tiene un em-
brague que determina la profundi-
dad. Cuando el tornillo se embute a
una profundidad preconfigurada, el
embrague se desacopla automáti-
camente y hace un clic o un sonido
de trinquete. Esto es normal e
indica la finalización del impulso.
Cet outil posséde un dispositif
de mesure de profondeur avec
débrayage. Lorsque la vis arrive
à la profondeur prédéterminée, le
dispositif se débraie automatique-
ment et produit un clic, signifiant
que le vissage est terminé.
(2) Press the nosepiece, with
constant force, against the work
surface. Do not remove the tool from
the work surface until the clutch
disengages and the bit stops rotating,
signaling a fully driven screw.
(2) Presione la pieza de la boca,
ejerciendo una fuerza constante,
contra la superficie de trabajo. No
retire la herramienta de la superficie
de trabajo hasta que el embrague
se desenganche y la broca deje de
girar, lo que indica que el tornillo se
ha embutido totalmente.
(2) Appuyez le nez sur la sur-
face de travail avec une pression
constante. N’enlevez pas l’outil
de la surface de travail avant dé-
brayage et arrêt de la rotation de
la broche indiquant que l’opération
de vissage est complètement
terminée.
To lock the switch in the on position
for continuous operation, depress
the trigger switch and push in
the
locking button. The tool will
continue to run. To turn the tool
off, from a locked on condition,
squeeze and release the trigger
once. Before using the tool (each
time), be sure that the locking but-
ton release mechanism is working
freely.
Para bloquear el interruptor en
la posición de encendido para
funcionamiento continuo, oprima
el gatillo y pulse el
botón de blo-
queo. La herramienta continuará
funcionando.
Para apagar la herramienta, desde
una condición de encendido
continuo, oprima y suelte el gatillo
una sola vez. Antes de usar la
herramienta (cada vez), cerciórese
de que el mecanismo soltador
del botón de bloqueo funcione
libremente.
Pour bloquer la détente en position
pour un fonctionnement en continu
sans avoir à la maintenir, appuyez
dessus et pressez le
bouton de
blocage. L’outil va continuer à
tourner. Pour le couper à partir de
ce mode, appuyez de nouveau sur
la détente et relâchez-la. Avant
chaque démarrage de l’outil, véri-
fiez que le mécanisme de libération
du bouton de blocage fonctionne
bien.
To o l O p e r a t i o n • O p e r a c i ó n d e l a H e r r a m i e n t a • U t i l i s a t i o n d e l ’ O u t i l
English
Espanol
Francais