Luxor|H.Wilson WPSDD3 User Manual
Page 2
04/05/13
WARNING:
Please follow
the cautionary guidelines
included with your drill.
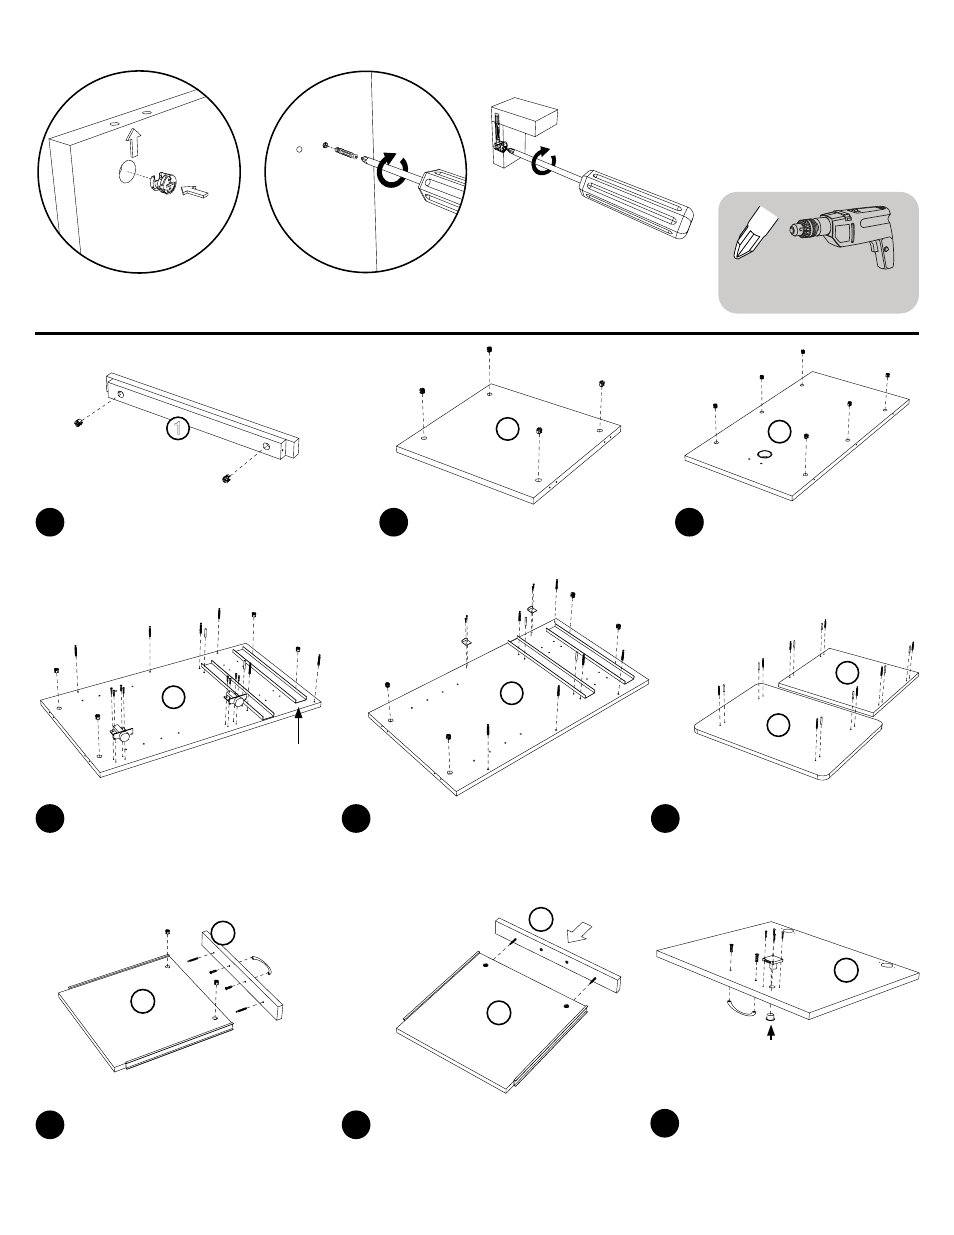
Proper Cam Installation:
The small arrow on the cam
faces toward the outside edge
Screw the metal dowel into
the threaded hole
After panels are placed
together, turn the cam 90°
clockwise to lock in place
Insert 2 cams B into the top
support brace 1
Upper cams may
come preinstalled
Detach lock E faceplate
prior to installation
Metal runners need to be
loosened to install cams
Insert 4 cams B, 6 metal dowels
A, 2 wood dowels I into the right
side panel 4. Use drill on 2 door
hinges D with 8 wood screws Ca.
Install the metal dowels A in the
pullout shelf front 7b and 2 cams
B into the pullout shelf 7a. Install
the handle F onto the pullout shelf
front 7b, with the handle screws J.
Push the pull out shelf front panel
7b on to the pull out shelf 7a, and
turn the cams to lock into place.
The handle screws J should still
be visible.
Insert 4 cams B, 6 metal dowels A,
2 wood dowels I into the left side
panel 5. Use drill on 2 lock catches
G with 4 lock catch screws L.
Insert 4 metal dowels A and 4
wood dowels I into the top panel
6a. Repeat for bottom panel 6b.
Use drill on lock E with 4
lock screws M. Screw the
handle F onto the door panel
8 with 2 handle screws J.
Insert 4 cams B into the
horizontal divider panel 2
Insert 6 cams B into the
back panel 3.
B
B
B
B
B
B
B
B
B
B
B
B
B
B
B
D
D
B
F
E
F
B
A
A
B
B A
B
B
B
B
A
A
A
A
A
A
A
A
A
A
A
A
A
A
G
G
Lx2
Lx2
A
A
A
I
I
I
I
I
I
I
I
I
I
I
I
Cax4
Jx2
Jx2
Mx4
Cax4
A
A
1
2
3
A
Phillips
Screwdriver
Phillips
Screwdriver
90°
2/5
1
4
7a
7b
5
6
8
2
3
1
2
3
6a
6b
7a
7b
7a
7b
8
4
5
Phillips Head Drill Bit