Warning, Assembly instructions – Rivers Edge RE765 Universal Concealment Curtain User Manual
Page 2
TREESTANDS
Universal Concealment Curtain (RE765)
Page
HuntRiversEdge.com
HuntRiversEdge.com
800-450-EDGE (3343)
waRninG
iF YOU aRE nOT wEaRinG a FULL BODY HaRnESS
THaT iS PROTECTinG YOU FROM a FaLL, DO nOT
LEaVE THE GROUnD.
REaD, UnDERSTanD anD FOLLOw aLL aSSEM-
BLY, inSPECTiOn, MainTEnanCE, & SETUP/USE
inSTRUCTiOnS PROViDED BEFORE EaCH USE.
FaiLURE TO FOLLOw aLL waRninGS anD in-
STRUCTiOnS COULD RESULT in SERiOUS inJU-
RY OR DEaTH.
aLL aSSEMBLY MUST BE DOnE in THiS ORDER aT
GROUnD LEVEL BEFORE USE.
DO nOT CRUSH TUBinG wHEn TiGHTEninG BOLT
aSSEMBLiES! iDEnTiFY anD FaMiLiaRiZE YOUR-
SELF wiTH aLL PaRTS BEFORE YOU STaRT.
DOUBLE CHECK aSSEMBLY STEPS TO BE CER-
Tain YOU HaVE CORRECTLY aSSEMBLED THiS
PRODUCT. iF anY inSTRUCTiOnS aRE nOT
UnDERSTOOD OR iF YOU HaVE a PaRTS iS-
SUE CaLL 800-450-EDGE (3343) BEFORE USinG.
THiS iS nOT a SaFETY RaiL! nEVER LEan
aGainST, LEan OVER OR SiT On SHOOTinG RaiL.
iT iS DESiGnED aS a SHOOTinG REST OnLY. aL-
waYS BE awaRE THaT THE SHOOTinG RaiL Can
SwinG TO OnE SiDE OR THE OTHER.
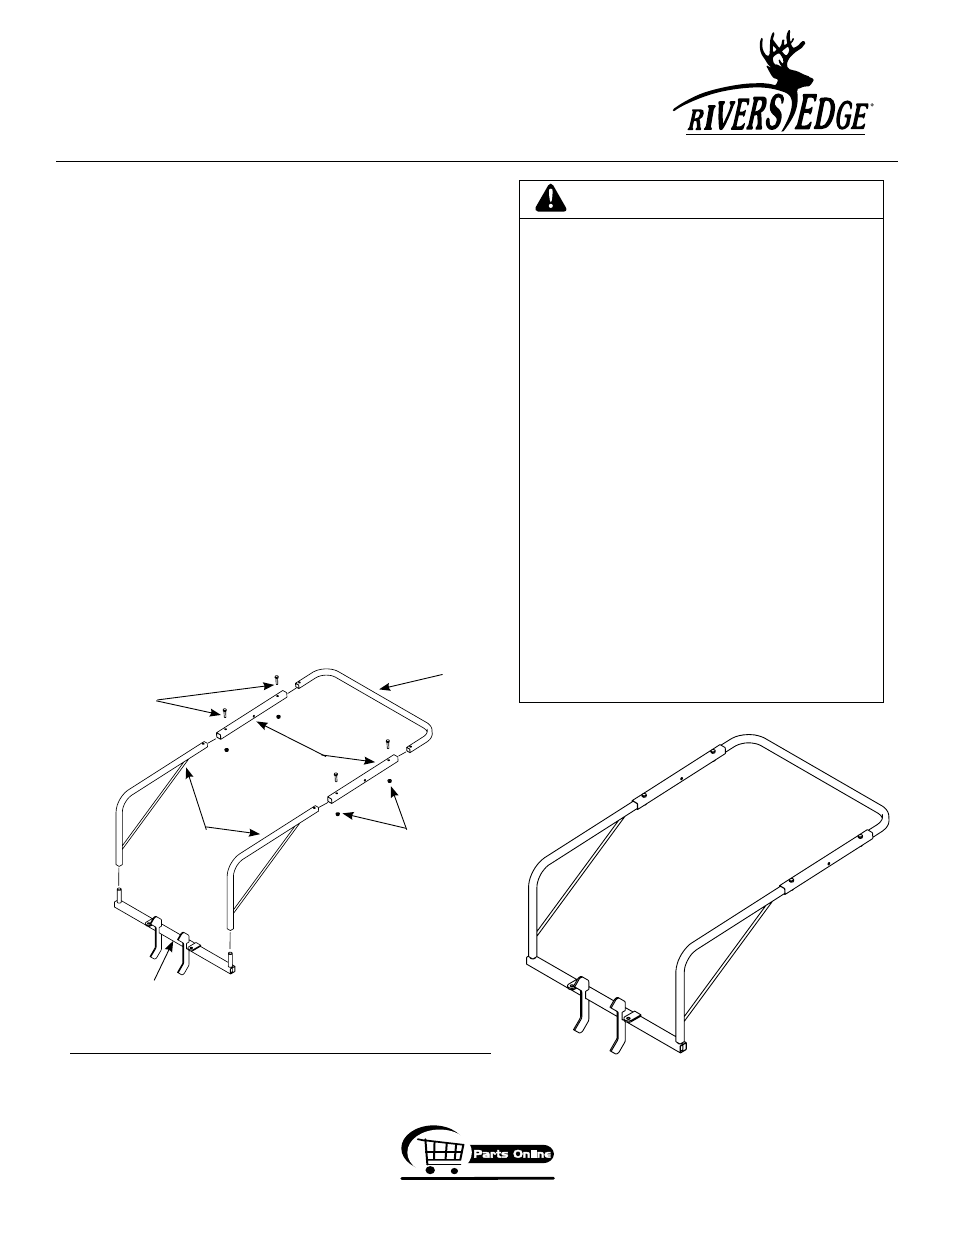
COMPLETED ViEw
aSSEMBLY inSTRUCTiOnS
Tools needed – two 7/16” wrenches
IMpOrtant asseMBlY tIp: DO nOt tIGHten nut& BOlt
COMBInatIOns COMpletelY untIl all parts are asseMBleD
tOGetHer! FInGer tIGHten plus One turn OF a WrenCH OnlY!
tHIs WIll teMpOrarIlY HOlD tHe lOCK nut On tHe BOlt
WHIle HelpInG alIGnMent OF all parts! aFter all parts
are asseMBleD tOGetHer, all nut & BOlt COMBInaItOns
Must Be COMpletelY tIGHteneD.
1. Insert (2) side rail weldments (48363) into (2) rail spanner tubes
(TWr26) and secure together using (2) provided 1/4-20 x 1-1/4”
bolts and locknuts.
SEE FiGURE 1. DO nOT tighten all nut & bolt
assemblies completely!
2. Insert the front rail (48372) into (2) rail spanner tubes (TWr26)
and secure together using (2) provided 1/4-20 x 1-1/4” bolts and
locknuts.
SEE FiGURE 1. You must now tighten all nut & bolt
assemblies. Be sure to tighten securely to ensure the rail
assembly is not loose!
3. Attach the provided camo foam pad to the shooting rail frame by
wrapping around tubing and attaching Velcro together.
rail
weldments
rail spinner
tubes
1/4-20 x 1-1/4"
bolts
locknuts
tree mount
weldment
front rail
FiGURE 1