Main menu, Connection to tv, Front & rear panel overview – Apex Digital DT150 User Manual
Page 19: Press exit, Dt1001 (front view), Dt1001 (rear view), Diagnostic/ service use only)
9
VIDEO
16
1
2
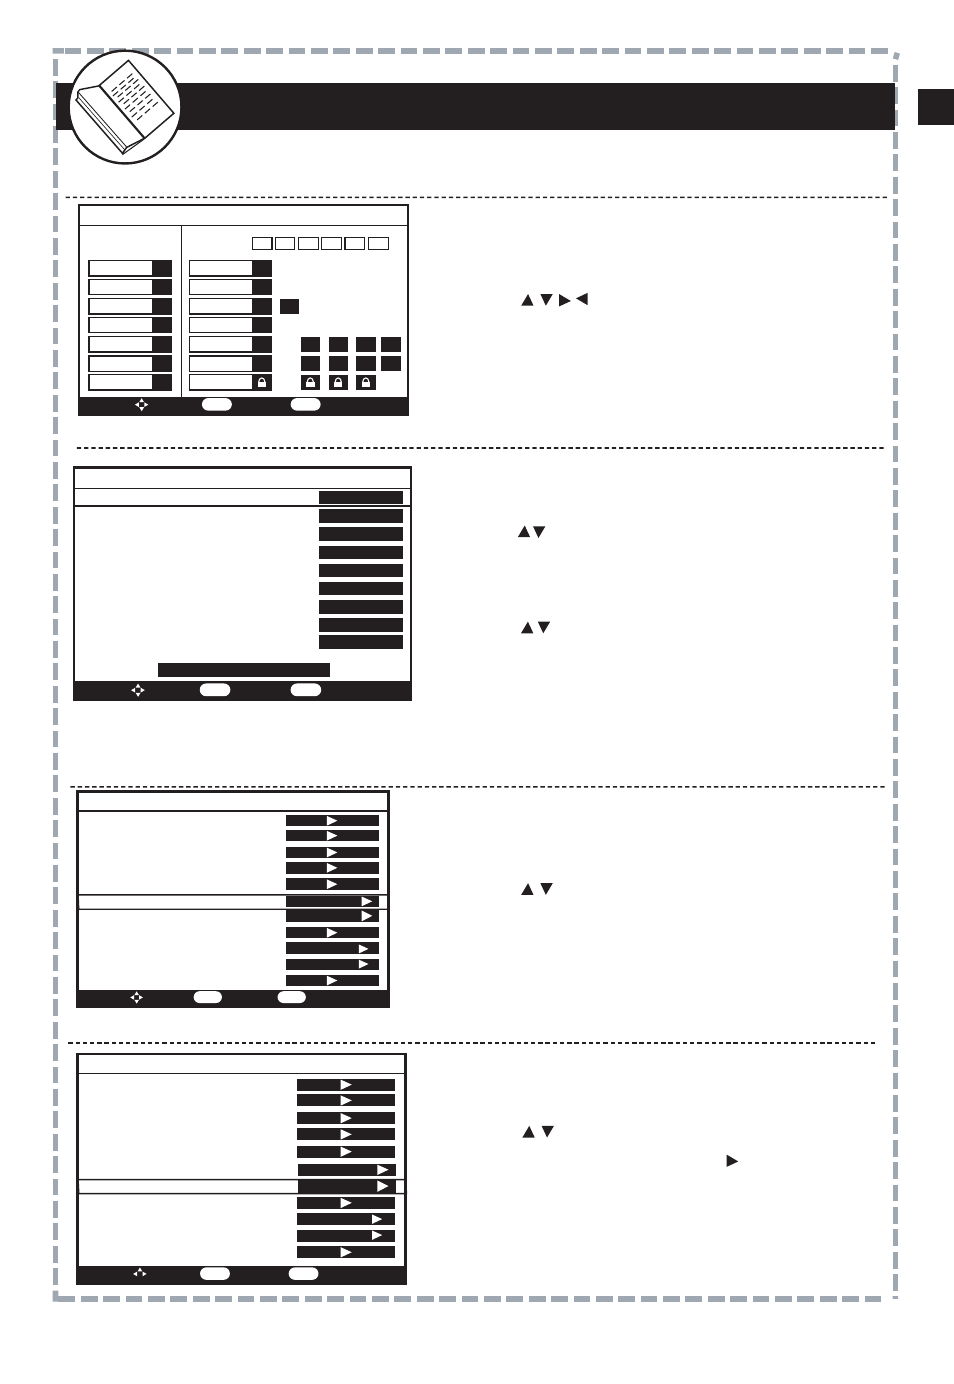
Main Menu
Set Password Code
Auto Scan Digital Channels
Manual Channel Set (Add / Delete Channels)
Auto Program
Press MENU on the remote control to display the Main Menu.
It is strongly recommended to set up your personal preferences in
accordance with the menu options. It is presumed your television
antenna is installed. A rooftop antenna is strongly recommended.
The unit will scan and search for all digital
channels that can be received.
To add or delete digital channels that were
found during auto scan.
Note: You can add or delete channels from your Favorite’s
List from this menu. Highlight a channel, then press FAV.
Using arrow buttons, highlight
“Manual Channel Set”. A menu of available
channels will display.
Press to select a channel to be viewable
or not viewable. Press OK to confirm the
change.
For access to Parental Controls, enter your
4 digit password. Factory default code:
0000
The Main Menu display is for accessing
and setting up preferences for the DT150.
When Auto Program is highlighted, press
OK to begin the auto scan program search.
Note: Auto Program search for digital channels
in your local area may take several minutes
to complete.
Main Menu
Auto Program
Manual Channel Set
Password
Parental Controls
Closed Captions
Language
Sleep Timer
Smart Antenna
Time Zone
TV Aspect Ratio
Reset Default Settings
To Move
To Select
To Exit
OK
EXIT
English
4 Hours
Pacific
4:3
Manual Channel Set Menu
To Move
To Select
To Exit
OK
EXIT
Ch 2-1
Ch 4-1
Ch 4-2
Ch 4-4
Ch 5-1
Ch 5-5
Ch 7-1
Ch 7-2
Ch 7-3
Ch 9-1
KCBS-DT
NBC-4LA
WX-PLUS
RawNews
KTLA-DT
TheTube
KABC-DT
KABC-SD
KABC-WN
KCAL-DT
Viewable
Viewable
Not Viewable
Viewable
Viewable
Viewable
Viewable
Viewable
Viewable
Viewable
Fav
Fav
Fav
Auto Program Menu
Auto Scan
Progress (%)
Scanning
25
Enter Old Password
Connection to TV
yellow
To TV Video Input
ANTENNA IN
TV OUT
S-VIDEO
L
AUDIO
R
CH 3
CH 3/4 &
Analog Pass-Through
CH 4
SMART
ANTENNA
Composite (using supplied AV cables)
S Video
Connect the supplied video (yellow) and
audio (red & white) cables.
To view, cycle through your television inputs
(Video 1, 2, etc) to select the source that the
DT250 is connected to.
For better quality, connect with an optional
S-Video cable (if your TV has this input).
Do not connect the yellow video cable when
installing the S-Video cable.
To view, cycle through your television inputs
(Video 1, 2, etc) to select the source that the
DT250 is connected to.
(using supplied audio cables)
Note: TV reception is dependent on local
terrain, distance from the local area
antenna tower and strength of your antenna.
To TV Audio R, L Input
white
red
L
AUDIO
R
CH 3
CH 3/4 &
Analog Pass-Through
CH 4
S-VIDEO
ANTENNA IN
TV OUT
VIDEO
SMART
ANTENNA
To TV Audio R, L Input
white
red
To S-Video Input on TV
17
8
Front & Rear Panel Overview
1
2
3
4
5
1
2
DT1001 (front view)
4
3
5
Navigation (Left, Right, Up, Down, OK to confirm)
Power ON / OFF
(Green light illuminates when power is on)
IR Receiver
Exit Menu
Main Menu Display
DT1001 (rear view)
1
2
4
3
5
Composite Video Output
Antenna (RF Front)
Channel 3/4 (RF Output)
S-Video Output
Audio (L/R) Output
5
6
7
8
1
2
3
4
6
8
7
(
Diagnostic/ service use only)
Channel 3/4 Switch
Smart Antenna Connector
(For use with optional Smart
Antenna CEA-909)
Main Menu
Sleep Timer
Closed Caption
Language
Parental Control of MPAA Ratings
After your password code is accepted, the
Parental Control < Menu will display.
Press arrow buttons to select
the TV rating best suited to your family’s
preference.
1
Using arrow buttons, highlight
“Language” then press OK to select a
preferred on screen display text:
English > Spanish > French.
1
2
Using arrow buttons, highlight
“Closed Caption” then press OK to
display a menu of customizable options.
Press to highlight and select CCD
display option preferences. Press
OK to confirm.
3
Press Exit
4
Press CCD on the remote to display
captions
Press Exit
Press MENU on the remote control to
display the Main Menu.
Press MENU on the remote control to
display the Main Menu.
Press MENU on the remote control to
display the Main Menu.
Using arrow buttons, highlight
“Sleep Timer”, then press to select
how many hours before the unit should
turn off (Standby mode) 1hr > 2hrs >
4hrs > off (factory default is set at 4hrs).
2
1
1
Press Exit
2
Parental Control Menu
MPAA
To Move
To Select
To Exit
OK
EXIT
NONE
G
PG
PG-13
R
NC-17
X
NONE
TV-Y
TV-Y7
TV-G
TV-PG
TV-14
TV-MA
ALL FV
L
S
V
D
Closed Caption
Style
Size
Font
Text Color
Text Opacity
Background Color
Background Opacity
Edge Effect
Edge Color
To Move
To Select
To Exit
OK
EXIT
DETERMINED BY BROADCASTER
Automatic
Automatic
Automatic
Automatic
Automatic
Automatic
Automatic
Automatic
Automatic
Main Menu
Auto Program
Manual Channel Set
Password
Parental Controls
Closed Captions
Language
Sleep Timer
Smart Antenna
Time Zone
TV Aspect Ratio
Reset Default Settings
To Move
To Select
To Exit
OK
EXIT
English
4 Hours
Main Menu
Auto Program
Manual Channel Set
Password
Parental Controls
Closed Captions
Language
Sleep Timer
Smart Antenna
Time Zone
TV Aspect Ratio
Reset Default Settings
To Move
To Select
To Exit
OK
EXIT
English
4 Hours
Pacific
4:3
Pacific
4:3
18
EN