Battery installation, Operating instructions, Selecting the compatibility mode – Lectrosonics UM400a User Manual
Page 8
UM400a
LECTROSONICS, INC.
8
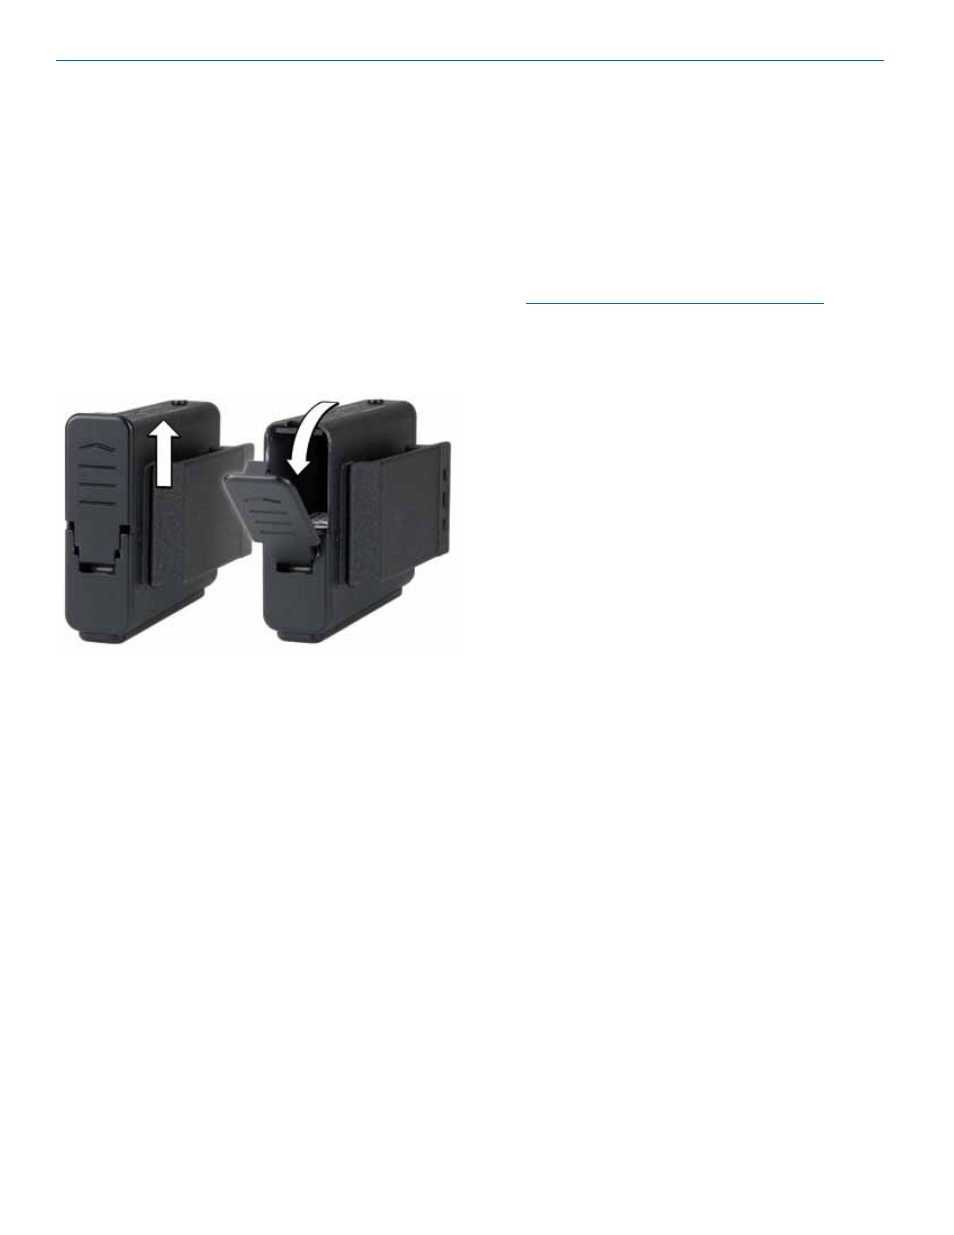
To open the battery compartment, press outward on the
cover door in the direction of the arrow as shown in the
illustration. Only firm, sliding pressure is needed to open
and close the battery door. Swing the door open and take
note of the polarity marked inside showing the location of
the positive (+) and negative (-) terminals. You can also
see the large and small contact holes inside the battery
compartment with the door open.
Insert the battery correctly and close the cover by press-
ing the door closed and across, reversing the open-
ing procedure illustrated here. If the battery is inserted
incorrectly, the door will not close. Do not force the door
closed.
Battery Installation
Selecting the Compatibility Mode
The UM400a can be used with Lectrosonics 400 Series
Digital Hybrid, 200 Series analog, 100 Series analog,
Lectrosonics IFB and some non-Lectrosonics analog
wireless receivers. Contact the factory for details on the
non-Lectrosonics models that can be used. The trans-
mitter must be set to the operating mode of the match-
ing receiver, which is done using the supplied screw-
driver and a battery.
NOTE: The unit is supplied from the factory as a
Digital Hybrid (400 series) transmitter.
1) Ensure the battery is good.
2) Turn off the transmitter.
3) With a small screwdriver (one is included with your
unit), set the Frequency Select Switches to CC. (for
Change, Change).
4) Power up the unit briefly – just long enough for the
LED’s to light up and then turn it off.
5) Change the Frequency Select Switches to one of
the following settings:
• To set Lectrosonics 100 Series mode:
set switches to 1,1
• To set Lectrosonics 200 Series mode:
set switches to 2,2
• To set Mode 3: set switches to 3,3
(contact the factory for details)
• To set Lectrosonics Hybrid mode:
set switches to 4,4
• To set IFB mode: set switches to 5,5
(not available on earlier units)
• To set Mode 6: set switches to 6,6
6) Turn the unit on, wait a couple of seconds and turn
it off again.
7) Change the Frequency Select Switches to 0,0.
8) Turn on the transmitter to complete the operation.
The LEDS will blink to indicate the selected com-
patibility mode. Immediately after power up, all
LEDS will blink together red, then green, followed
by the audio level LEDs (-20 and -10) blinking to
indicate the mode.
The -20 and -10 LEDs will blink:
• Once for 100 Series mode
• Two times for 200 Series mode
• Three times for Mode 3
• Four times for Hybrid mode
• Five times for IFB mode (if available)
• Six times for Mode 6
At powerup the transmitter will confirm the current
compatibility mode with the number of blinks listed
here. This setting will remain the same until you
reset it with the procedure listed above.
Operating Instructions