Fixture cleaning, Dmx channel – American DJ Utopia 250S User Manual
Page 7
©
American DJ
®
- www.americandj.com - Utopia 250S™ Instruction Manual Page 14
Utopia 250S™
Cleaning
Utopia 250S™
Trouble Shooting
Fixture Cleaning:
Due to fog residue, smoke, and dust cleaning the
internal and external optical lenses and mirror should be carried out
periodically to optimize light output. Cleaning frequency depends on
the environment in which the fixture operates (I.e. smoke, fog residue,
dust, dew). In heavy club use we recommend cleaning on a monthly
basis. Periodic cleaning will ensure longevity, and crisp output.
1. Use normal glass cleaner and a soft cloth to wipe down the outside
casing.
2. Use a brush to wipe down the cooling vents and fan grill.
3. Clean the external optics and mirror with glass cleaner and a soft
cloth every 20 days.
4. Clean the internal optics with glass cleaner and a soft cloth every
30-60 days.
5. Always be sure to dry all parts completely before plugging the unit
back in.
Trouble Shooting: Listed below are a few common problems that you
may encounter, with solutions.
No light output from the unit;
1.
Be sure you have connected your unit into a standard 120V wall
outlet.
2. Be sure the external fuse has not blown. The fuse is located on the
bottom panel of the unit.
3. Remove the lamp cover and be sure the lamp is seated in its
socket properly. Occasionally lamps become loose during shipping
be sure the lamp is push in to its socket all the way.
4.
Be sure the fuse holder is completely and properly seated.
Unit does not respond to sound;
1. Low frequencies (bass) should cause the unit to react to sound.
Tapping on the microphone, quiet or high pitched sounds may not
activate the unit.
2.
Be sure the SENSITIVITY KNOB (5) is not set to the minimum
position
©
American DJ
®
- www.americandj.com - Utopia 250S™ Instruction Manual Page 13
Utopia 250S™
Master/Slave Settings
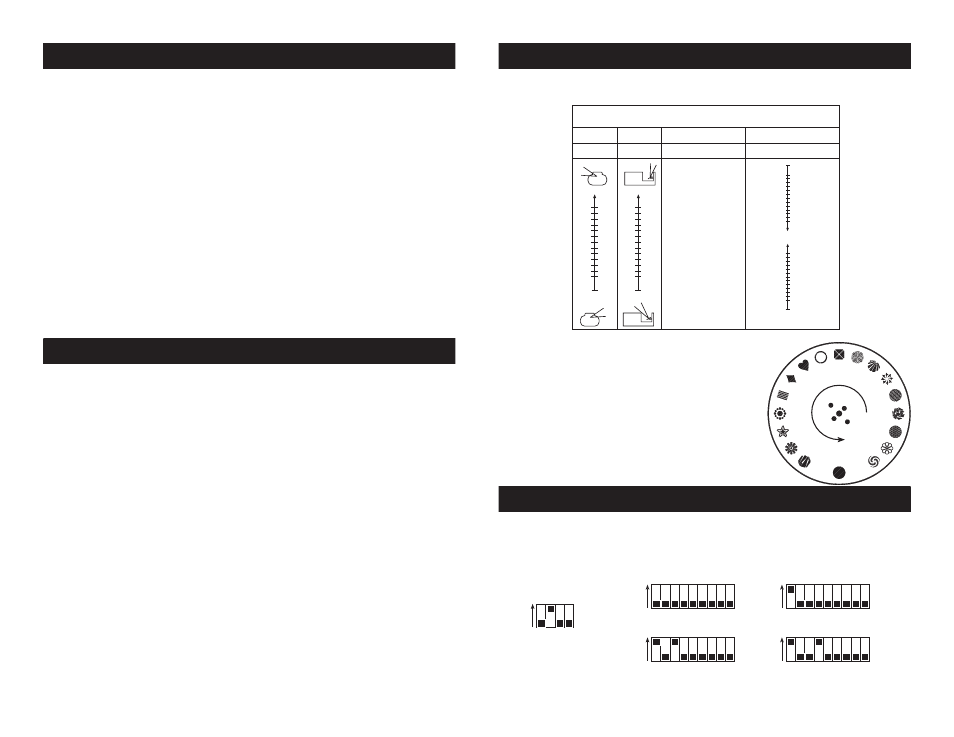
Utopia 250S™
DMX Traits
This chart details the Master/Slave dip switch setting for Master/Slave
configuration. Use this configuration only when you will be using your
fixtures in a Master/Slave configuration. Be sure the number 2 function
switch is set to the on position for sound-active operation.
This chart below details the DMX traits. The individual trait can only be
accessed an universal DMX controller.
ON
1
9
8
7
6
5
4
3
2
Master - Head 1
ON
1
9
8
7
6
5
4
3
2
Head 2
ON
1
9
8
7
6
5
4
3
2
Head 3
ON
1
9
8
7
6
5
4
3
2
Head 4
DMX CHANNEL
1
2
3
4
PAN
TILT
COLOR/GOBO
STROBE
Lamp Off
00
White/Lg Spot
248-255
Strobe 8fps
247
Strobe 2fps
208
Fast Rotation
207
Gobo 2/Yellow
32-39
Gobo 1/Red
24-31
Blackout
16-23
Lrg Spot/White
08-15
0˚
0
0˚
0
90˚
255
73˚
128
145˚
255
45˚
128
Blackout
01-07
Gobo 3/Green
40-47
Gobo 4/Lt Blue
48-55
Gobo 5/Blue
56-63
Gobo 6/Purple
64-71
Gobo 7/Red-Green 72-79
Gobo 8/Purple-Wht 80-87
Gobo 9/4-Colors
88-95
Gobo 10/White
96-103
Gobo 11/Red
104-111
Gobo 12/Yellow
112-119
Gobo 13/Green
120-127
Gobo 14/Lt Blue
128-135
Gobo 15/Blue
136-143
Gobo 16/Purple
144-151
Gobo 17/Ylw-Lt Blue
152-159
Slow Rotation
160
Strobe 7fps
129
Strobe 1fps
01
Stop
00
Strobe 1fps
255
Strobe 7fps
128
Strobe Step Up
Strobe Step Down
ON
1
4
3
2
Function Switch
This chart details the gobo pattern as well
as the gobo wheel placement.