Exhaust syncronized operation, Basic hook up procedure, Co2 monitor operation – Green Air Products CDMC-7 User Manual
Page 2: Temperature calibration, Co2 calibration, Display, Start - up, Features
Exhaust Syncronized Operation
1. Plug the CDDS-2 sequencers power cord into a 120 volt outlet.
2. Plug the CO2 monitors transformer into a 120 volt outlet.
3. Insert the transformer plug into the monitors power input jack.
4. Connect the patch cord between the monitor and the sequencer.
5. Turn the model 7001monitor and the CDDS-2 sequencer "on".
Allow both units a 2 to 3 minute warm up period.
6. Plug CO2 producing equipment into the outlet located on the
underside of the CDDS-2 sequencer. The system is now ready
to operate.
7. Set monitor and controller according to programming instructions.
Basic Hook Up Procedure
CO2 Monitor Operation
Power-Up
Press the Power button. A two second delay will occur before the display becomes visible. A 10
second delay before current C02 readings are displayed. "Warm-up" will display for one minute.
Elevation Correction - Factory elevation is set at "zero" (sea level). For altitudes greater than 500
feet, adjustment will assure sensor accuracy. For elevation correction follow the steps below.
1. While in Normal Mode press the “Mode” button once. The LCD will begin blinking. Press Enter.
2. Press mode to toggle the elevation reading between feet (ft) and meters (m).
3. Use the Up/Down button to adjust the altitude. The altitude can be adjusted in increments of 500
(feet) or 100 (meters). Once the correct altitude is set, press Enter to lock the setting.
Display in Fahrenheit or Celsius - To change the temperature to read in Celsius or Fahrenheit, or
to turn the temperature display off, use the Up or the Down button.
Stand-alone Monitoring - Once the batteries have been installed the sensor will begin to accurately
display current room conditions.
Monitoring using an External Data Logger -Voltage outputs for both C02 and temperature are
available via an RJ-45 jack on the rear of the unit.
Temperature Calibration
Use this procedure to adjust the temperature output when, for example, you wish to have the
temperature output match a reference sensor. The accuracy of a field adjustment is dependent upon
the stability of the environment is which the procedure is performed, and upon the accuracy of the
reference sensor.
1. Before performing the temperature adjustment, connect the supplied AC adapter to the bark of
the sensor. If you do not have the AC adapter, new batteries should be used.
2. Power up the sensor and, using the kickstand, place it on a flat surface in a stable environment
relatively free of drafts or temperature changes. Wait 30 minutes for the unit to fully equilibrate with
the environment. Do not hold the unit in your hand during this period.
3. Press the Mode button three times. The word “TEMPERATURE” at the bottom of the display will
begin blinking.
4. Press Enter. Both the word “TEMPERATURE” and the numeric temperature display will begin
blinking in unison.
5. Use the Up/Down Rocker button to adjust the temperature reading to match the reference.
6. Press Enter. The temperature offset is immediately adjusted, the blinking stops, and the unit is
now in normal operating mode.
CO2 Calibration
I. The calibration procedure will last approximately 5 minutes. First remove the battery cover to
provide access to the C02 calibration activation switch. Connect the supplied AC adapter to the
back of the sensor. If you do not have the AC adapter, new batteries should be used.
2. Power up the sensor and wait for the Warm-up to end.
3. Next, verify the Elevation correction has been set. Refer to Elevation Correction for procedure.
4. Press the Mode button twice. The Calibration mode will begin blinking. Press Enter.
5. Use the Up/Down Rocker button to adjust the lower reading on the display to the current ambient
conditions. Pressing the button once will change the readings in increments of 10 ppm.
6. Next, on the backside of the unit locate the push button switch (under the battery cover, in the
small round hole to the right of the connector jack), use a small pointed object to depress and hold
the switch for 5 seconds. The Calibration light will begin to blink. Press Enter.
7. Calibration In Progress will blink. The unit will program itself based on the C02 value that was
input in Step 6. The calibration process will take about 5 minutes. When Calibration is complete, the
display will return to the steady Calibration mode. Press Enter to return to normal operation mode.
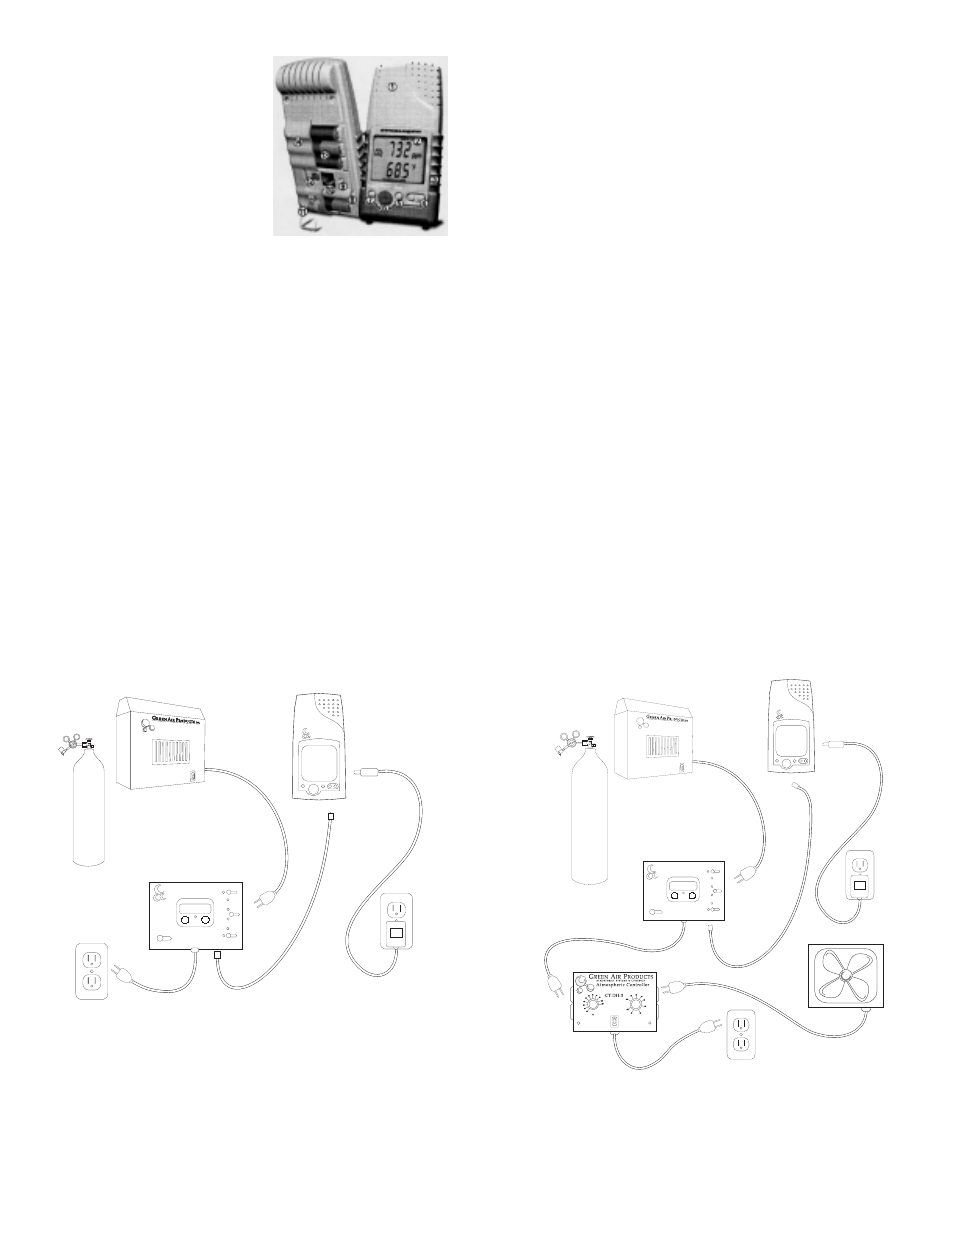
1. Lightweight - Made of ABS plastic.
2. Display - C02 and Temperature and adjustments to
mode settings.
3. Soft Touch - Attractive, gives comfort and durability.
4. Up/Down Button - Used to increase or decrease values
while in the edit mode.
5. Mode Button - Toggles between menu options.
6. Power - Turns the power on and off.
7. Enter - Enter button will select desired menu option for
editing (e.g. Altitude settings). After changes have been
made, the Enter key will also confirm settings and return
to the main menu.
8. Calibration Port - Gas connection for calibration.
9. Calibration Activation Switch - Located in the battery
compartment, used to activate the calibration process for
C02 or Temperature.
10. Voltage Output - The sensor is equipped with an output
for data logging. (see accessories).
11. Built-in Kickstand - Supports in upright position.
12. Power Connection - For 6V power adapter.
13. Batteries - 4 AA Batteries for portable operation.
14. Battery Cover
Features
Display
Modes of operation visible on the display and accessible through the on-board buttons.
Warm-Up Mode - One minute warm-up indicated by the word WARM-UP in the upper left corner.
Normal Operating Mode - After warm-up the sensor will stabilize and display current conditions.
Elevation Settings Mode - This feature allows the user to correct the monitor for elevation changes.
Calibration Settings Mode - Set the C02 concentration or temperature when calibrating.
Calibration in Prog Mode - Displays when calibration is in progress.
Low Battery - Displays when the power source is low.
Start - Up
B
attery Operation - For portable use, the monitor operates on 4 AA batteries.
Normal (Non-Alkaline) up to 50 hrs - Alkaline up to 70 hrs - Rechargeable up to 60 hrs.
Battery Installation - Remove the battery cover (located on the back) by pressing the pressure clip
(located on the bottom near the kickstand) and pull upward.
Follow the battery diagram imprinted on the plastic on the back cover for proper installation.
Low Battery - Depending on the battery a warning signal will flash (indicated by the blinking Low
Battery LCD) when there is less than 30 minutes of battery life. At this point the batteries should be
replaced or the AC adapter should be used as a substitute.
If operation continues, the unit will become inoperable and only the Low Battery will be blink on the
LCD display.
AC Power - The sensor is shipped with a 6V DC 5OOmA AC/DC adapter.
To use the AC adapter, connect the plug into the back of the unit and plug the transformer into any
standard wall outlet.
NOTE: Use the supplied adapter. Using the wrong adapter may cause damage to the unit. If power
is lost during operation, battery operation will not function as a back up.
Model 7001
Portable Infrared
Carbon Dioxide Monitor
420
68.5
ppm
F
Green Air products
4 2 0
Green Air products
The CDMC-7 system can be combined with the Green Air Products
CT-DH-3 temperature and humidity controller to defeat CO2
production during exhaust functions. Plug power cord from CDDS-2
sequencer into the left hand equipment outlet on the CT-DH-3 and
power to the sequencer will be interrupted when ever temperature
or humidity conditions constitute an exhaust function. CO2 production
will resume immediately after exhaust cycle is completed.
420
68.5
ppm
F
Green Air products
4 2 0
Green Air products