ACT Meters GOLD-PLUS 6V/12V Battery Tester User Manual
ACT Meters Power suppliers
WARNING: ISOLATE THE BATTERY BEFORE
TESTING!
To test a lead acid battery
accurately, you need to know which type
you’re testing,
SLA, GEL
or
FLOODED?
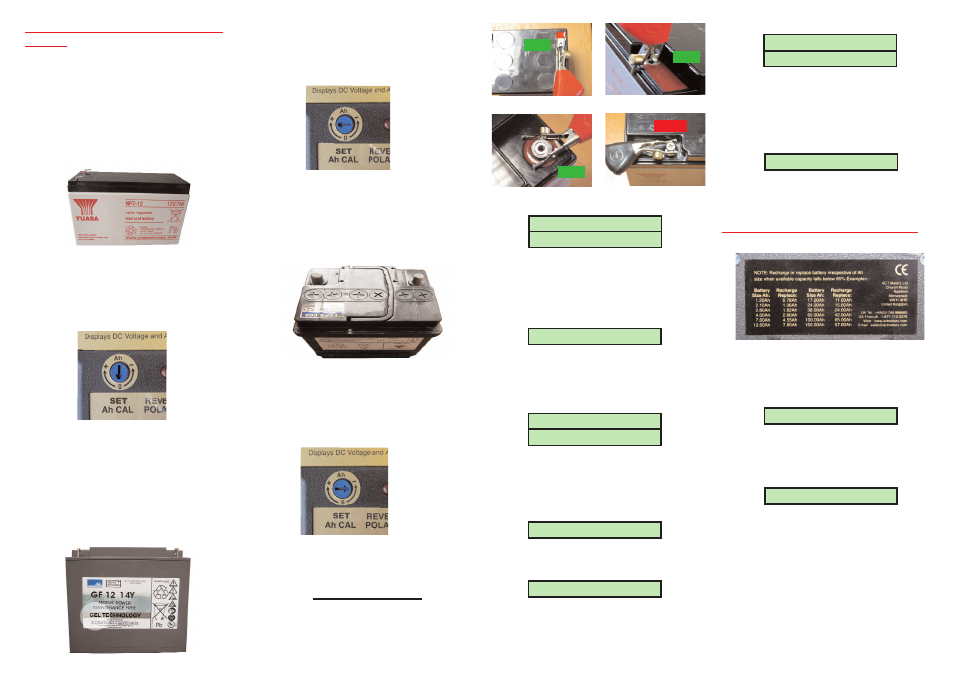
TYPE SLA:
Standby SLA (Sealed Lead
Acid) batteries. Normally permanently on
charge. Used in standby applications
including alarm systems, power supplies,
stair lifts etc.
To measure the Ah capacity available in
standby SLA batteries, adjust the Ah
calibration control to the ‘zero’ position (i.e.
approx six-o’clock) shown below.
TYPE GEL:
Cyclic GEL (Gelified
Electrolyte) batteries. Normally charged
then discharged repeatedly. Often used in
mobility scooters and golf trollys etc. These
batteries are specified GEL technology. If it
doesn’t state ‘GEL’ on the battery, it should
be tested as a standby SLA battery above.
To measure the Ah capacity available in
cyclic GEL technology batteries, adjust the
Ah calibration control to the ‘+’ position (i.e.
approx nine-o’clock) shown below.
Type FLA:
Car FLOODED (WET) batteries.
Commonly used in motor vehicles and
have removable caps so that you can
visually check that the acid/water level is
above the battery plates.
To measure the Ah capacity available in
car FLOODED batteries, adjust the Ah
calibration control to the ‘-’ position (i.e.
approx three-o’clock) shown below.
Step by step battery testing sequence.
1: Observing polarity, connect the test
leads clips
exactly as described for the
types of battery terminals shown above,
Red +, Black -.
WARNING: Maximum
input voltage 15VDC.
2:
Provided there is sufficient voltage in the
battery, the message ‘POWERING UP’
followed by ‘ANALYSING BATT’ is
displayed.
During analysis, a pulsed load
removes any excess surface charge.
3: The message ‘SET CALIBRATE’
reminds you to check that the Ah CAL
position is adjusted to test a standby SLA,
cyclic GEL or car FLOODED battery.
4: The message ‘TESTING VOLTS’
followed by ‘PLEASE WAIT’ indicates that
the battery tester is automatically selecting
to test a 6V or 12V battery.
5: When the battery voltage appears,
record it onto a label for future reference.
6: When ready, press and hold the test
button (approx 1 second) to test the Ah
capacity available in the battery.
7: Record the Ah reading obtained onto a
label for future reference.
NOTE: Ah
capacity is automatically displayed in three
ranges: 1.2Ah - 7.9Ah, 08Ah - 99Ah, then
‘OVER 100Ah’
8: If required, press the test button again,
to verify the Ah reading obtained.
NOTE:
Ah capacity available is determined by
battery temperature and state of charge.
9: Recharge or replace when the Ah
capacity available in the battery falls below
65% of the stated battery Ah size.
10: This message indicates low battery
voltage or Ah capacity. Recharge or
replace the battery and re-test.
11: This warning message indicates that
the input voltage exceeds 15V, Remove
immediately!
12: Still confused? Read ‘Battery Testing
Tips’ overleaf. Call or email your question.
Tel: +44(0)1744 886660
Email: [email protected]
Right
Right
Right
Wrong
SET CALIBRATE
TESTING VOLTS..
PLEASE WAIT..
12.66 VOLTS
PRESS TO TEST
TESTING Ah..
7.2 Ah
TEST COMPLETE
POWERING UP..
Grip clips tightly around tab terminals
Grip tightly around posts using spikes
Do not connect to high resistance bolts
Insert clips fully inside battery terminals
FLAT BATTERY
HIGH VOLTAGE
NOTE: This
position is
calibrated to
typical standby
SLA batteries.
If required, Ah
adjustment can be
made to suit any
specific brand.
NOTE: This position
is calibrated to
typical GEL
technology batteries.
If required Ah,
adjustment can be
made to suit any
specific brand.
NOTE: This position
is calibrated to typical
car FLOODED
(WET) batteries. If
required, Ah
adjustment can be
made to suit any
specific brand.
ANALYSING BATT.