J&M 1688 Running Gear User Manual
Page 14
Pg. 14
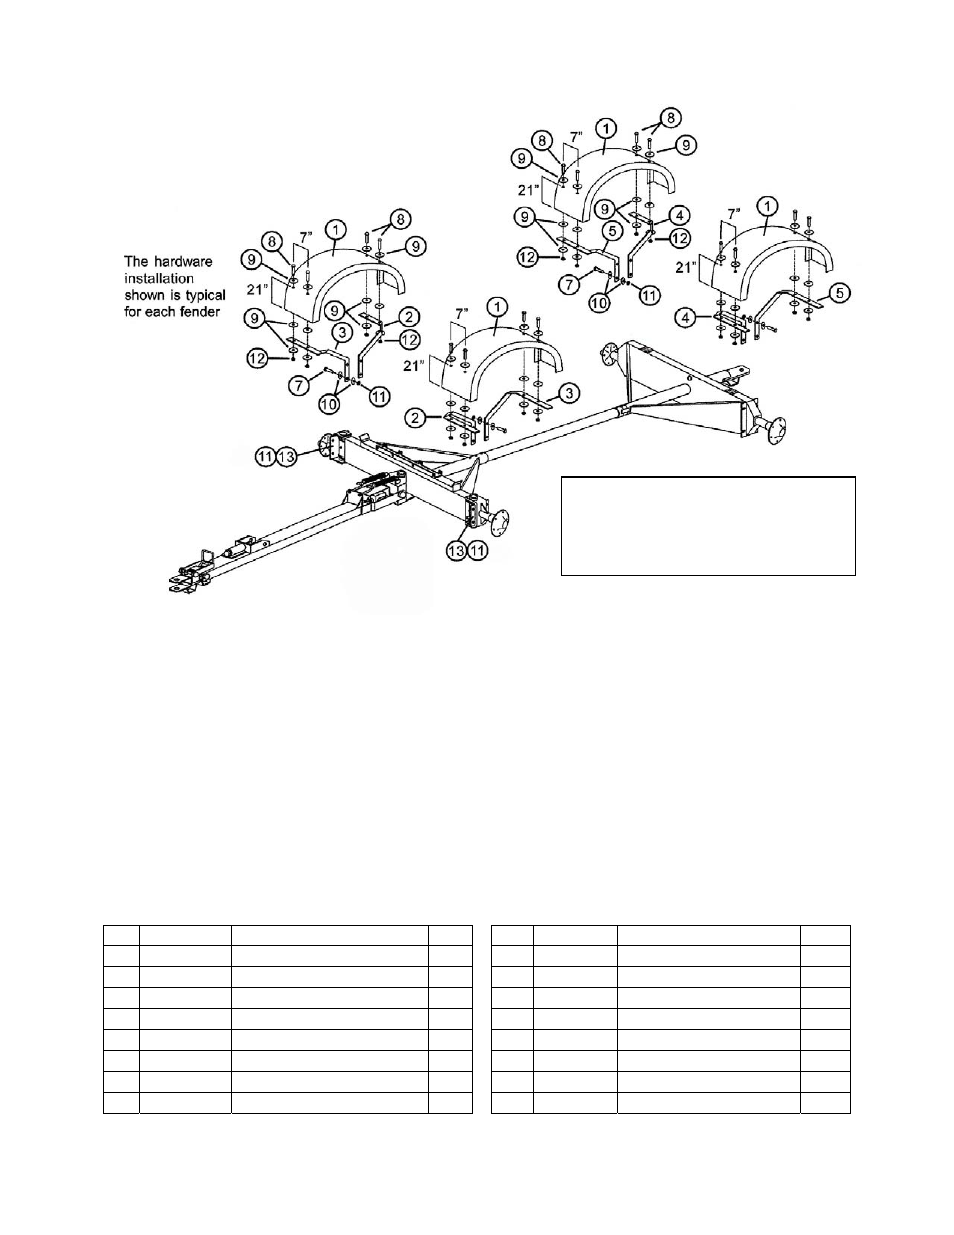
OPTIONAL FENDER KIT
Installation Instructions
Step One – Secure the Bracket Plates to the U-Assemblies located on the front spindles using three 1/2”
x 2” grade 5 bolts and 1/2” flange nuts.
Step Two – Loosely fasten each set of front and rear Fender Brackets to the mounting plate located on
the front and rear spindle assemblies using four 1/2” x 2 1/2” grade 5 bolts, eight 1/2” regular washers
and four 1/2” flange nuts. Do Not Tighten the brackets.
Step Three – Mark and drill two 9/16” diameter holes on the front and rear ends of the fender. To
properly seat the fender over the tire, the holes should be evenly spaced along the width of the fender,
located 7” apart and 21” from the bottom edge.
Step Four – Secure each fender to the mounting brackets using four 1/2” x 1 1/2” grade 5 bolts, twelve
1/2” oversized washers and four 1/2” regular nuts. The head of the bolt should be placed on the top side
of the fender with one oversized washer on each side of the fender and another oversized washer on the
bottom side of the mounting bracket. Do Not Tighten.
Step Five – Adjust the fender to ensure it is properly located around the tire. Tighten the mounting
brackets to the spindle assemblies and the fenders to the mounting brackets.
PARTS LIST
#
Part #
Description
Qty
#
Part #
Description
Qty
1 PF-4
Plastic
Fender
4 10 12RW
1/2”
Regular
Washer
54
2
FMB-16A
Fender Mounting Bracket
2
11 12FN
1/2” Flange Nut
22
3
FMB-16B
Fender Mounting Bracket
2
12 12RN
1/2” Regular Nut
16
4
FMB-16C
Fender Mounting Bracket
2
13 122G5B
1/2” x 2” Grade 5 Bolt
6
5
FMB-16D
Fender Mounting Bracket
2
6 FBP-2
Bracket
Plate
2
7
12212G5B 1/2” x 2 1/2” Grade 5 Bolt
16
8
12112G5B 1/2” x 1 1/2” Grade 5 Bolt
16
9
12OSW
1/2” Oversized Washer
48
NOTE: The running gear wheels and tires
have been removed for illustration
purposes only. When mounting the Fender
Kit, the tires should be mounted to the
running gear.