Baldwin Ashton Two-Point Lock Handleset User Manual
Point tubular lock, Installation instructions, Tools required
H1705.000.00015A
© 2005 BALDWIN HARDWARE CORPORATION, READING, PA, U.S.A.
2-POINT TUBULAR LOCK
INSTALLATION INSTRUCTIONS
TOOLS REQUIRED
1. Pencil
2. No. 2 and No. 3 Phillips Head Screwdrivers
3. No. 1 and No. 2 Slotted Screw Drivers
4. 1/8" Allen Head Wrench
5. 3/4" Wood Chisel or Corner Chisel
6. Measuring Device
7. Lock Face Template
8. Combination Square
9. Awl
10. Drill & Assorted Bits:
1/8", 5/32", 3/4", 1", 2-1/8"
11. Screw Wax or Soap
12. Powdered Chalk or Graphite
NOTE: In order to successfully install a tubular lock and trim, a minimum of average skill level is required with use of the
above listed tools. Backset is located from low side of beveled door, please adjust accordingly for non-beveled doors.
Read and understand the provided instructions BEFORE attempting to mark or cut the door and/or frame. If there are any
questions before you begin installation, phone or visit your nearest Baldwin Distributor or contact the Technical Service
Department at Baldwin at 1-800-437-7448.
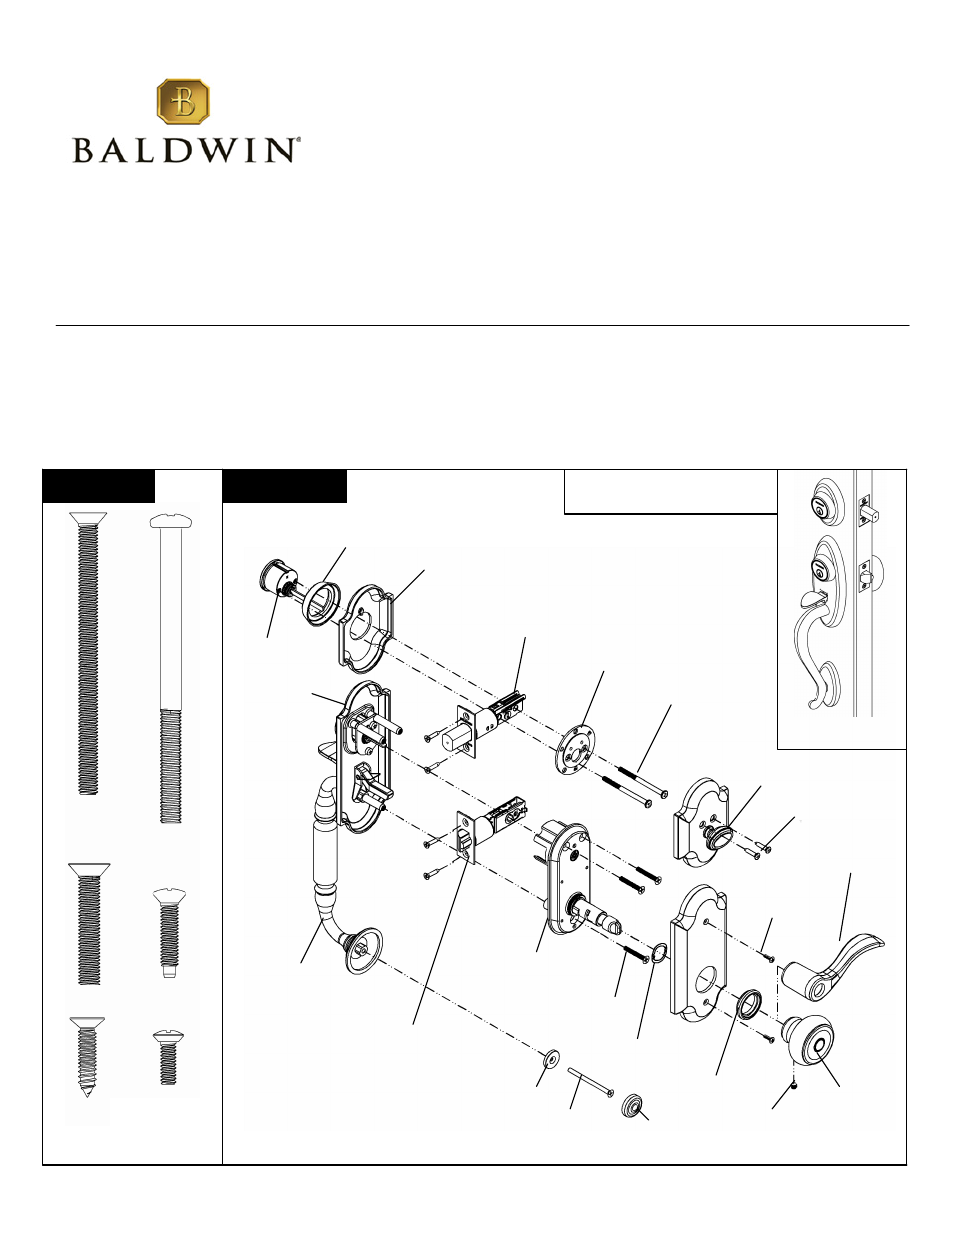
INSIDE
Diagram A
OUTSIDE
THRU-
BOLTING
Fasteners
#10-32 x 2-5/8” PAN
HEAD SCREW
SCREW
BASE
LATCH
ASSEMBLY
DEADBOLT
ASSEMBLY
INTERIOR
SUBASSEMBLY
EXTERIOR
SUBASSEMBLY
DEADBOLT
CYLINDER
BACKPLATE
CYLINDER
SCREWS
Thru-bolting shown is for 1-3/4"
to 2” thick doors
CYLINDER
RING
CYLINDER
COLLAR
TURNPIECE
MOUNTING
SCREWS
KNOB
LEVER
*** THIMBLE
MOUNTING
SCREWS
SET SCREW
SCREW
COVER
THRU-
BOLTING
DOOR PULL
#8-32 x 3/4" FLAT
HEAD
COMBINATION
SCREW
#10-32 x 2-1/2” FLAT
HEAD SCREW
#10-32 x 1-1/4” FLAT
HEAD SCREW
#8-32 x 3/4”
OVAL HEAD
SCREW
#6-32 x 7/16”
OVAL HEAD
SCREW
SHOWN ACTUAL SIZE
*** MAY COME PREASSEMBLED
WAVE
WASHER
STYLE SHOWN:
ASHTON
LANDON