Operation, Acme jack, Manual ball screw jack – atwood Truck Camper Jacks User Manual
Page 2: Electric jacks
2
Electric Ball Screw Jack
WITH REMOTE CONTROL
-
FIG
7
7. Mount two wire connectors on front and rear of camper within 5˝
from edge of camper.
ƽ
CAUTION
PRODUCT DAMAGE
•
Disconnect power to the power relay module prior to HiPot testing
of the camper or the microprocessor will be damaged.
TO INSTALL THE WIRELESS REMOTE CONTROL, REFER TO INSTRUCTION
MPD 87920.
OPERATION
ƽ
WARNING
CAMPER CAN TIP OVER
•
Soft or spongy areas may cause jacks to sink, causing camper to
tip over. Park the camper on a firm, level site.
•
Insure area below and around jack is clear of obstructions.
•
Do not place blocks under the jack for additional ground clearance.
•
Always keep the front of camper higher than or equal to the rear
of the camper. Never allow either side or end of camper to be more
than 4˝ out of level. See
FIG
12 and 13.
•
Do not use the jacks to raise the truck, such as to change a tire.
The jacks are designed only for lifting and lowering the camper
onto the truck and for stabilization of camper.
ƽ
CAUTION
PRODUCT DAMAGE
•
Do not over extend or over retract jacks. Each jack has built in stops.
Excessive force applied against the stops will cause damage.
•
Do not use pneumatic tools to operate any jack. They can over-extend
or over-retract the jack.
•
Do not use the jacks to level the truck and camper. This will overload
the jacks.
ACME JACK
—
FIG
14
ƽ
CAUTION
PERSONAL INJURY/PRODUCT DAMAGE
•
Do not use pneumatic tool to run drill adapter.
•
Battery operated drills, 9.6V to 18V, are powerful. Hold drill with
both hands to protect your wrist. Keep loose clothing and body
parts away from drill as the reaction torque from the drill may
cause it to kick back.
•
Refer to your drill manufacturer’s operation manual.
To extend or retract jack, push handle onto drive shaft and rotate
slightly until drive pin is engaged in handle slot. Rotate handle clock-
wise to raise camper or counterclockwise to lower camper. Follow
instructions in T
O
L
IFT OR
L
OWER
T
RUCK
C
AMPER
section. To remove handle,
reverse above procedure. A drill adapter is provided, for even faster set-
up or tear-down (
FIG
15 and caution above). Follow instructions in T
O
L
IFT
OR
L
OWER
T
RUCK
C
AMPER
section.
MANUAL BALL SCREW JACK
—
FIG
16
To extend or retract jack, push handle onto alignment tube and depress
release bar with plastic push collar (
FIG
17). Hold plastic push collar in
place with one hand and rotate handle slightly with the other hand
until black pin engages at either end of handle “T” slot. Rotate handle
clockwise to raise camper or counter clockwise to lower camper.
Follow instructions in T
O
L
IFT OR
L
OWER
T
RUCK
C
AMPER
section.
ƽ
WARNING
PERSONAL INJURY & PRODUCT DAMAGE
•
Always maintain positive pressure on handle until the release bar
is completely back into place, engaging the drive pin.
• Do not use quick-to-ground feature with handle in place. Handle
will spin and can cause property and bodily injury.
To remove handle, hold plastic push collar in place with one hand
and back handle off with the other hand until the pin is engaged in
the middle of handle “T” slot. Release bar should audibly and visually
spring back into position. To do so the handle must be in the vertical
position (
FIG
17).
NOTE
: If jack is supporting camper, it may be necessary to rotate han-
dle clockwise slightly to relieve load on Release Bar before
Release Bar can be disengaged.
Manual Ball Screw Jacks have a quick-to-ground feature. To drop
jack foot quickly to ground: push in both sides of Release Bar, then
step down on jack foot to drop it to the ground.
NOTE
: Quick-to-ground feature may not work freely until jack has been
used several times because of close tolerances built into jack.
ELECTRIC JACKS
ƽ
CAUTION
PRODUCT DAMAGE
•
Do not over-extend or over-retract jacks. The electric jack has an
internal slip clutch to help prevent damage; when clicking sound is
heard, release switch. Continuing to hold the switch will wear out
the slip clutch or cause damage to the motor.
•
If the motor will not extend/retract the jack and the motor is mak-
ing a ratcheting sound (clutch slipping), do not use the manual
override. Immediately contact an Atwood Service Center and have
jack replaced. Do not use the jack until replaced.
•
If grinding operation should occur or any indications of improper or
inadequate performance, have a trained service professdional
inspect the jack set.
Electric Ball Screw Jack
WITHOUT REMOTE CONTROL
—
FIG
6 & 7
Press switches on driver side jacks to raise and lower camper. Press
top of switch to retract jack (RET) or bottom of switch to extend jack
(EXT). You may need to first turn on power to jacks using switch inside
your camper. Follow instructions in T
O
L
IFT OR
L
OWER
T
RUCK
C
AMPER
section.
Manual Override Operation: To manually extend or retract jack, place
manual override handle (
FIG
8-A) into alignment tube (
FIG
8-B) and
engage drive pin. Rotate handle counter-clockwise to raise or clock-
wise to lower camper.
Electric Ball Screw Jack
WITH REMOTE CONTROL
—
FIG
7
Remove the hand held remote control from its secure compartment.
Push activation switch to energize for wireless remote. Operator and
all spectators must stand a safe distance from the camper.
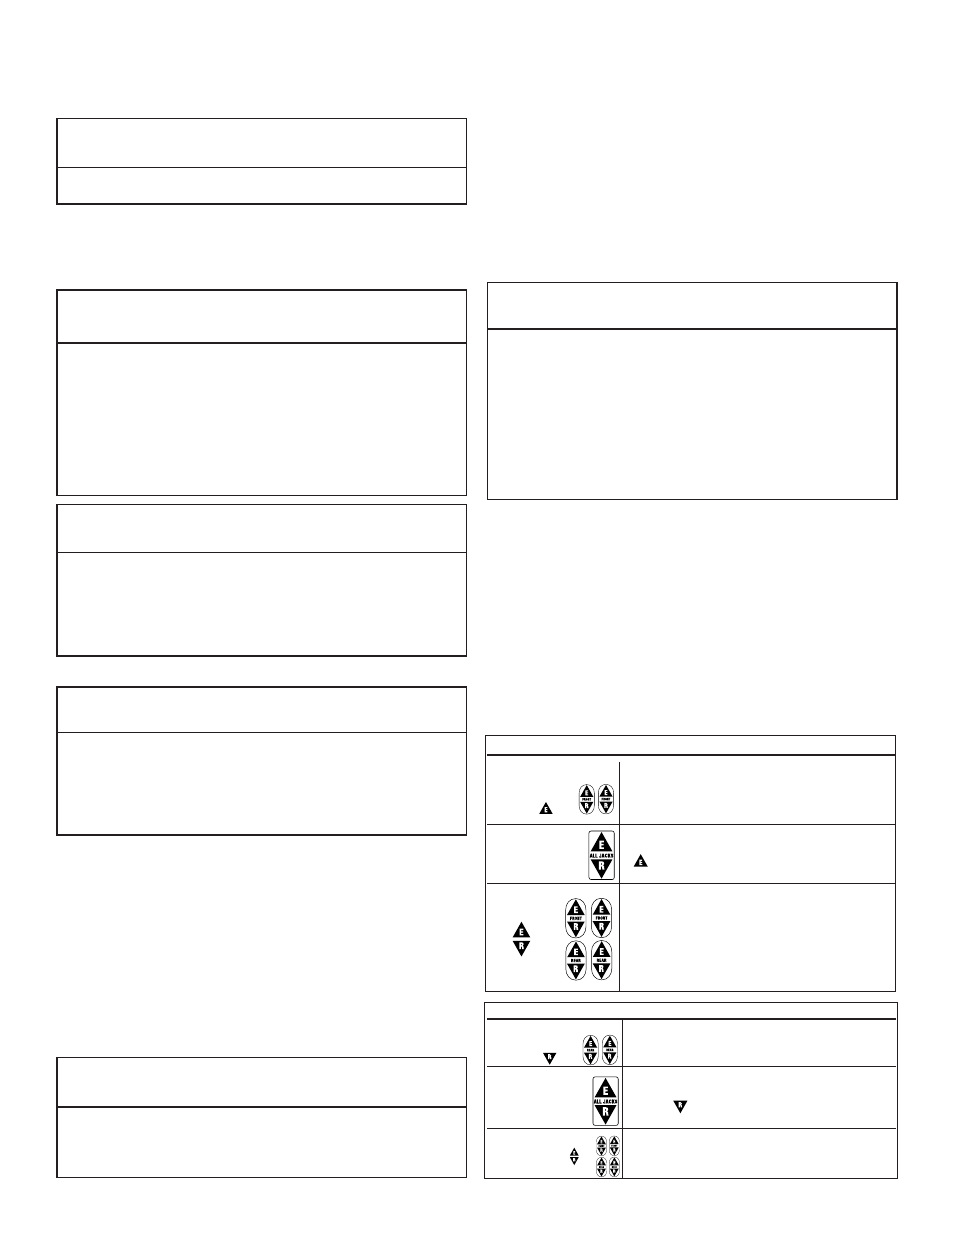
To LIFT Truck Camper
WITH REMOTE CONTROL
EXTEND FRONT
Disconnect the front and rear tiedowns.
JACKS FIRST
Extend front jacks so camper is 4˝ higher in
front than in the rear. (see
FIG
12).
EXTEND ALL JACKS
Once the camper front is higher than the rear,
press and hold the
ALL JACKS BUTTON
, extend
( ). Release when the camper is at the
desired height.
INDIVIDUAL JACK
Use the individual jack buttons to adjust an
ADJUSTMENT
individual jack. Press and hold the extend or
release buttons for the individual jacks as
needed to keep the front of the camper 4˝
higher than the rear, to prevent tipping over
the camper. Keep all corners within 4˝ of
level with each other.
To LOWER truck camper
WITH REMOTE
RETRACT REAR JACKS
Retract rear jacks so camper is 4˝ lower in
FIRST
rear than in the front. (see
FIG
13).
RETRACT ALL JACKS
Once the camper has the rear lower than the
front, press and hold the
ALL JACKS BUTTON
,
retract ( ). Release when the camper is at
the desired height.
INDIVIDUAL JACK
Use the individual jacks buttons to adjust an
ADJUSTMENT
individual jack. Keep all corners within 4˝ of
level with each other.
Press and hold
Extends single jack.
Press and hold.
Retracts single jack.
Press and hold.
Retracts single jack.
Press and hold
Extends single jack.
Press and hold.
Retracts single jack.
Press and hold
Extends single jack.