Mtp r 15hd rsa d • setup guide, Set the dip switches, Mount the receiver – Extron Electronics MTP R 15HD RSA D Setup Guide User Manual
Page 2: Connect/configure the front panel
68-1463-50 Rev. B
01 13
MTP R 15HD RSA D • Setup Guide
Extron Headquarters
+800.633.9876 Inside USA/Canada Only
Extron USA - West
Extron USA - East
+1.714.491.1500 +1.919.850.1000
+1.714.491.1517 FAX
+1.919.850.1001
FAX
Extron Europe
+800.3987.6673
Inside Europe Only
+31.33.453.4040
+31.33.453.4050 FAX
Extron Asia
+800.7339.8766
Inside Asia Only
+65.6383.4400
+65.6383.4664 FAX
Extron Japan
+81.3.3511.7655
+81.3.3511.7656 FAX
Extron China
+4000.EXTRON
+4000.398766
Inside China Only
+86.21.3760.1568
+86.21.3760.1566
FAX
Extron
Middle East
+971.4.2991800
+971.4.2991880 FAX
Extron Korea
+82.2.3444.1571
+82.2.3444.1575 FAX
Extron India
1800.3070.3777
Inside India Only
+91-80-3055.3777
+91 80 3055 3737
FAX
©
2013 Extron Electronics All rights reserved.
www.extron.com
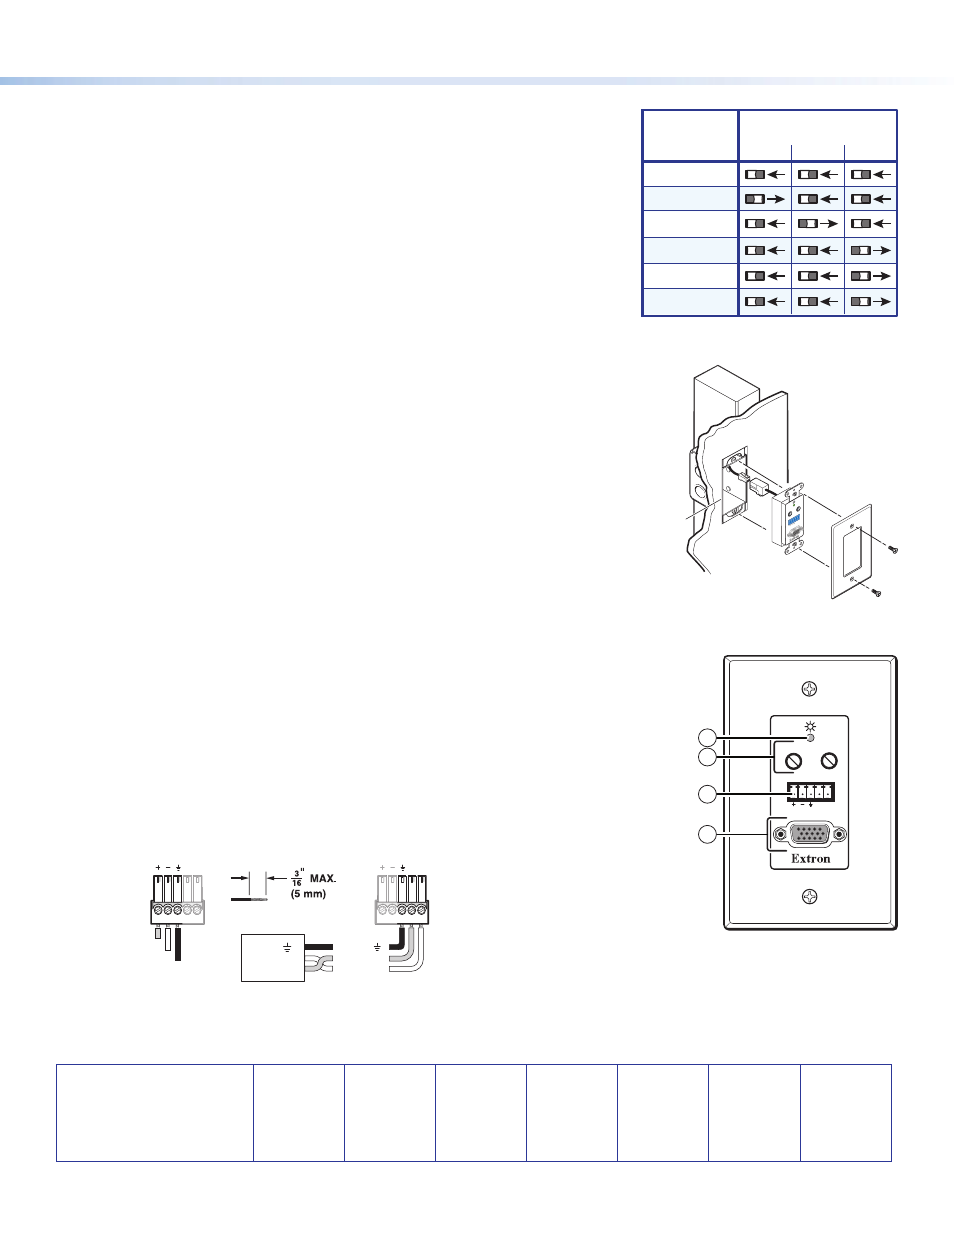
Set the DIP Switches
Output Signal
Format from
the Receiver
Receiver DIP
Switch Settings
C Sync
SOG
Video
RGBHV
RGBS
RGsB
Component*
S-video*
Composite*
* Input video format must match
H Sync and V Sync switches — Set these switches on (right) for positive sync or
off (left) for negative sync.
Composite Sync, SOG, and Video switches — Set these switches as shown on
the right to output the indicated format.
BI-RS232 — Set this switch on (right) to select bidirectional communications
when serial data is present on the audio/RS-232 wire pair; off (left) to select
unidirectional communications.
Mount the Receiver
Wall opening
is flush with
edge of box.
Wall Box
Decora
Faceplate
Extron
MTP R 15HD RSA D
OUTPUT
PEAK
LEVEL
AUDIO RS
-232
Tx
Rx
Before mounting, test the transmitter/receiver system. Make any cabling adjustments
before final installation, as the cables will be inaccessible afterwards.
After testing, do the following:
1.
At the power outlet, unplug the power supply.
2.
Mount the receiver into the box, and attach the supplied Decora faceplate to the
unit.
3.
At the power outlet, reconnect the power supply.
Connect/Configure the Front Panel
d
Output video connector — Connect a projector or other high resolution
video device to this 15-pin HD connector.
e
Audio/RS-232 output connector — Insert a 3.5 mm, 5-pole captive screw
connector into this jack for mono audio, a RS-232 serial output, or both.
See image below for wiring details.
f
Level control — Adjust this control while viewing the displayed image to provide
the best picture quality.
Peaking control — Adjust this control to obtain the optimum picture sharpness.
g
Power LED — This LED indicates power is applied to the MTP.
Receive (Rx)
Transmit (Tx)
Ground ( )
Bidirectional
Mono Audio Output
RS-232 Output
Tip
Ring
Sleeve
Rx
Tx
RS-232
Device
Ground ( )
Receive (Rx)
Transmit (Tx)
Rx
Tx
Do not tin the wires!
MTP 15HD RSA D Rx Front Panel
OUTPUT
PEAKING
LEVEL
AUDIO RS-232
Tx Rx
4
6
5
7