Danger – John Wood Indirect Water Heaters User Manual
Page 4
– 4 –
5. To fill the coil of the heater to be used in conjunction
with the boiler, refer to Boiler instructions.
NOTE: WHEN FILLING, AVOID WATER SPILLAGE. DO
NOT ALLOW THE INSULATION OF THE HEATER TO
GET WET AS WATER CAN CAUSE ELECTRICAL
MALFUNCTlON.
IV) OPERATION
Temperature Adjustment
In order to reduce the risk of scald injury, thermostats are
factory set at 50°C (120°F). The thermostats operate auto-
matically. They can be adjusted to provide warmer or cool-
er water temperature. The setting of 50°C (120°F) has been
proven to most satisfactory from the standpoint of opera-
tional costs and safety. We recommend the thermostats
remain set at 50°C (120°F).
If water temperature adjustment is required:
1. Turn off the electrical supply.
2. Remove the access door.
3. Turn back insulation.
4. Adjust the thermostat to the water temperature desired.
5. Replace insulation and access door.
6. Turn on electrical supply.
Temperature Limit Control
For safety, a non-adjustable high limit temperature switch
will shut off the power when excessive water temperatures
are reached. This switch must be re-set manually.
V) MAINTENANCE
Establish a maintenance program to extend the life of your
water heater. Most water heater failures are due to
lime/sediment buildup, excessive pressure or corrosion.
To Reduce Lime/Sediment Buildup
(Every 6 months):
1. Turn off the electrical supply to the water heater.
2. Close the cold water inlet valve.
3. Open a nearby hot water faucet.
4. Connect a hose to the drain valve and terminate it to an
adequate drain.
Note: The drain hose should be rated for at least 93°C
(200°F). If the drain hose does not have this rating, open the
cold water inlet valve and a nearby hot faucet until the water
is no longer hot. Close the cold water inlet valve.
5. Open the water heater drain valve and allow all the
water to drain from the tank.
6. When the tank is empty and the water flow stops, close
the drain valve.
7. Remove the anode rod.
8. Pour 3 or 4 gallons of “apple" cider vinegar into "anode
bolt" hole and re-insert anode rod. Use Teflon® tape or
approved pipe sealant on the treads.
9. Let the vinegar sit in the tank for 24 to 36 hours.
10. Open the drain valve.
11. Open the cold water inlet valve and let water flow from
the drain hose for 5 minutes.
Note: If water does not flow freely from the drain hose,
check the hose for (and remove) blockages (e.g. lime scale
pieces).
12. Close the drain valve and remove the hose.
13. Ensure a hot water faucet is open (to vent the system).
14. Fill tank and close the hot water faucet when a steady
flow of water with no air bubbles appears (6 minutes).
15. Turn on the electrical supply to the water heater.
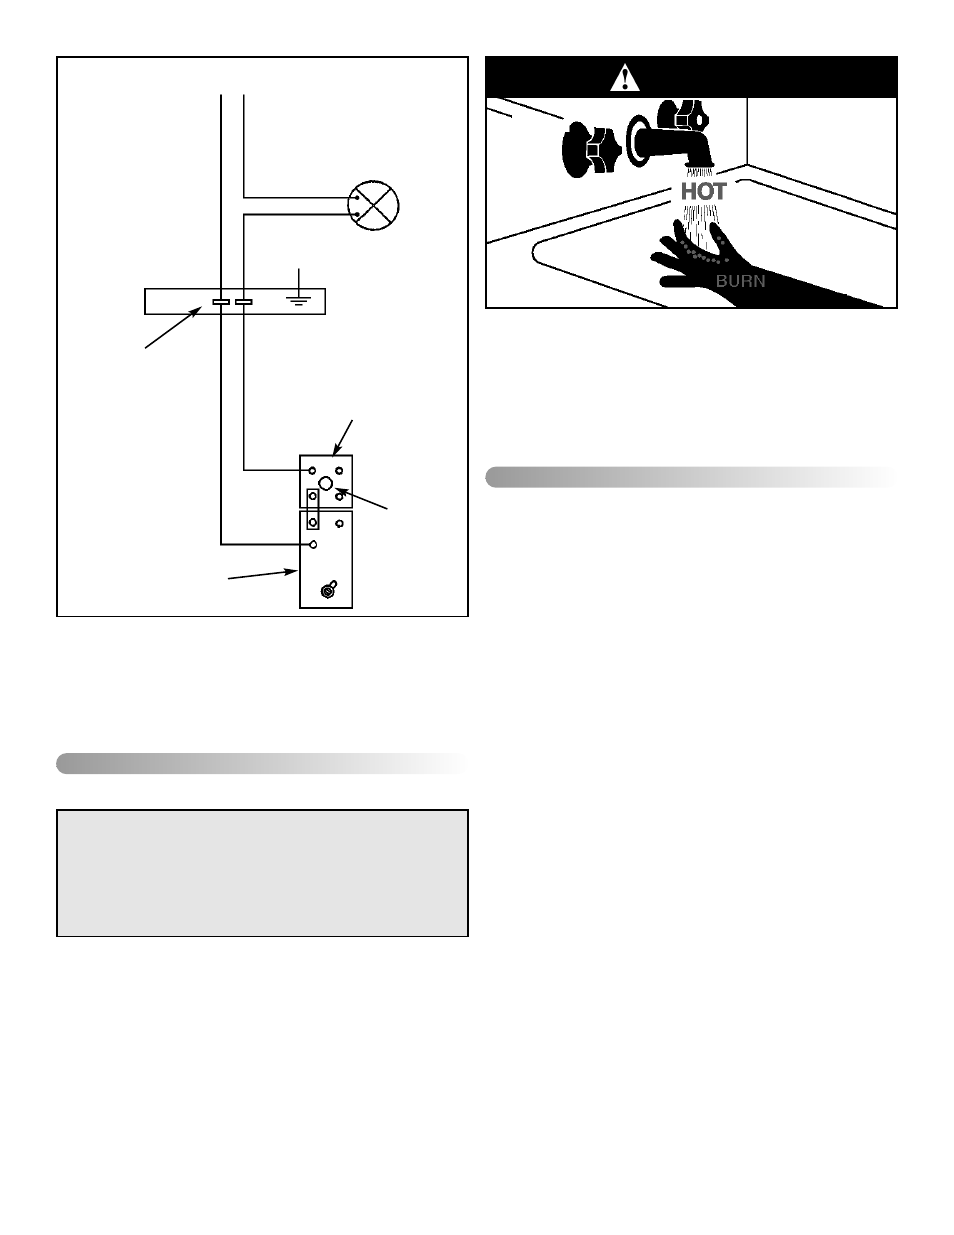
120V SUPPLY
N
L1
CIRCULATOR
PUMP
GROUND
WIRE CONNECTORS
LIMIT CONTROL
THERMOSTAT
RESET
Figure 2 Wiring
DANGER
CAUTION
INCREASING THE THERMOSTAT SETTING ABOVE
THE PRE-SET TEMPERATURE MAY CAUSE SEVERE
BURNS AND CONSUME EXCESSIVE ENERGY. HOT-
TER WATER INCREASES THE RISK OF SCALD
INJURY.