Step 2 - determine the location of the flow switch, Step 3 - connecting the flow switch to pipe – Xylem MM 601H Series FS4-3 General Purpose Liquid Flow Switch User Manual
Page 5
5
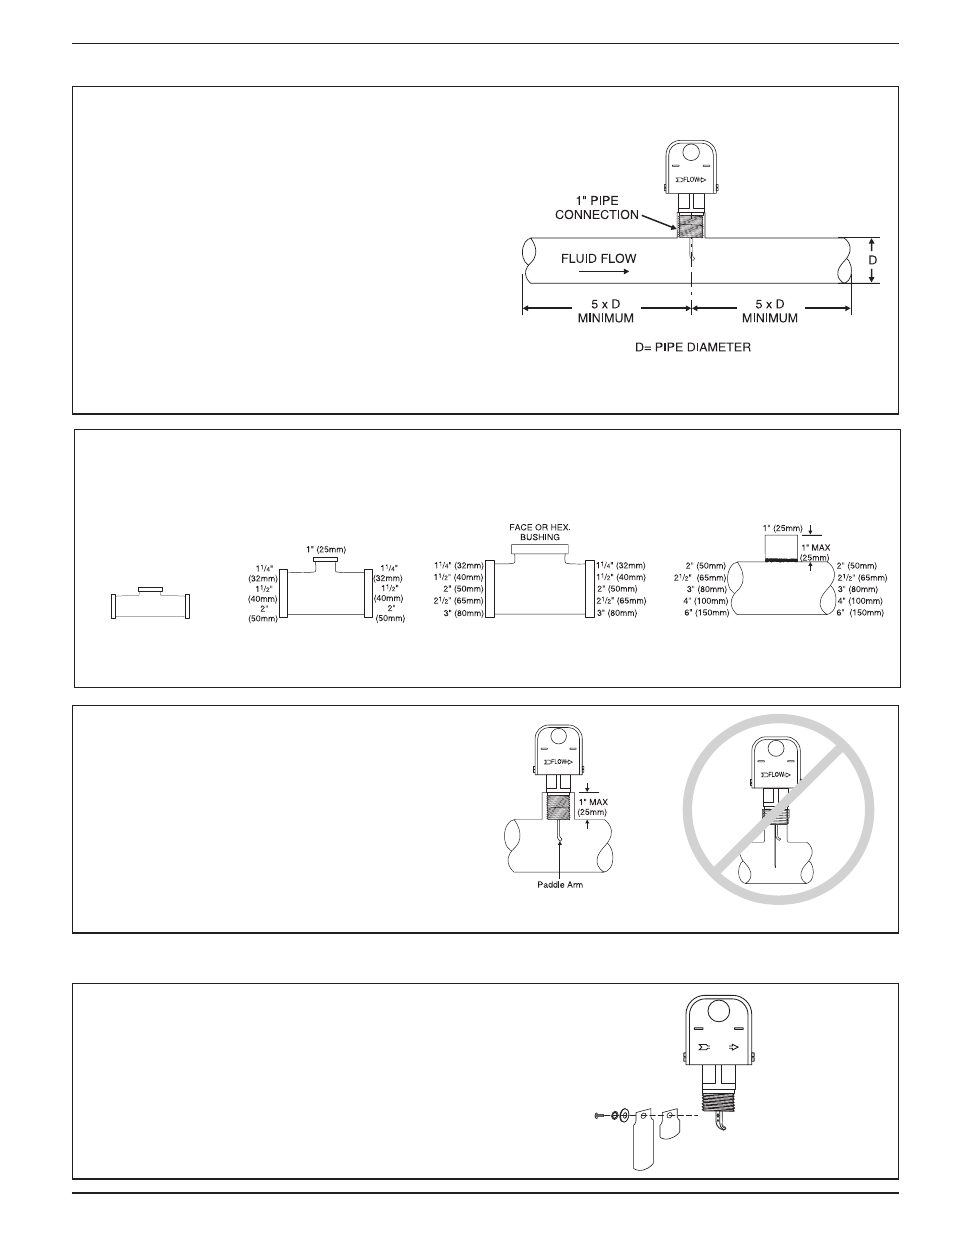
STEP 2 - Determine the Location of the Flow Switch
a. The flow switch must be installed in the pipe using
a threaded tee connection or welded fitting of
minimum length such as a half coupling. Use a
face or hex bushing to reduce the tee outlet to 1"
(25mm) pipe thread if a reduced tee outlet thread
size fitting is not available.
• The flow switch
should be located in a horizontal
section of pipe where there is a straight horizontal run
of at least 5 pipe diameters on each side of the flow
switch. The flow switch may be installed in a vertical
pipe if the flow is in the upward direction.
• The flow switch
must be installed in the upright
position as shown with arrow mark on side of casting
in the same direction as fluid will flow.
• Some system conditions that require more than 5 pipe
diameters are high viscosity fluid and high fluid velocity.
• The flow switch must be installed in the pump suction
piping when spring-loaded check valves and/or other
close coupled accessories are installed in the pump
discharge piping.
1" (25mm)
1"
(25mm)
1"
(25mm)
Threaded
Pipe
Threaded
Pipe
Threaded
Pipe
Welded
Pipe
b. When installing in brazed/soldered copper pipe,
size the threaded adapter to ensure the paddle
arm extends into the main run of the pipe
STEP 3 - Connecting the Flow Switch to Pipe
FLOW
a. Insert the 8/32 x 1/4" flathead screw through
washer and paddle. Attach screw to opposite side
of the paddle arm’s curve and tighten to a torque
of approximately 12-16 lb•in (1.36-1.81 N•m).
NOTE: If two paddles are being installed, they
must be stacked one on top of the other with the
longer paddle first in line to the flow.
CORRECT
INCORRECT