4 removing the power supply – Asus T2-P User Manual
Page 26
26
Chapter 2: Basic installation
2.4
Removing the power supply
You must remove the power supply unit (PSU) before you can install a
central processing unit (CPU) and other system components.
To remove the PSU:
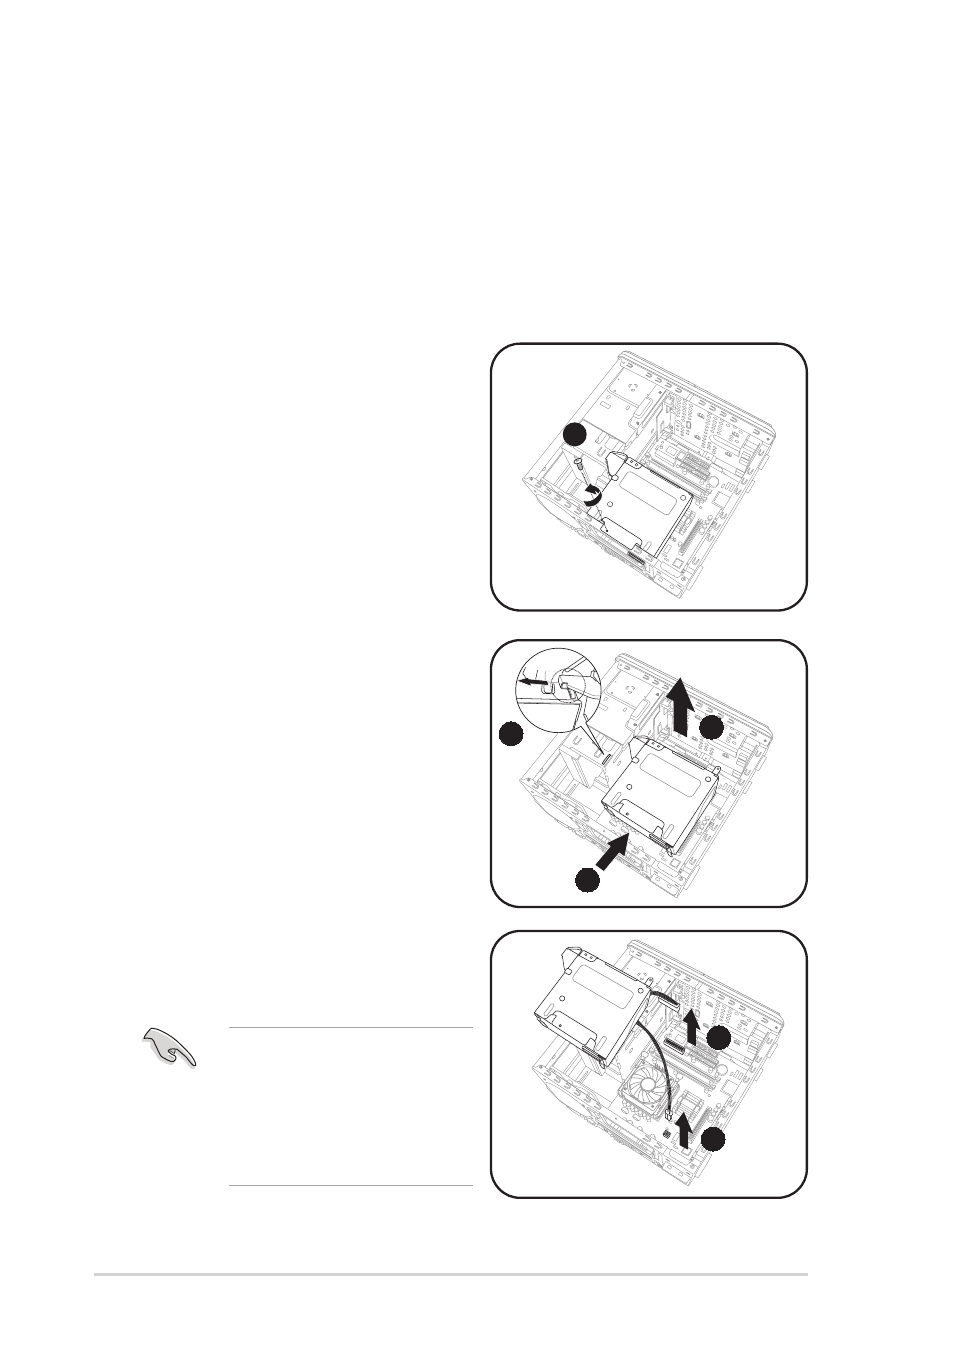
1.
Lay the system on its side on a flat, stable surface.
2.
Disconnect the optical drive and floppy disk drive power plugs.
3.
Remove the screw that secures
the PSU to the chassis.
4.
Slide the PSU to the left until
the side hook is disengaged
from the chassis.
5.
Push the PSU towards the front
panel for about half an inch.
6.
Slightly lift the PSU.
3
4
5
6
7.
Disconnect the power plugs on
the motherboard, then set the
PSU aside.
7
7
When removing the PSU,
make sure to hold or support
it firmly. The unit may
accidentally drop and
damage the other system
components.
See also other documents in the category Asus Computers:
- CG8565 (410 pages)
- CG8565 (246 pages)
- CS5111 (26 pages)
- CS5120 (1 page)
- ET1611PUK (38 pages)
- S2-P8H61E (80 pages)
- P2-P5945GCX (90 pages)
- P2-PH1 (80 pages)
- P1-P5945G (80 pages)
- CG8270 (534 pages)
- CG8270 (362 pages)
- CG8270 (218 pages)
- CG8270 (536 pages)
- CG8270 (72 pages)
- CG8270 (76 pages)
- P3-P5G31 (100 pages)
- P3-PH4 (80 pages)
- P2-M2A690G (80 pages)
- P2-M2A690G (8 pages)
- P4-P5N9300 (82 pages)
- P4-P5N9300 (1 page)
- P2-P5945GC (92 pages)
- P1-P5945GC (92 pages)
- P3-P5G33 (98 pages)
- T3-P5945GC (80 pages)
- T3-P5945GCX (80 pages)
- P2-M2A690G (94 pages)
- T3-PH1 (82 pages)
- T3-PH1 (80 pages)
- T5-P5G41E (76 pages)
- T5-P5G41E (82 pages)
- S1-AT5NM10E (68 pages)
- P6-P7H55E (67 pages)
- ES5000 (174 pages)
- T4-P5G43 (104 pages)
- T-P5G31 (92 pages)
- BT6130 (60 pages)
- BT6130 (54 pages)
- BT6130 (2 pages)
- CG8265 (210 pages)
- CG8265 (350 pages)
- CM1740 (330 pages)
- CM1740 (70 pages)
- CM1740 (198 pages)
- P6-M4A3000E (59 pages)