Pfister GT72-M1SS User Manual
Page 3
7
9
10
11
8
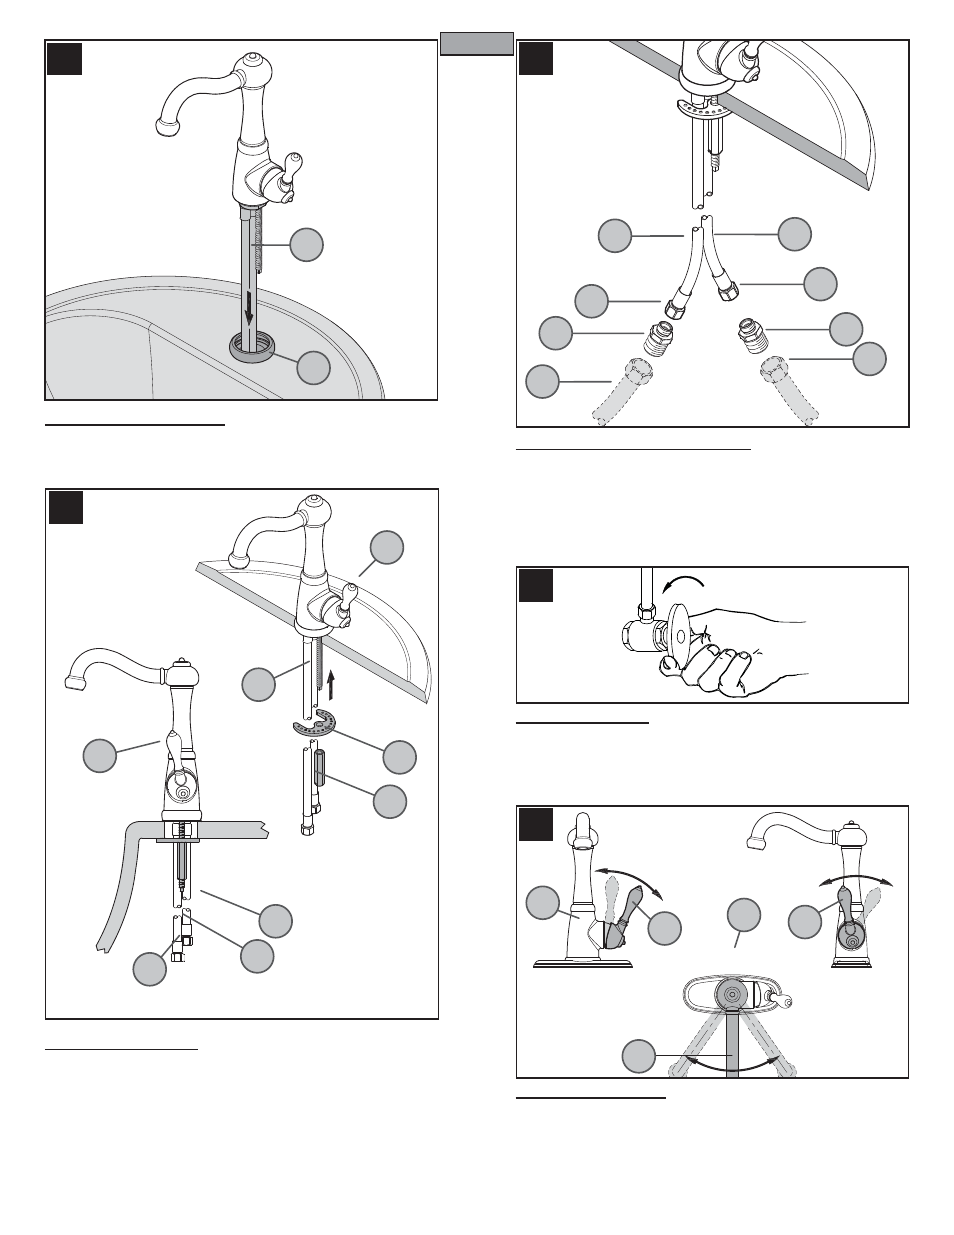
7 FAUCET INSTALLATION
With the spout facing forward, carefully install the Faucet Supply Hoses (7A)
through the center hole of Mounting Ring (7B).
8 SECURING FAUCET
From underneath sink, secure the faucet by placing the Metal Washer (8A) and
the Long Nut (8B) (
7
/
16
hex.) onto the Mounting Post (8C). Make sure that the
bumps on the Metal Washer (8A) are facing up. Tighten loosely, make sure
Handle (8D) swings equally in both directions. Firmly hand tighten Long Nut
(8B). Secure Long Nut (8B) not to exceed a 1/4 turn.
Caution: Do not over tighten!
9 WATER SUPPLY CONNECTIONS
Thread the ½” NPSM Adapter (9A) into the ⅝” Nut (9B). Tighten using wrenches
on both the Adapter and the Nut. Make connection to the Faucet Inlet (9C).
Repeat for the other tube. Connect water Supply Lines (9D) to Faucet Inlets
(9C). Hot water supply lines go into left inlet. Cold water supply lines go into
right inlet. (Supply lines not included). Please follow manufacturer’s instruc-
tions when installing suppy lines..
10 UNIT START UP
Turn on hot and cold water supplies, and check for leaks above and below
the sink.
FAUCET FUNCTIONS
11 VALVE FUNCTION
By rotating the Lever Handle (11A) away from the Faucet Body (11B), the valve
will be activated allowing water to flow. The water flow will increase by continuing
to rotate the Lever Handle (11A). By rotating the Lever Handle towards you, the
water temperature will decrease to cold flow only. By rotating the Lever Handle
away from you, the water temperature will increased to hot flow only. The Spout
(11C) can be rotated around the Faucet Body (11B) in any direction.
3
ENGLISH
8A
8C
8C
9D
7A
7B
8B
8B
8A
9A
9B
9C
9C
9B
9A
9D
HOT
HOT
COLD
COLD
OPEN
CLOSED
11A
11B
11C
11B
11A
8D
8D