Wilwood MasterCylinder No: 260-11322 User Manual
Page 2
• Make sure pedal is firm: Hold firm pressure on pedal for several minutes, it should remain in position without
sinking. If pedal sinks toward floor, check system for fluid leaks. DO NOT drive vehicle if pedal does not stay firm
or can be pushed to the floor with normal pressure.
• At very low speed (2-5 mph) apply brakes hard several times while turning steering from full left to full right, repeat
several times. Remove the wheels and check that components are not touching, rubbing, or leaking.
• Carefully examine all brake components, brake lines, and fittings for leaks and interference.
• Make sure there is no interference with wheels or suspension components.
• Drive vehicle at low speed (15-20 mph) making moderate and hard stops. Brakes should feel normal and
positive. Again check for leaks and interference.
• Always test vehicle in a safe place where there is no danger to (or from) other people or vehicles.
• Always wear seat belts and make use of all safety equipment.
WARNING • DO NOT DRIVE ON UNTESTED BRAKES
BRAKES MUST BE TESTED AFTER INSTALLATION OR MAINTENANCE
MINIMUM TEST PROCEDURE
Fluid: The Wilwood proportioning valve is fully
compatible with all types of brake fluid including DOT
3, 4, 5, and 5.1 fluids. DOT 3, 4 and 5.1 fluids are
fully miscible, but DOT 5 silicone fluid should never
be mixed with any other fluids. Always follow the
vehicle manufacturers fluid recommendations for
any vehicle. A complete flush and fill with fresh fluid
is recommended for all installations. For best
performance, use Wilwood Hi-Temp 570, EXP 600
Plus, or Wilwood FIVE DOT 5 high performance
fluids.
Bleeding: To properly bleed the brake system, begin
with the caliper farthest from the master cylinder. For
fixed mount calipers with two bleed screws on top,
bleed the outboard bleed screw first, then bleed the
inboard screw. Repeat this procedure until all
calipers have been bled, ending with the caliper
closest to the master cylinder. Once the system has
been bled, the pedal should maintain a consistent,
firm feel. If the pedal returns to a spongy feel after it
has rested from the bleeding process, this is an
indication that air still exists in the system. If this
occurs, repeat the bleeding process until all air has
been purged and the pedal retains a firm feel. NOTE:
When installing a new master cylinder, it is important
to follow proper bench bleeding procedures. Follow
the installation instructions provided with the new
master cylinder. If a firm pedal can not be achieved
after bleeding the system, the master cylinder may
not be properly sized for the brake system.
Proportioning Valve Adjustment: The proportioning valve is non-adjustable by the user and functions automatically. NOTE: For safety and
performance, the rear brakes should never lock before the front brakes. Otherwise, an out of control situation could occur.
Help: If after following the instructions, you still have difficulty with installing, or bleeding the system please consult your chassis builder, the
retailer where the valve was purchased, a qualified brake technician, or Wilwood Customer Service at (805) 388-1188.
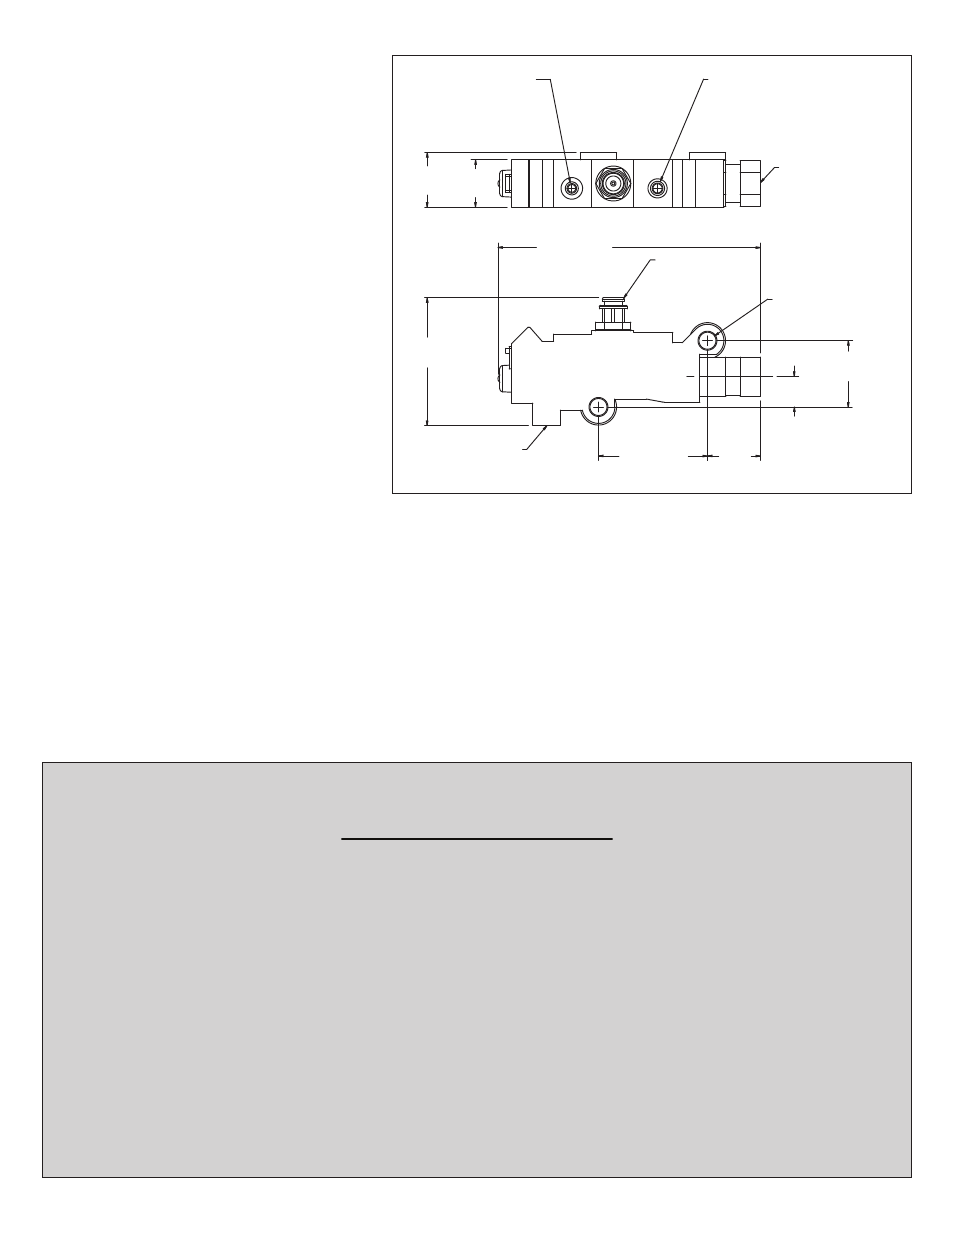
5.41 (137,5)
2.25 (57,1)
CIRCUIT
FAILURE
SWITCH
CONNECTION
.97
(24,7)
1.12
(28,5)
2.63
(66,8)
1.37
(34,7)
.62
(15,8)
1.09
(27,8)
9/16-18 THREAD
INVERTED FLARE
(REAR BRAKES
OUTLET)
.35 (8,9) MOUNTING
HOLE 2 PLACES
7/16-24 THREAD
INVERTED FLARE
(REAR BRAKES
INLET FROM
MASTER CYLINDER
3/8-24 THREAD
INVERTED FLARE
(FRONT BRAKES OUTLET)
1/2-20 THREAD
INVERTED FLARE
(FRONT BRAKES
INLET FROM
MASTER CYLINDER
Figure 1. Combination Proportioning Valve, Mounting Dimensions