Wilwood High Volume Master Cylinder User Manual
Page 2
•A dual master cylinder application will require three people for bleeding, one pushing the brake pedal and one each on the front
and rear of the car. Be sure to bench bleed and fill both master cylinders with fluid, then install on the chassis. Elevate the right
side of the car and bleed both front wheel and rear wheel outboard bleed screws simultaneously. Repeat the procedure for the
inboard bleed screws. Lower the right side and elevate the left side of the car. Simultaneously bleed the left side front and rear
outboard screws first, then the inboard. If the brake pedal does not feel firm when applying pressure, repeat this procedure
starting with the right side of the car.
•If the master cylinder is mounted lower than the disc brake calipers, some fluid flowback to the master cylinder reservoir may
occur, thus creating a vacuum effect that retracts the caliper pistons into the housing. This will cause the pedal to go to the floor
on the first stroke until it has “pumped up” and has moved all the pistons out against the pad again. A Wilwood in-line two pound
residual pressure valve, installed near the master cylinder will stop the fluid flowback and keep the pedal firm and responsive.
•After the system is bled, fill the reservoir to within 1/4 inch of the top and replace the cap. Adjust the push rod for proper pedal
position and tighten the jam nut against the pedal clevis. Make sure that the pedal allows the push rod to return completely.
•Inspect for leaks at all pressure connections. Use a Wilwood Pressure Gauge (P/N 260-0966) to verify line pressure at each
caliper and to pre-adjust the balance bar, if used.
MAINTENANCE:
•Flush and bleed the system with fresh Wilwood Hi-Temp 570° racing brake fluid before every race. This eliminates accumulated
moisture in the system and maintains the high boiling point of the brake fluid. Rebuild master cylinders every season to ensure
peak performance and reliability.
If after following the instructions, you still have difficulty installing or bleeding your master cylinder, consult your local chassis
builder, or retailer where the unit was purchased for further assistance.
Wilwood Disc Brakes • Camarillo, CA 93012 Phone 805 / 388-1188 • www.wilwood.com
E-mail Technical Assistance: [email protected]
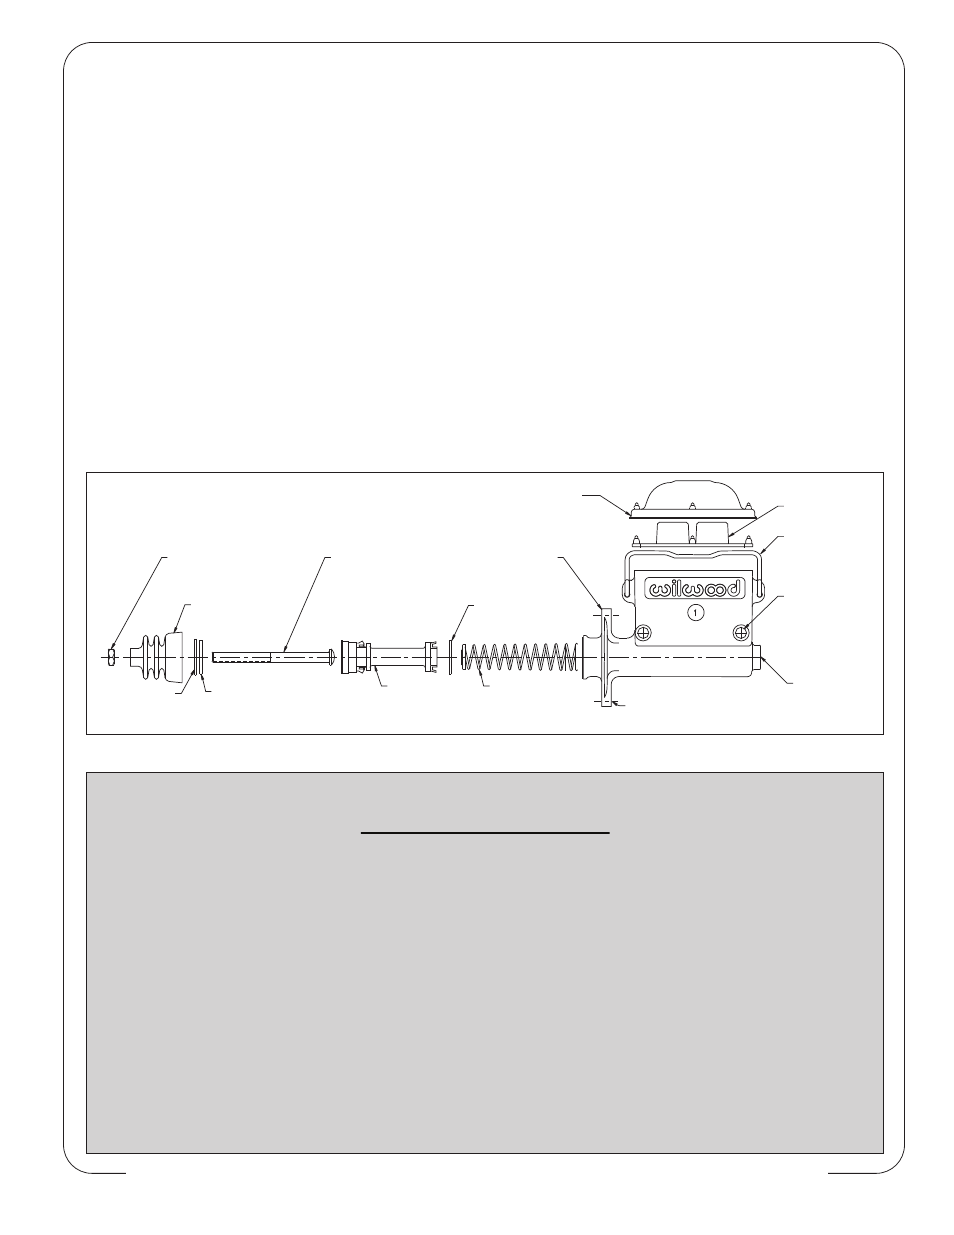
HEX NUT
MASTER
CYLINDER
DIAPHRAGM
WIRE BAIL
MOUNTING HOLE
.33 DIA, 2 PLACES
3.00 APART
OUTLET
1/8-27 NPT
PUSH ROD
5/16-24 UNF-2A THD
DUST BOOT (*)
RETAINING
RING (*)
LARGE WASHER (*)
PISTON / SEAL (*)
MOUNTING HOLE .40 DIA,
2 PLACES - 2.25 APART
SPRING (*)
WASHER (*)
CAP
(*) ITEMS INCLUDED IN REBUILD KITS
Wilwood High Volume Aluminum Master Cylinder Exploded Diagram
• Make sure pedal is firm: Hold firm pressure on pedal for several minutes, it should remain in position without
sinking. If pedal sinks toward floor, check system for fluid leaks. DO NOT drive vehicle if pedal does not stay firm
or can be pushed to the floor with normal pressure.
• At very low speed (2-5 mph) apply brakes hard several times while turning steering from full left to full right, repeat
several times. Remove the wheels and check that components are not touching, rubbing, or leaking.
• Carefully examine all brake components, brake lines, and fittings for leaks and interference.
• Make sure there is no interference with wheels or suspension components.
• Drive vehicle at low speed (15-20 mph) making moderate and hard stops. Brakes should feel normal and
positive. Again check for leaks and interference.
• Always test vehicle in a safe place where there is no danger to (or from) other people or vehicles.
• Always wear seat belts and make use of all safety equipment.
WARNING • DO NOT DRIVE ON UNTESTED BRAKES
BRAKES MUST BE TESTED AFTER INSTALLATION OR MAINTENANCE
MINIMUM TEST PROCEDURE