Gebruikershandleiding – Velleman WB020 User Manual
Page 6
WB020
Rev. 02
26/04/2011
©Velleman
®
nv
6
P-2B) There are 3 ways to use the spacers of the bolts [17], as indicated.
P-2C) Make sure the height of the 3 arms is equal.
P-2D) Turn the arms towards the centre and attach the projector plate [2]. Use for each
mounting point a spring washers [11], flat washers [16] and an M6-screw [7].
Make sure all screws are secured tightly.
P-3) For Toshiba-type projectors, use following mounting instructions:
P-3A) Attach the included bracket adaptor #1 [9] to the projector using the M4-screws
[8].
P-3B) Fix the projector arms [5] on the bracket adaptor [9] and projector using the
included bolts [17] (see also P-2B and P-2C).
P-3C) Turn the arms towards the centre and attach the projector plate [2]. Use for each
mounting point a spring washers [11], flat washers [16] and an M6-screw [7].
P-3D) Make sure all screws are secured tightly.
P-4) For Philips-type projectors, use following mounting instructions:
P-4A) Slide the included bracket adaptor #2 [10] into the projector housing.
P-4B) Fix the projector arms [5] on the bracket adaptor [10] and projector using the
included bolts [17] (see also P-2B and P-2C).
P-4C) Turn the arms towards the centre and attach the projector plate [2]. Use for each
mounting point a spring washers [11], flat washers [16] and an M6-screw [7].
P-4D) Make sure all screws are secured tightly.
P-5) Mount an extension – 8cm [4] or 15cm [3] - to the ceiling plate [1] and connect the
projector plate [2] to the extension.
P-5A) Push on the two bolts of the ceiling plate (see arrows) and slide the desired
extension over the bolts until the bolts and the holes are lined up. Use the 4mm hex
key [13] to turn the bolts counter clockwise to secure them.
P-5B) Push on the two bolts of the projector plate (see arrows) and slide it into the
extension until the bolts and the holes are lined up. Use the 4mm hex key [13] to
turn the bolts counter clockwise to secure them.
7.
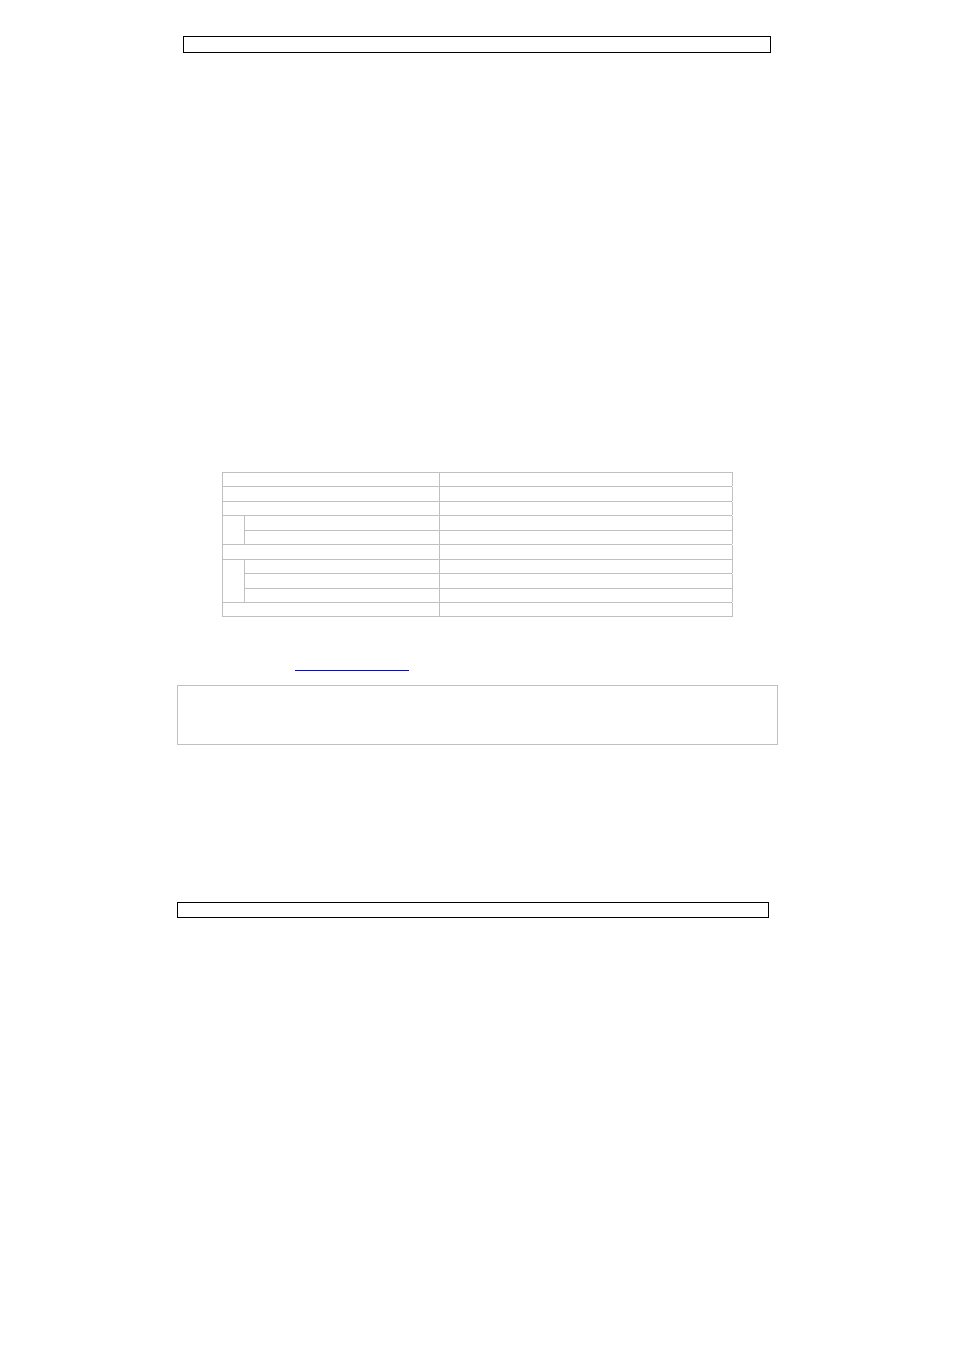
Technical specifications
projector size
13-32cm
max. load
10kg / 22lbs
rotation angle
pan
360°
tilt and roll
15°
dimensions
ceiling bracket
Ø85 x 50mm
extension
Ø60 x 80mm / Ø60 x 150mm
base
Ø178 x 50 mm
weight 1.2kg
Use this device with original accessories only. Velleman nv cannot be held responsible in
the event of damage or injury resulted from (incorrect) use of this device.
For more info concerning this product and the latest version of this user manual, please
visit our website
www.velleman.eu
. The information in this manual is subject to change
without prior notice.
© COPYRIGHT NOTICE
This manual is copyrighted. The copyright to this manual is owned by Velleman nv. All
worldwide rights reserved. No part of this manual may be copied, reproduced, translated or reduced
to any electronic medium or otherwise without the prior written consent of the copyright holder.
GEBRUIKERSHANDLEIDING
1.
Inleiding
Dank u voor uw aankoop! Lees deze handleiding grondig voor u het toestel in gebruik neemt. Werd
het toestel beschadigd tijdens het transport, installeer het dan niet en raadpleeg uw dealer.