Step 6. hook suspended ceiling tile, Step 7. fix safety wire, Step 8. cut out hole in original ceiling tile – Atdec Telehook TH-PT8 Installation manual User Manual
Page 2: Step 9. install projector mount and ceiling cover, Installation complete - ready to install projector
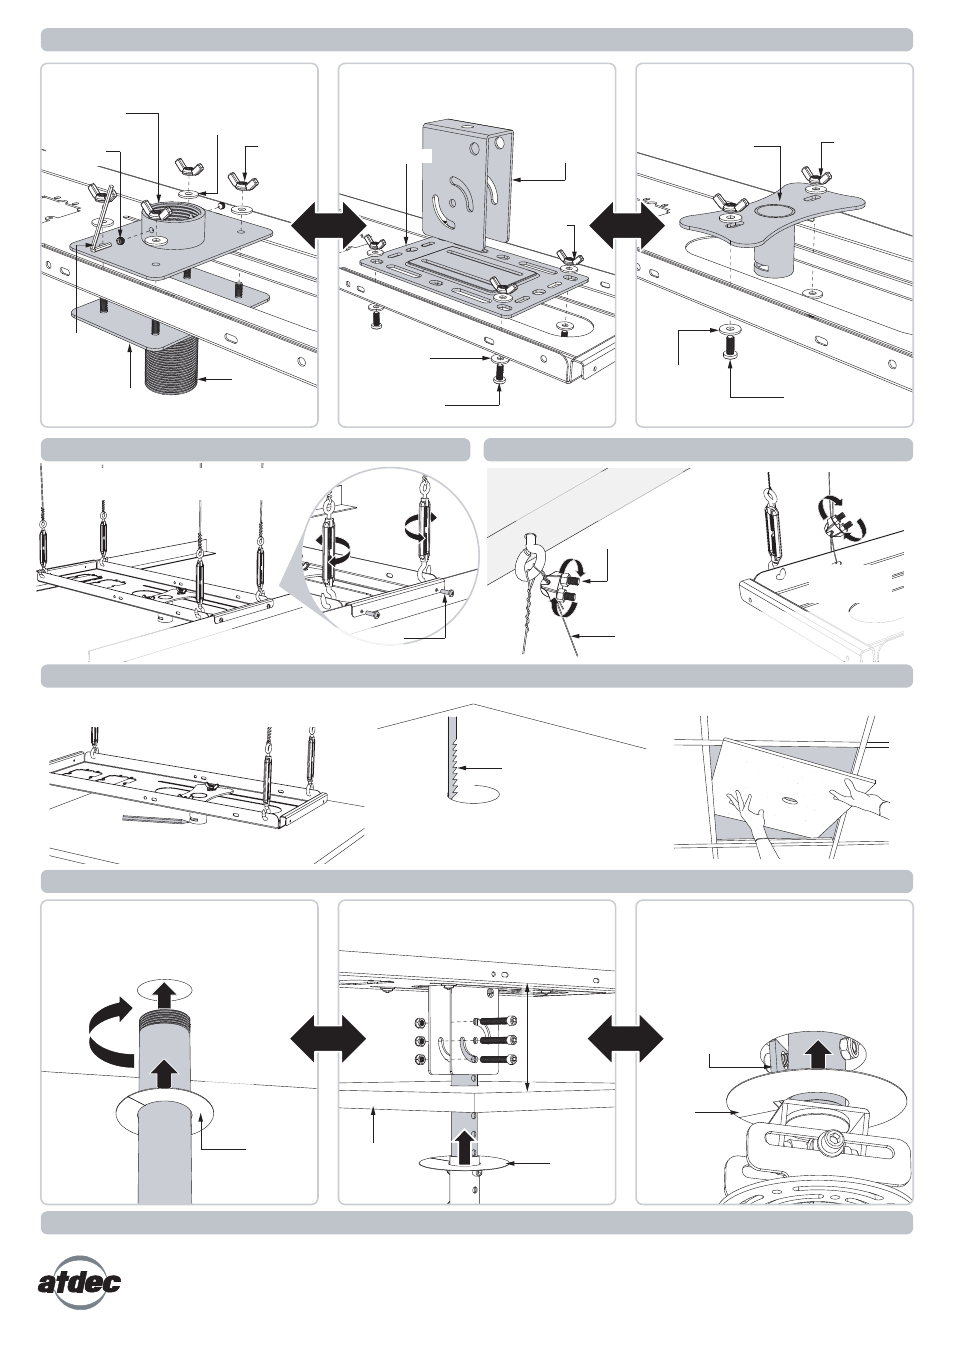
Step 5. Assemble Projector Mount Interface onto Suspended Ceiling Plate
Step 6. Hook Suspended Ceiling Tile
1.5” NPT Bracket (included)
Atdec Flush Mount
(TH-WH-PJ-FM supplied separately)
Atdec Pole Mount
(TH-WH-PJ-CM supplied separately)
Wing Nuts
(x4)
1.5” NPT
Mounting Collar
(optional for 1.5”
projector heads only)
Upper
Mounting Plate
Lower
Mounting Plate
M6 Washer
(x4)
M6 Set
Screw (x2)
3mm
Allen Key
M6x16mm
Screws (x4)
M6 Washers
(x8)
Wing Nuts
(x4)
TH-WH-PJ-CM
Fixing Coupler
TH-WH-PJ-CM
Mounting Plate
TH-WH-PJ-FM
Ceiling Plate
M6x16mm
Screws (x2)
M6 Washers
(x4)
Wing Nuts
(x4)
Hook Suspended Ceiling Tile to the Turnbuckles.
Twist Turnbuckles for height adjustment.
Step 7. Fix Safety Wire
Thread one end of the Safety Wire through
a Lag Eye Bolt, Concrete Anchor, or Truss
and clamp using Safety Clamp.
Safety Clamp
Safety
Wire
Thread other end of Safety Wire
through the Suspended Ceiling Tile
and clamp using Safety Clamp.
Step 8. Cut out Hole in Original Ceiling Tile
Hold the original ceiling tile up to the ceiling grid and
mark out where the projector mount will protrude through.
Step 9. Install Projector Mount and Ceiling Cover
(choose Ceiling Cover to suit projector mount)
Replace original ceiling tile into the ceiling grid.
Installation Complete - Ready to install Projector
Cut hole in the original ceiling tile, the
same diameter as the projector mount.
1.5” NPT Pole Mount
(supplied separately)
Atdec Flush Mount
(TH-WH-PJ-FM supplied separately)
NOTE: For TH-WH-PJ-FM the cut-out must
be at least Ø65mm (2.5”) to allow access to
the Locking Hook and fasteners.
Atdec Pole Mount
(TH-WH-PJ-CM supplied separately)
SCREW
130mm (5”)
approx.
Original
Ceiling Tile
TH-WH-PJ-FM
Locking Hook
Jigsaw or Hole Cutter
recommended
Ceiling
Cover
PUSH
PUSH
Ceiling
Cover
Ceiling
Cover
PUSH
TIP: Use a spirit level to ensure
the Suspended Ceiling Tile is level.
M5x16mm Screw (x4)
optional
TWIST
Original Ceiling Tile
(reverse side)
TIGHTEN
2x NUTS
TIGHTEN
2x NUTS
OR
OR
No portion of this document or any artwork contained herein should be reproduced in anyway without the express written consent of Atdec Pty Ltd.
Due to continuing product development, the manufacturer reserves the right to alter specifications without notice. Published 29.03.11©
OR
OR