English, Pre-testing checks, Fuel pressure testing procedures – Actron Professional Fuel Pressure Tester Kit CP7838 User Manual
Page 3
Pressure Line: A pressurized fuel line that
carries fuel from the fuel tank to the fuel injectors.
Fuel Filter: A filter that is located in-line with the
pressure line. Its function is to prevent foreign
particles from reaching the fuel injectors. A
clogged or restricted fuel filter can also cause low
fuel pressure readings. This is the only fuel
system component that requires periodic
replacement. Refer to vehicle owners manual for
replacement interval.
Fuel Rail Test Port: A schrader valve located on
the fuel rail that allows easy connection of a fuel
pressure gauge to measure fuel pressure. Do not
confuse this valve with the schrader valves that are
used for recharging air conditioning systems.
Fuel Pressure Regulator: The fuel pressure
regulator is connected across the pressure line
and return line. It contains a spring loaded valve
assembly that opens to allow fuel to move into the
return line, when the pressure line fuel pressure is
English
exceeded. It is used to keep a constant fuel
pressure drop across the fuel injectors. Some fuel
pressure regulators have a vacuum port so fuel
pressure can be adjusted based on engine load.
These are commonly called vacuum actuated
(compensated) fuel pressure regulators. A leaking
fuel pressure regulator can cause low fuel
pressure readings and hard starting problems.
Fuel Rail: The fuel rail assembly is bolted to the
intake manifold. Its purpose is to hold the fuel
injectors in place and to deliver pressurized fuel to
the fuel injectors.
Fuel Injectors: A precision valve that is controlled
by a solenoid. Fuel injection is controlled by the
amount of fuel pressure, and the size and duration
of the valve opening. Fuel injectors contain a filter
used to prevent very small particles from clogging
the valve. Leaking fuel injectors will cause fuel
pressure to slowly decrease when the ignition key
is on and engine is off.
Pre-Testing Checks
1. Read Safety Precautions.
2. Do a thorough visual and hands-on inspection
of the engine and fuel system. Look for loose or
cracked electrical wiring, battery cables,
ignition wires, and fuel or vacuum lines.
3. Verify that the battery is fully charged and fuel
tank has an adequate supply of fuel.
4. Verify that the inertia switch on certain Ford/
Lincoln/Mercury vehicles has not been tripped.
(The inertia switch is usually located in the
trunk.)
5. Verify that all fuel system fuses are good.
6. Verify fuel vapor recovery system and gas cap
are in good condition.
7. Verify that manifold vacuum is within
manufacturers specification which is typically 18-
20 inches at idle.
8. Look for fuel leaks and wipe up any spilled fuel
immediately.
9. If engine will not start, check ignition system for
spark. If no ignition spark is present, refer to
vehicle service manual for No Start Diagnostics.
10.Inspect wire harnesses and electrical
connectors for damaged or corroded parts.
11. Check other electrical systems including
ignition and car computer system.
Fuel Pressure Testing Procedures
This test procedure explains how to make
fuel pressure measurements on vehicles while
ignition key is on and while engine is at idle. The
procedure also explains the safest way to connect
and disconnect fuel pressure tester kit from
vehicles. If fuel pressure readings measured in this
test procedure are not within vehicles
manufacturers specification, then use vehicle
service manual along with fuel pressure tester kit
to service problem. This test procedure does not
contain any vehicle specific diagnostics
.
1. Read all SAFETY PRECAUTIONS and PRE-
TESTING CHECKS.
2. Apply a lightweight household oil to rubber O
rings on test adapters.
3. Turn Ignition Key OFF.
4. Install Gauge.
For GM/Chrysler vehicles with test port...
Note: A right-angle large schrader adapter, part
number 0180-1299 is available for close-
clearance connections.
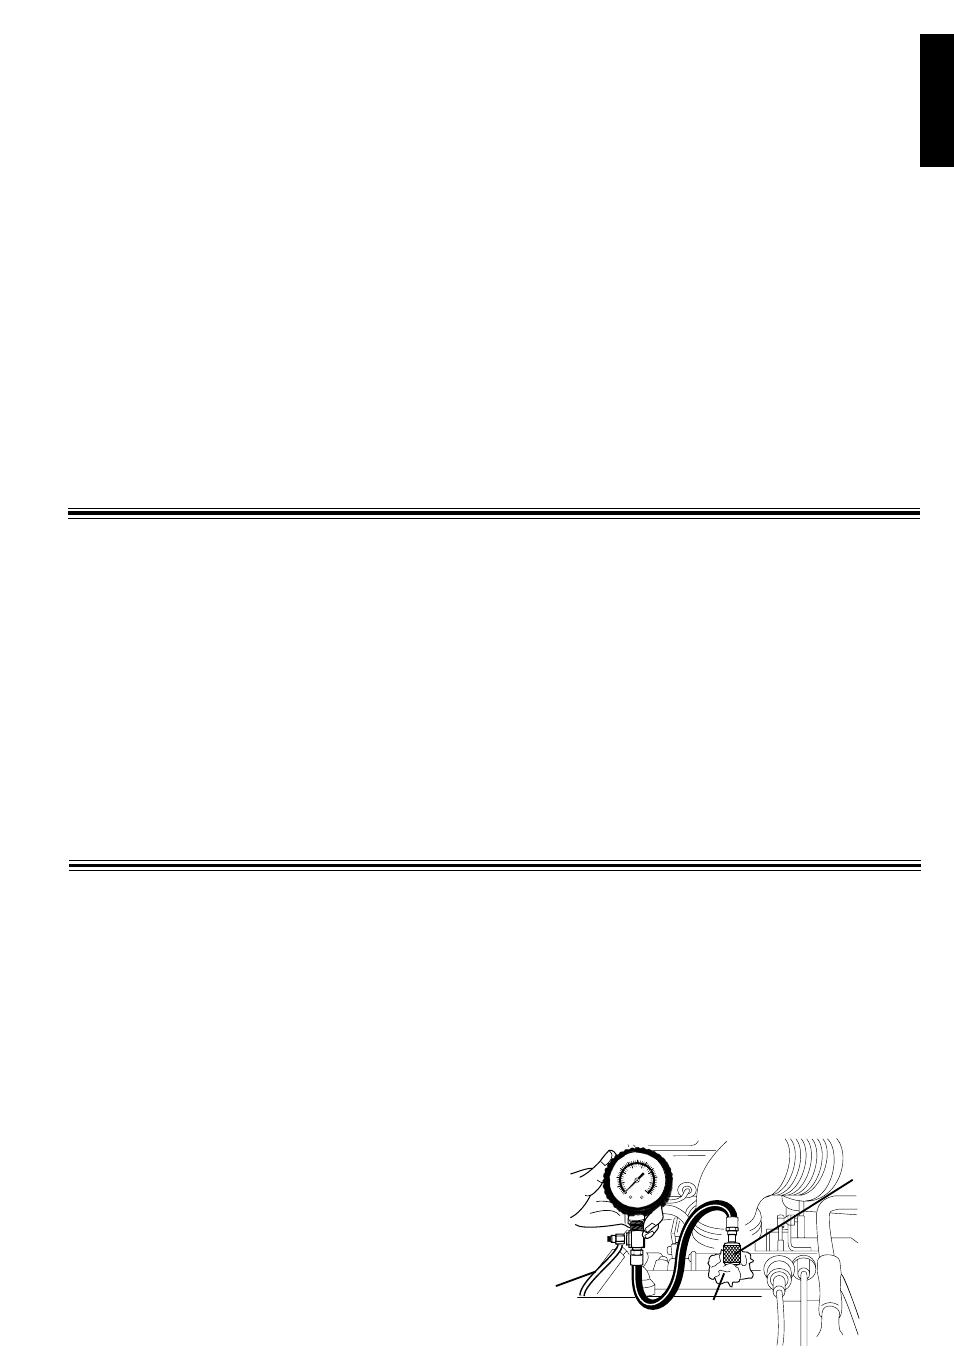
Remove Test Cap.
Screw GM/Chrysler test port adapter to fuel
rail test port until finger tight.
Note: Always wrap a shop rag around fuel rail
test port when attaching test port adapters.
This is a precaution in case a small amount of
fuel leaks out while attaching adapters.
2 0
4 0
6 0
8 0
10 0
10 0
2 0 0
300
500
400
6 0 0
7 0 0
kPa
psi
1 0
3 0
5 0
7 0
9 0
END OF BLEED OFF HOSE
MUST BE PLACED IN AN
APPROVED FUEL CONTAINER
Shop Rag
Test Port
Adapter