Activeforever Invisia Collection Toilet Paper Dispenser with Integrated Support Rail User Manual
Page 3
L
H
Page 3 of 4
.
b
1
e
r
u
g
i
F
.
a
1
e
r
u
g
i
F
B
A
BATHROOM
WALL
(i.e. DRYWALL)
BACKSIDE
ACCESS TO
BATHROOM
L
H
Figure 4.
L
H
Figure 2a.
Figure 2b.
TIPS FOR LOCATING A WOOD STUD
• For drywall surfaces, use a stud sensor to locate a stud.
• For tile surfaces, try a stud sensor to locate a stud. If no stud
is found, measure 16" from a perpendicular wall. Drill a small
hole in the grout to ensure the stud has been found. If there is
no stud at this location, bend a piece of wire in a “L” shape
and insert it through the hole. Spin the wire to determine
exactly where the stud is located and mark its location. Patch
all holes with silicone to keep moisture out of the wall.
• If there is access to the backside of the bathroom wall (i.e.
through a closet), measure the stud location and transfer the
measurements into the bath area.
STRUCTURAL REINFORCEMENT SUGGESTIONS
NOTE: Due to variances in local construction methods and
materials used, details given below are suggestions only.
Consult the appropriate local contractor for specific advice.
For concrete walls, you may be able to install fasteners
(such as a wedge anchor) directly into the concrete wall
without modification.
If there is access to the backside of the bathroom wall (i.e.
through a closet) and structural reinforcement is required,
consider cutting a hole in this backside wall to allow access to
the bathroom wall from behind (without having to remove /
replace ceramic tiles).
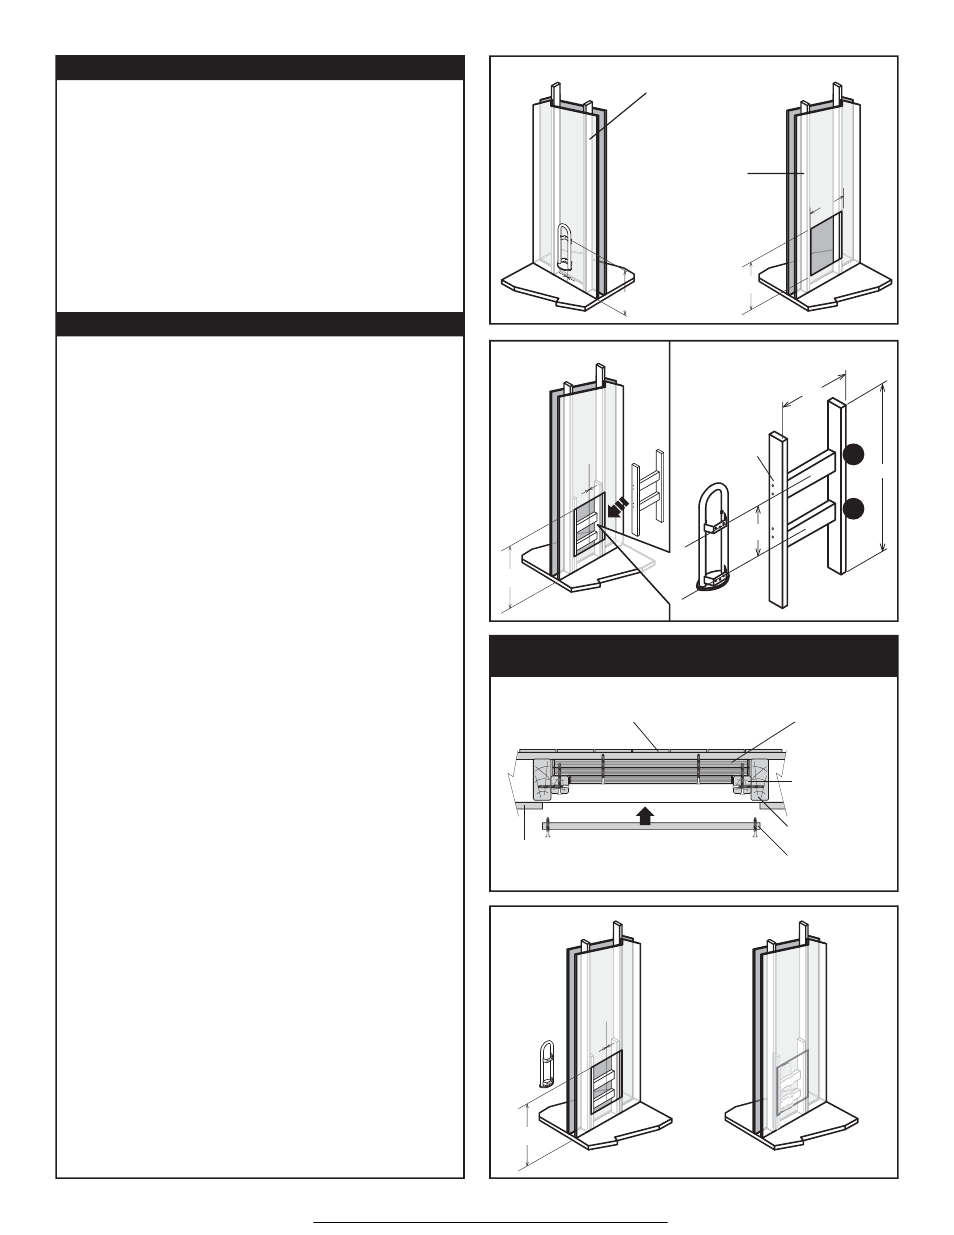
1. Choose optimal mounting location of rail including height
(H) and side to side location (L) as shown in
Figure 1. Mark
the height and location on the wall for future reference.
NOTE:
If accessing the bathroom wall from the backside, transfer the
measurements for the support rail location to the backside
wall as shown in
Figure 1b.
2. Find wall support studs & cut hole in wall board to expose
wall studs as shown in
Figure 1. Suggested hole size is
height (A) of 18-24" (48-61cm) and width (B) corresponding
to wall stud spacing. Expose half width of each stud to
facilitate re-installation of wall board patch.
IMPORTANT:
Avoid any utilities located in wall!
3. Fabricate a support frame structure from suitable wood
pieces as shown in
Figure 2a. Support frame width (D) should
fit snugly within wall studs. Support frame height (E) should be
from 24-32" (61-81cm) high or more, depending on material
and stiffness of wall studs. Locate top cross member (F) to
position in line with top rail stem when rail is located at the
height (H). Lower cross member (G) should be spaced at C =
11.75" (30cm) center to center from top cross member. Hold
the support rail against the support frame to confirm the cross
members are in the correct location. Use a generous quantity
of wood screws and glue to hold the support frame structure
together as shown. See alternative to support frame as shown
in
Figure 3.
4. Insert support frame structure through hole in wall and
secure uprights to wall studs using a generous amount of
wood screws as shown in
Figure 2b.
5. Complete the Invisia™ Wall Toilet Roll Holder installation
instructions on Page 2. Then, patch the wall cutout (if backside
access to bathroom, consider making an access panel for
future servicing) to match the surrounding wall as shown in
Figure 4.
Bathroom Tile Wall
(
CAUTION: Do not puncture
when fastening plywood)
Multi-layers of
3/4" plywood
(approx 24" high)
2" X 2" nom. Stud
(approx 36" high)
Wallboard patch
Generous amounts of
wood screws & glue
Backside access to bathroom
(insert structure from this side)
Wall Stud
FIGURE 3: ALTERNATIVE TO SUPPORT FRAME - MULTI-LAYER
PLYWOOD INSIDE WALL WITH WALLBOARD PATCH (TOP VIEW)
D
C
E
F
G
WOOD
SCREWS
www.ActiveForever.com