Activeforever Invisia Collection Corner Shelf with Support Rail User Manual
Page 2
MOUNTING LOCATION
We strongly recommend that you give some thought as
to the optimal location of your Invisia™ Corner Shelf
before installation. The following suggestions are offered
for your consideration, however, it is recommended to
consider advice from the appropriate healthcare
professional for locating any support rail.
To determine the optimal location, we recommend
holding the rail in place and walking through the motions
of a transfer (sitting, standing, reaching, etc.). Consider
the following when determining the optimal mounting
location:
1. Move mounting location to match structure behind
the wall.
2. Avoid electrical / plumbing behind the wall
3. Where possible, drill through tile - not through grout.
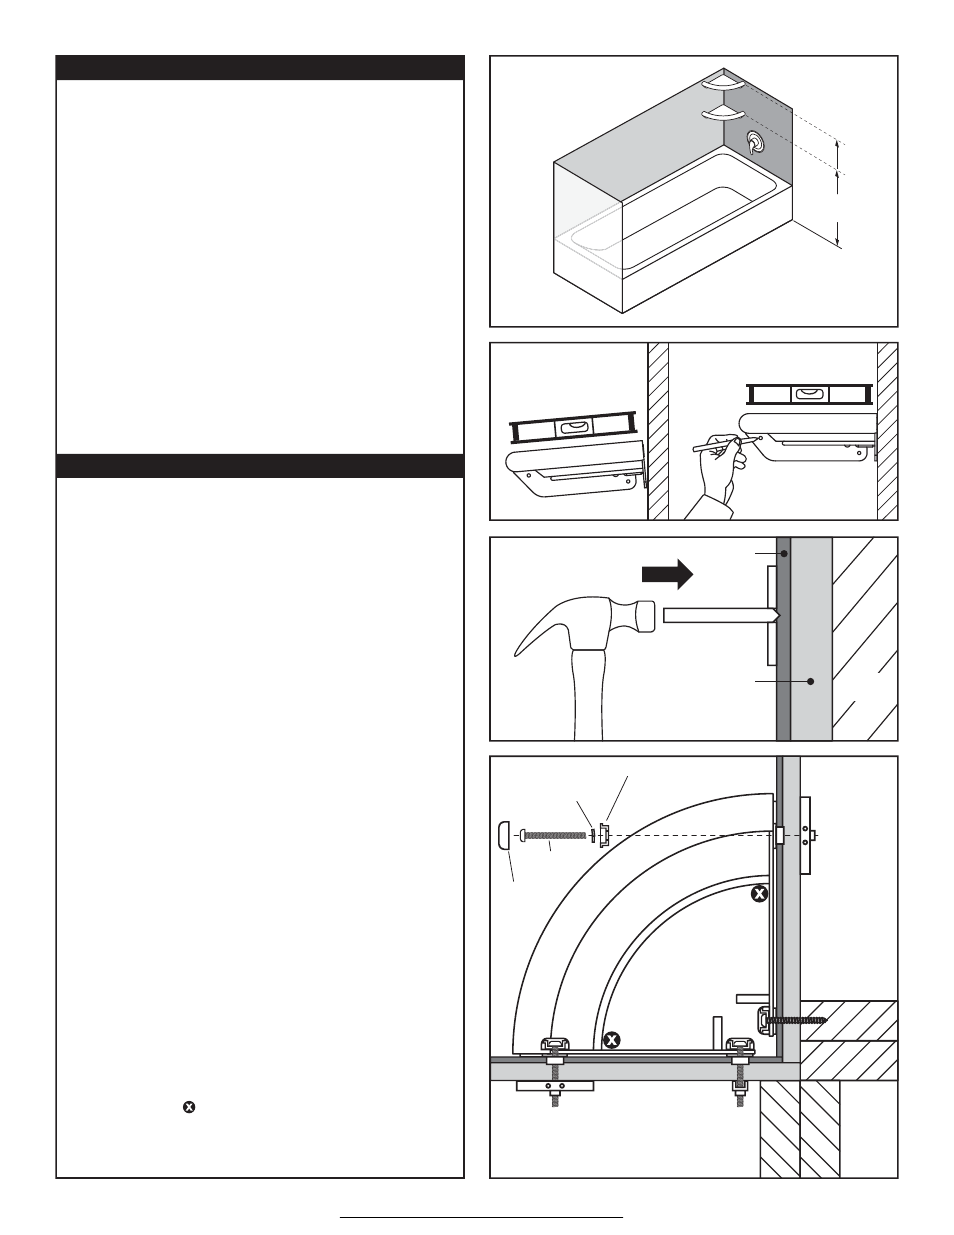
RECOMMENDED INSTALLATION LOCATION
Corner of Faucet Wall - Typically 36-60" from floor as
shown in
Figure 1. If installing multiple Invisia™ Corner
Shelves, ensure space between is adequate to place and
remove items.
INVISIA™ CORNER SHELF INSTALLATION
Place a blanket down in the area that you will be installing
the Invisia™ Corner Shelf to protect the floor from parts
that may fall during installation. The proposed mounting
location must be cleaned prior to installation.
Refer to the fastener chart on page 1 to determine the
size of hole required for the appropriate wall construction.
NOTE: It may occur that one hole may be installed into a
stud, and another installed with SnapToggle® toggle
bolts.
A1. Hold the corner shelf against the walls. Adjust the
corner shelf with a level until it is straight as shown in
Figure 2b.
A2. Mark the screw hole locations on the wall.
A3. Use the wall plates as a locating guide and notch the
tile with center punch as shown in
Figure 3. NOTE: A
light tap is all that is required for punch to make notch.
A4. Use the appropriate drill bit on the notched tile to drill
a pilot hole for the fasteners. If SnapToggle® toggle bolts
are to be used, please see the separate installation
instructions. Continue with step A4.
A5. Fasten the Invisia™ Corner Shelf with the appropriate
fastener for wall construction, lock washer and retaining
washer & waterproof as shown in
Figure 4.
NOTE: Perform a final tighten and inspection of all
fasteners. Test the installation by vigorously pulling on
the support handle of the Invisia™ Corner Shelf.
A6. Install the plastic snap caps to the plastic retainer
washers to cover the screws.
A7. Place the tray on top of the Invisia™ Corner Shelf,
pushing it against the corner. Install the rubber bumpers
on the bottom of the tray, behind the bent metal bar as
indicated by the in
Figure 4. These rubber bumpers
will hold the tray in place.
Your Invisia™ Corner Shelf is now installed.
Page 2 of 4
Figure 4.
WOOD
STUD
PLASTIC
RETAINER
WASHER
SNAP
CAP
FASTENER
LOCK
WASHER
Figure 1.
Level
NOT Level
Figure 3.
Figure 2a.
TILE
Cement
Board
WOOD
STUD
“LIGHT TAP”
Figure 2b.
FAUCET
SIDE
BACK
Typically 36-60"
from f
loo
r.
www.ActiveForever.com