Activeforever Invisia Collection Accent Ring Support Rail User Manual
Page 2
FAUCET
SIDE
BACK
Center with
shower co
ntrols.
Typically 36-48"
from floo
r.
Alternative
Location Option
Figure 1.
Figure 5.
Figure 3a.
Figure 3b.
Lock
Washer
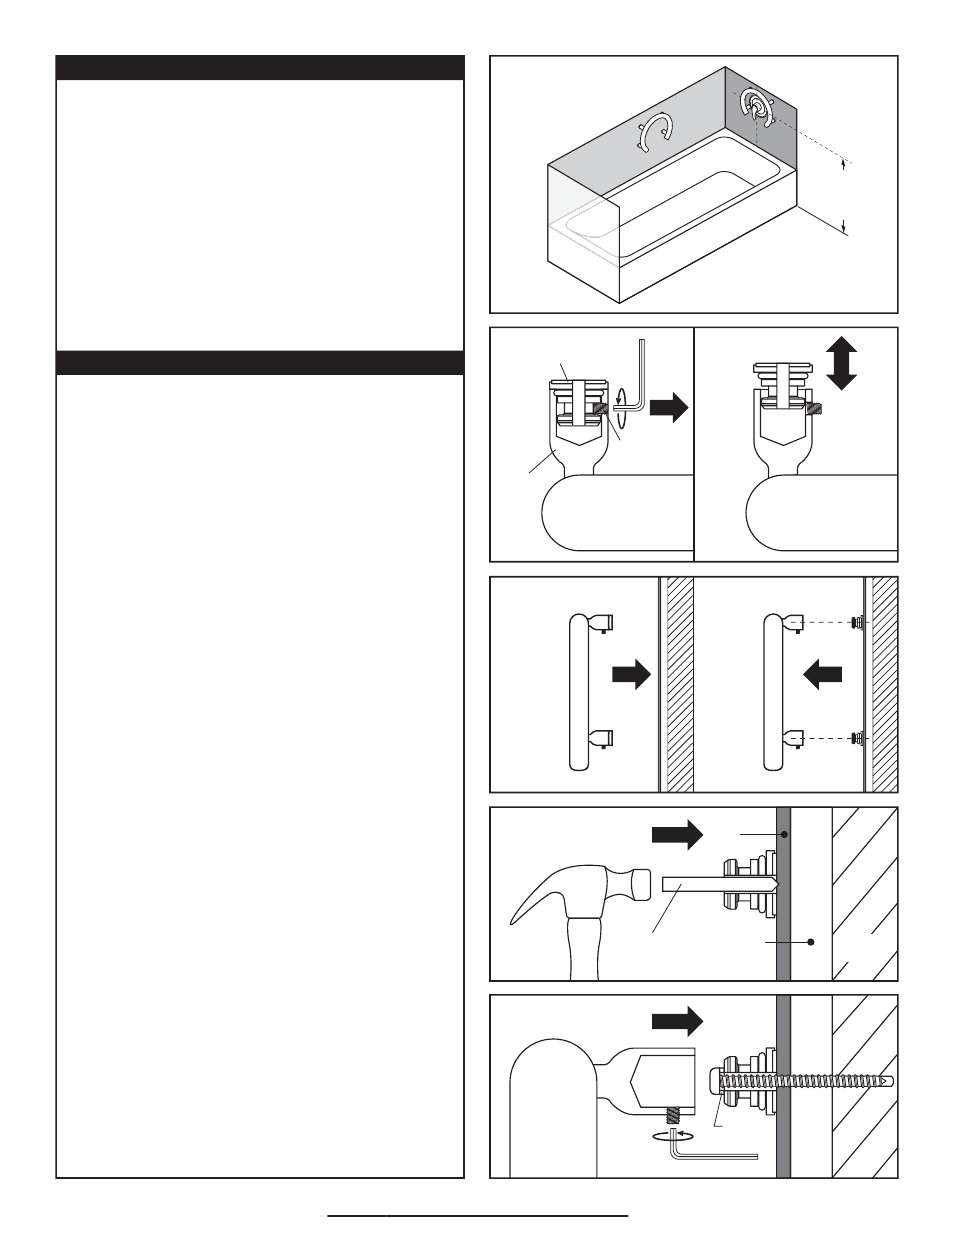
MOUNTING LOCATION
We strongly recommend that you give some thought as to the
optimal location of your Invisia™ Accent Ring before
installation. The following suggestions are offered for your
consideration, however, it is recommended to consider
advice from the appropriate healthcare professional for
locating any support rail.
To determine the optimal location, we recommend holding
the rail in place and walking through the motions of a transfer
(sitting, standing, reaching, etc.). Consider the following
when determining the optimal mounting location:
1.
Ensure shower controls can rotate fully without
interference with rail.
2. If possible, move mounting location to match structure
behind the wall.
3. Avoid electrical / plumbing behind the wall.
4. Where possible, drill through tile - not through grout.
INVISIA™ ACCENT RING INSTALLATION
Place a blanket down in the area that you will be installing the
Invisia™ Accent Ring to protect the shower or bathtub
surfaces from parts that may fall during installation. The
proposed mounting location must be cleaned prior to
installation.
Refer to the fastener chart on page 1 to determine the size of
hole required for the appropriate wall construction.
A1. Mark the horizontal and vertical location of the Invisia™
Accent Ring.
A2. Using supplied hex-key, back off set screws in the rail
sockets so the wall stems can move in and out freely as
shown in
Figure 2a and 2b.
A3. On back of wall stems, peel off backing to expose
adhesive side of rubber gasket washer.
A4. With the wall stems inside the rail sockets , push rail
firmly against wall in marked location as shown in
Figure 3a.
A5. Remove the rail as straight as possible as to not pull the
wall stems off from the wall as shown in
Figure 3b. NOTE:
The peel and stick is not meant to be a permanent adhesive.
A6. Use the wall stem as a locating guide and notch the tile
accurately with supplied center punch as shown in
Figure 4.
NOTE: A light tap is all that is required for punch to make notch.
A7. Use the appropriate drill bit on the notched tile to drill a
pilot hole for the fasteners. If SnapToggle® toggle bolts are to
be used, please see the separate installation instructions.
Continue with step A8.
A8. Fasten the wall stems to the wall with the appropriate
fasteners & waterproofing.
A9. Place the rail back onto the wall stems, and secure rail by
tightening the set screws with supplied hex key as shown in
Figure 5. The rail will pull into the stems as the set screws are
tightened.
The rail will fit best if placed as straight as possible over the
wall stems. If the rail sockets do not easily fit onto the wall
stems at first, this can be adjusted. There is some movement
possible with the oversized hole of the wall stems, and the
location of the wall stems can be adjusted to accommodate
the rail sockets.
NOTE: Perform a final tighten and inspection of all fasteners.
Test the installation by vigorously pulling on the support
handle of the Invisia™ Accent Ring.
Your Invisia™ Accent Ring is now installed.
Figure 2a.
Figure 2b.
Wall Stem
Set
Screw
Rail
Socket
“LIGHT TAP”
Center
Punch
Figure 4.
Tile
Cement
Board
Wood
Stud
Page 2 of 4
www.ActiveForever.com