Candy FP 827 X User Manual
Page 13
23
24
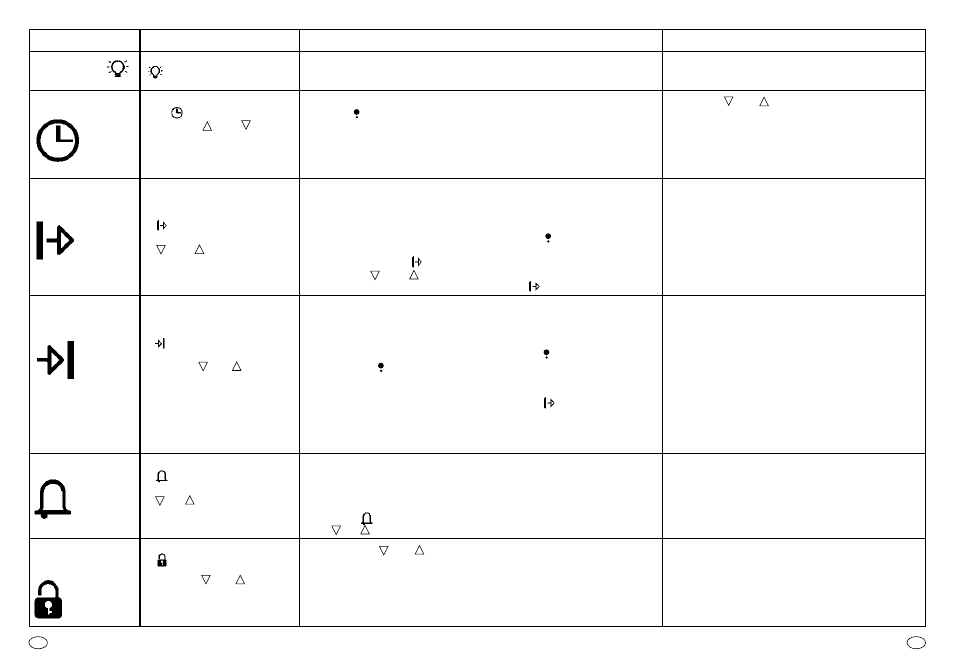
CLOCK
• Turn the selector knob (1) to
the symbol.
• Using the and buttons,
set the time of day (while
setting, the numbers on the
display will flash)
• Allows you to regulate the
time shown on the oven clock
• Using the and buttons, set the time of day
(while setting, the numbers on the display will flash)
NB: Set the clock immediately after installing
the appliance or after an interruption to the
power supply (this is shown by 12:00 flashing
on the display).
COOKING
TIME
• To select a cooking function
use (selector knob 2)
• Turn selector knob 1 to the
symbol
• Set the cooking time using the
and buttons (while
setting, the numbers on the
display will flash)
• When the cooking time is up,
the oven will switch itself off.
If you need to stop it before
then, the oven must be
switched off, or the cooking
time must be turned to 00:00.
(selector 1 to symbol ,
and use the and
buttons)
• Allows the end of cooking time
to be stored in the memory.
• When the cooking time has
been set, turn selector knob 1
to the symbol to display
the time of day.
• To display the programmed
time turn selector knob 1 to
the symbol.
• When the set cooking time is up the oven switches
itself off automatically and for a few seconds
an alarm sounds.
END OF
COOKING
• Select a cooking function
(selector knob 2)
• Turn the selector knob to the
symbol.
• Set the end of cooking time
using the and buttons
(while setting, the numbers
on the display will flash)
• Allows the end of cooking time
to be stored in the memory.
• When the cooking time has
been set, turn selector knob 1
to the symbol to display
the time of day.
• To display the programmed
time turn selector knob 1
to the symbol.
• This function is used typically used with ‘cooking
time’ function. For example if the dish has to be
cooked for 45 minutes and needs to be ready by
12:30, simply select the required function, set the
cooking time to 45 minutes and the end of cooking
time to 12:30.
Cooking will start automatically at 11:45 (12:30
minus 45 mins) and will continue until the pre- set
end-of-cooking-time, when the oven will switch
itself off automatically.
ALARM
• Turn selector knob 1 to the
symbol.
• Set the cooking time using the
and buttons (while
setting, the numbers on the
display will flash)
• When the set cooking time is
up, the oven will automatically
switch itself off. If you need to
stop it before then, you must
turn the set time to 0 (selector
knob 1 on and then use
the and buttons)
• Provides an audible alarm
signal (for a few seconds)
at the end of cooking time.
• Useful as a reminder
• This function works independently of the oven
(it can be used even when the oven is not
working)
FUNCTION
HOW TO ACTIVATE IT
HOW TO SWITCH IT OFF
WHAT IT DOES
WHAT IT IS FOR
CHILD
SAFETY
OVEN
LIGHT
• Turn the selector knob 1 to the
symbol. The indicator light
will flash.
• Press the and buttons
at the same time, for three
seconds.
• The setting is confirmed when
the light stops flashing.
When knob (1) is turned to the
symbol, the light comes on
• Press buttons and
together for three seconds.
The light flashes.
• The oven settings cannot be
altered (even when the knobs
are accidentally adjusted)
• Operates even when the oven is not on preventing
it from being inadvertently switched on.
• Is operational when the oven is on and prevents
any alterations to the settings (through accidental
turning of the knobs)
NB: the oven can still be switched off by
turning selector knob 2 to position 0.
• Turn the selector knob to the
position
• At the pre-set time the oven
automatically switches itself
off. If you need to stop it
before then, switch the oven
off by turning the selector
knob 2 to the symbol.
This function is useful for checking that the oven
is fully operational.
EN
EN