Operation – Zanussi ZI 8454 X User Manual
Page 5
5
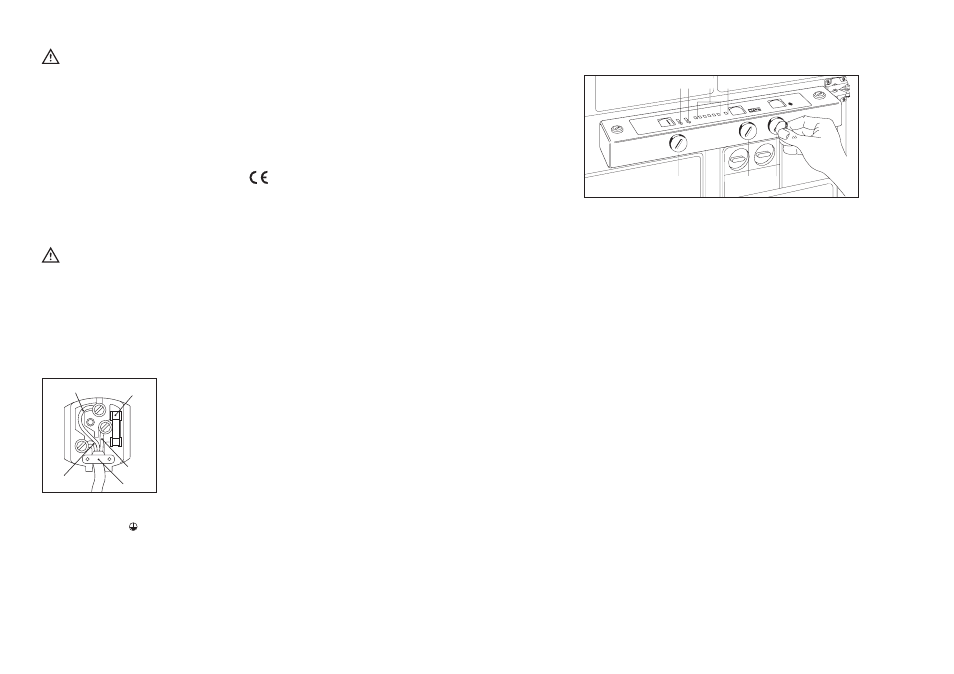
Warning light
The alarm light B indicates when the temperature
inside the freezer compartment has risen to a point
at which safe storage of frozen foods can no longer
be guaranteed. When the appliance is first started
up, or after having loaded a quantity of food to be
frozen, this warning light will stay on until a safe
storage temperature has been reached.
Electronic thermometer
The electronic thermostat C consists of 6 pilot lights.
Each light corresponds to a temperature inside the
freezer. Frequent or prolonged opening of the doors
may slightly modify the temperature indicated.
Temperature variations can also occur if excessive
quantities of food are loaded into the freezer (see
freezing capacity).
S
4
S
-26°
-24°
-21°
-18°
-15°
-13°
E
F
G
D
C
B
A
A = ÇMains OnÈ light
B = Freezer alarm light
C = Freezer electronic thermometer
D = Fast Freeze indicator (S)
E = Main On/Off switch
F = Freezer and Fast Freeze (S) temperature control
knob
G = Refrigerator temperature control knob
OPERATION
Starting up
¥ Turn switch E until the pointer is opposite the ÇIÈ
symbol (pilot lights A and B will come on).
¥ Turn refrigerator temperature knob G and freezer
temperature knob F to the required position; in
general a mid position is best (the lower the
number, the warmer the temperature).
¥ Pilot light D comes on when knob F is tumed to
position ÇSÈ.
The refrigerator and freezer are switched off by
turning switch E to position ÇOÈ.
Before using
Remove all securing tapes. Wash inside the
appliance with lukewarm water and bicarbonate of
soda (5 ml to 0.5 litre of water).
Do not use soap or detergent as the smell may
linger. Dry thoroughly.
16
Electrical connections
Any electrical work required to install this appliance
should be carried out by a qualified electrician or
competent person.
WARNING: THIS APPLIANCE MUST BE
EARTHED.
The manufacturer declines any liability should
this safety measure not be observed.
If the plug that is fitted to your appliance is not
suitable for your socket outlet, it must be cut off and
the appropriate plug fitted.
Remove the fuse from the cut off plug.
The cut off plug should then be disposed of to
prevent the hazard of shocks in case it should be
plugged into a 13amp socket in another part of your
home.
Important
The wires in the mains lead are coloured in
accordance with the following code:
Green and Yellow - Earth
Blue - Neutral
Brown - Live
If you fit your own plug, the colours of the wires in
the mains lead of your appliance may not
correspond with the markings identifying the
terminals in your plug, proceed as follows:
Connect the Green and Yellow (earth) wire to the
terminal in the plug which is marked with the letter
ÇEÈ or the earth symbol
or coloured green and
yellow.
Connect the blue (neutral) wire to the terminal in the
plug which is marked with the letter ÇNÈ or coloured
black.
Connect the brown (live) wire to the terminal in the
plug which is marked with the letter ÇLÈ or coloured
red.
D207
GREEN & YELLOW
13 AMP. FUSE
BROWN
CORD CLAMP
BLUE
13 AMP
The plug moulded onto the lead incorporates a fuse.
For replacement, use a 13amp BSI362 fuse. Only
ASTA or BSI approved fuses should be used.
The plug must not be used if the fuse cover/carrier is
lost. The cover/carrier is indicated by the coloured
insert at the base of the plug.
A replacement cover/carrier must be obtained from
your local Zanussi Service Force Centre.
This appliance complies with the E.E.C. Directive
No. 87/308 of 2.6.87 relative to radio interference
suppression.
This appliance complies with the following
E.E.C. Directives:
- 73/23 EEC of 19.2.73 (Low Voltage Directive)
and subsequent modifications;
- 89/336 EEC of 3.5.89 (Electromagnetic
Compatibility Directive) and subsequent
modifications.
Please ensure that when the appliance is
installed it is easily accessible for the engineer in
the event of a breakdown.