Install jacket, Before installing jacket, Remove jacket parts from cartons – Weil-McLain 88 User Manual
Page 20: Install support brackets/channels
Weil-McLain 88 Water and steam boilers — Series 2 —
for Gas, Light Oil, & Gas/Light Oil-Fired Burners
20
Part No. 550-100-068/1009
Install jacket
Before installing jacket
The boiler contains ceramic fiber and fiberglass materials.
Use care when handling these materials per instructions
on page 34 of this manual. Failure to comply could result
in severe personal injury.
These parts
1.
MUST
:
Plugs for unused tappings
a.
Supply and return piping and steam supply header
b.
Cleanout plates
c.
Tankless heaters (when used), tankless heater cover plates
d.
(when used), tankless heater piping (when used)
Flue damper assembly
e.
Observation port assemblies
f.
These parts
2.
MAY
:
Burner mounting plate
a.
These parts
3.
MUST
:
Water or steam gauge
a.
Limit control and low water cutoff
b.
Gauge glass and gauge glass cocks, tri-cocks
c.
Drain cock
d.
Remove jacket parts from cartons
Locate jacket cartons.
1.
Remove jacket parts from cartons as needed. Leave in cartons as
2.
long as possible to avoid damage.
Jacket parts are in the boxes listed below:
3.
Part
Box label descriptions
Jacket screws (in jacket corner boxes)
included in
CRNR
boxes
Jacket support brackets & hex nuts
BKT
Jacket side support channels, upper & lower
included in
42-#(.,
boxes
Jacket front/rear support channels, upper & lower
#/-
Jacket front panel
0., &
Jacket back panel
0., "
Jacket side and top panels
,
Jacket corners
CRNR
Jacket trim
42-#(.,
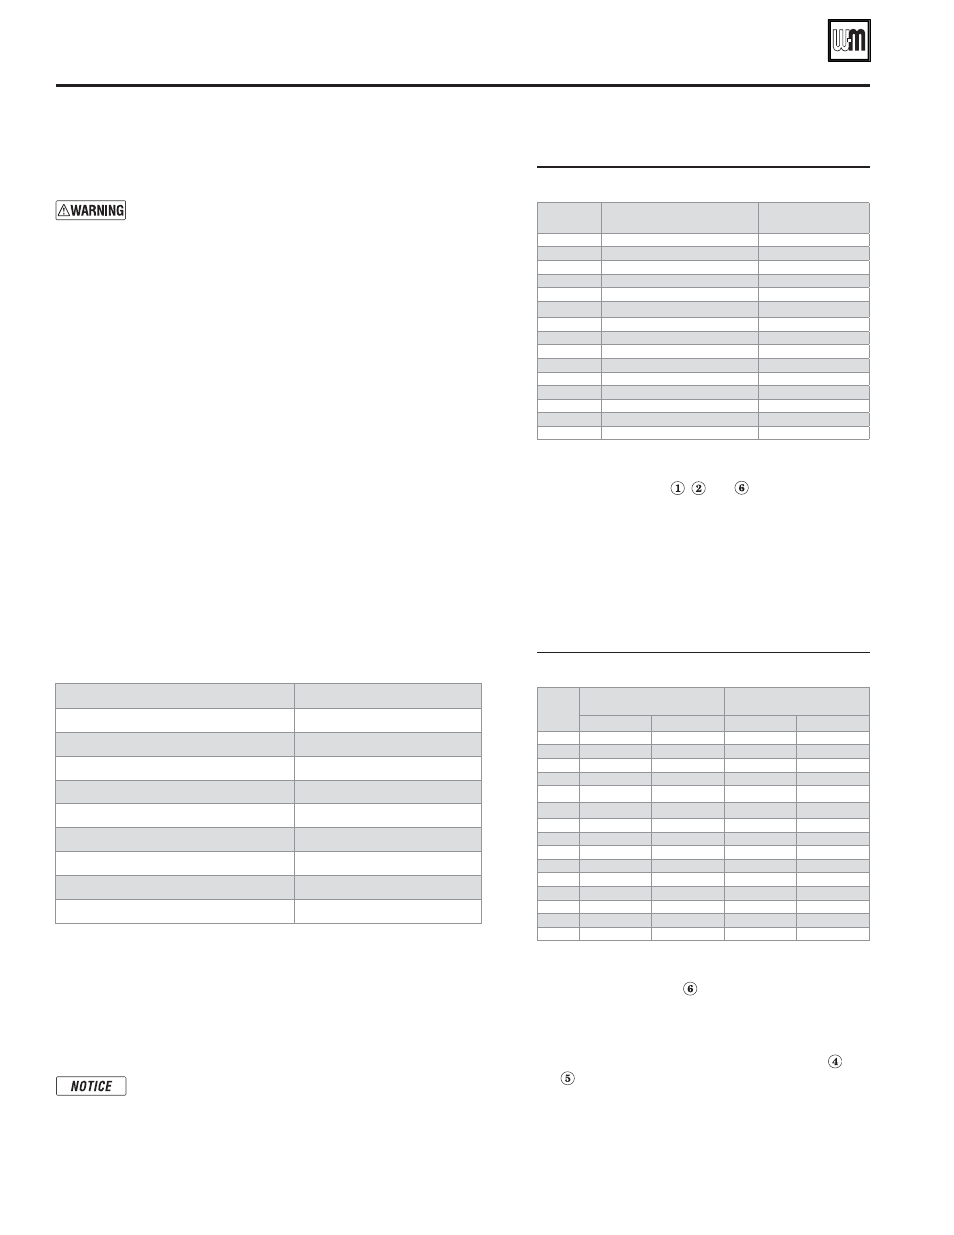
Install support brackets/channels
Place upper and lower support brackets over draw rods as shown
1.
in Figure 29, page 21. Place the brackets on the sections as given
in Figure 27. Sections are numbered from front to back.
Fasten each bracket loosely using two 5/8" nuts screwed onto the
2.
ends of the tie rods as shown.
Models 488 through 988 do not require lower support
brackets. Only upper brackets are required.
Fasten all nuts and screws loosely during assembly to
allow adjustment after all jacket frame parts are in-
stalled.
Place support brackets as listed below
&IGURE
Boiler
Upper brackets on
sections:
Lower brackets
on sections:
488
2, 3
None
588
2, 4
None
688
2, 5
None
788
2, 6
None
888
3, 6
None
988
2, 5, 8
None
1088
3, 6, 9
6
1188
3, 6, 9
6
1288
3, 7, 10
7
1388
3, 7, 11
7
1488
3, 7, 10, 13
7
1588
2, 5, 8, 11, 14
8
1688
2, 5, 9, 12, 15
9
1788
2, 5, 9, 13, 16
9
1888
2, 6, 10, 14, 17
10
Attach the upper channels to the upper supports as
3.
shown in callouts , and , Figure 29, page 21.
Use two #10 x ½" screws at each bracket. Models
988 and larger have two-piece channels.
The side channels are labelled
s
A
and
B
in Fig-
ure 29. Figure 28 gives the lengths of the side
channel parts for each model.
The channels at the boiler front and rear are
s
part numbers 426400030 & 426400031, re-
spectively.
Upper and lower side channel lengths
&IGURE
Boiler
Upper channel lengths
(inches)
Lower channel lengths
(inches)
A
B
A
B
488
30
NA
26
NA
588
38
NA
34
NA
688
46
NA
42
NA
788
54
NA
50
NA
888
62
NA
58
NA
988
35
35
66
NA
1088
43
35
40
34
1188
43
43
40
42
1288
51
43
48
42
1388
51
51
48
50
1488
51
59
48
58
1588
59
59
56
58
1688
67
59
64
58
1788
67
67
64
66
1888
71
71
72
66
Attach the four jacket corners to the upper channels
4.
as shown in callout , Figure 29, page 21. Corner
part numbers are: 426400054 (front left), 055 (front
right), 056 (back left), and 057 (back right).
Attach the lower side, front and rear channels
5.
to the jacket corners as shown in callouts and
of Figure 29, page 21. Models 1088 and larger
have two-piece side channels. The channels are
labelled
A
and
B
in Figure 29. Figure 28 gives the
lengths of these parts for each model. Front and
rear lower channels are part numbers 426400032
and 426400033.