Cable assembl y – Weider 831.159361 User Manual
Page 12
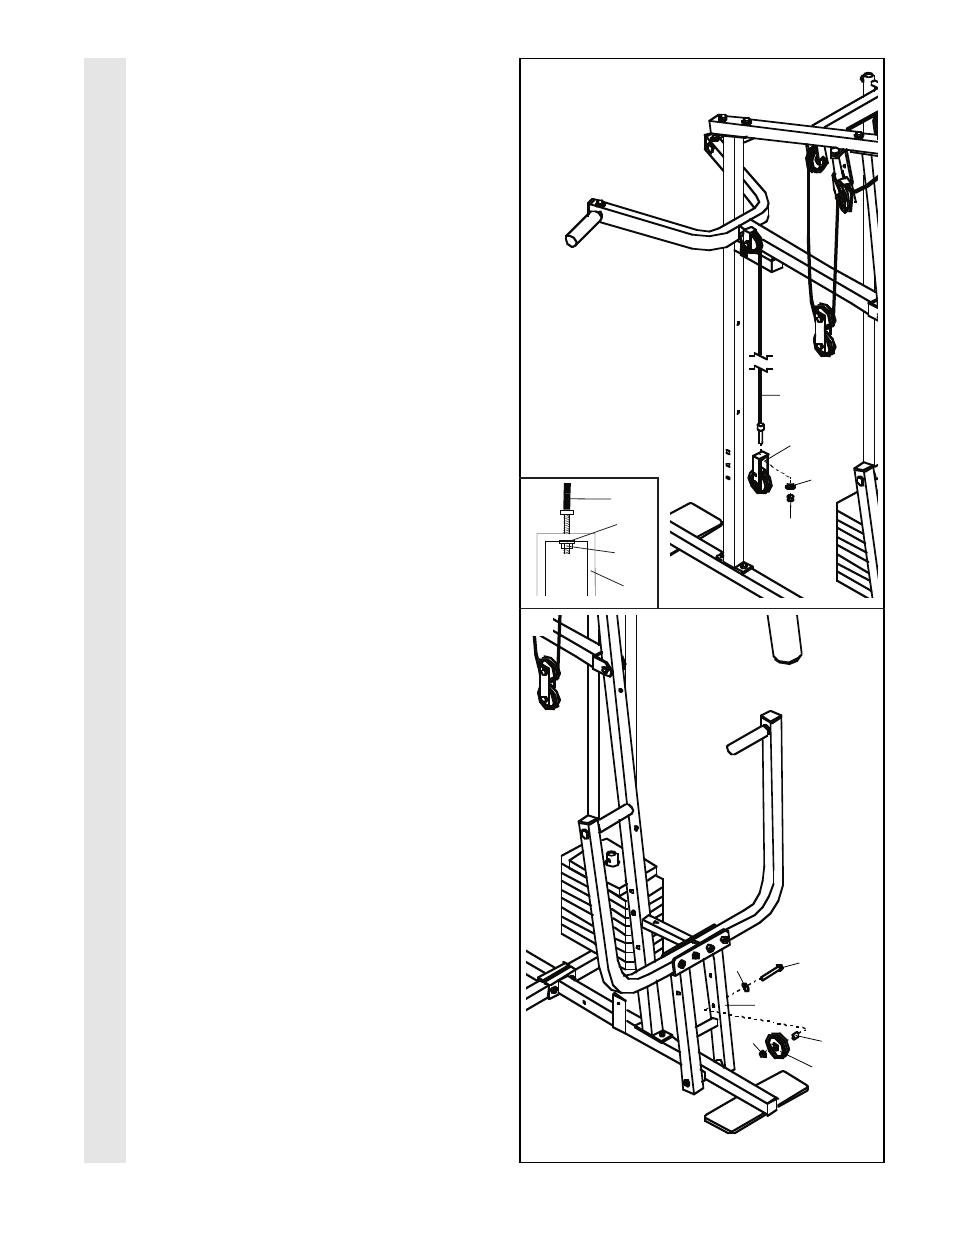
25. Attach the end of the Short Cable (58) to the
Long “U”-Bracket (57) with a 1/4” Nylon Lock-
nut (2) and a 1/4” Flat Washer (10).
Do not
completely tighten the Nylon Locknut. It
should be threaded onto the end of the
Cable so only a couple of threads are
showing above the nut, as shown in the
inset drawing.
26. Attach the 3 1/2” Low Pulley (88) and the 5/8”
x 9/16” Spacer (73) to the indicated hole in
the Press Frame (17) with a 3/8” x 3 3/4” Bolt
(71), a 3/8” Flat Washer (9), and a 3/8” Nylon
Locknut (21).
Do not tighten the 3/8” Nylon
Locknut (21) yet. Be sure that the 3/8” x
3 3/4” Bolt (71), the 3/8” Flat Washer (9),
the 5/8” x 9/16” Spacer (73), the 3 1/2” Low
Pulley (88), and the 3/8” Nylon Locknut
(21) are oriented as shown.
25
26
CABLE ASSEMBL
Y
12
57
10
2
88
73
71
9
21
17
58
58
57
2
10
- WEBE29911 (26 pages)
- 9940 (33 pages)
- WESY5993.2 (24 pages)
- WEBE11880 (15 pages)
- Pro XT 10 (16 pages)
- WESY39523 (35 pages)
- 831.153933 (33 pages)
- WEMC20063 (4 pages)
- WEBE13011 (16 pages)
- WESY59101 (35 pages)
- 148 (20 pages)
- WEBE44490 (22 pages)
- C670 (34 pages)
- WESY5993.3 (24 pages)
- 831.150290 (16 pages)
- 150722 (15 pages)
- WEBE09910 (8 pages)
- WEMC07730 (12 pages)
- WEBE19510 (20 pages)
- WESY19740 (28 pages)
- WESY19511 (28 pages)
- Pro 4850 831.153932 (33 pages)
- PRO 250 831.15707.0 (16 pages)
- WESY2966.0 (20 pages)
- WEBE12622 (19 pages)
- WEBE19200 (19 pages)
- 831.153971 (28 pages)
- WEMC0942.1 (7 pages)
- 2000X WESY7773.1 (24 pages)
- WEBE34110 (22 pages)
- WEBE06110 (16 pages)
- WESY5863.0 (24 pages)
- Pro XT20 WEBE09101 (16 pages)
- WESY38320 (33 pages)
- CORe 600 831.15715.0 (20 pages)
- WEBE09913 (8 pages)
- WEBE1137.0 (16 pages)
- WEBE17100 (20 pages)
- Pro 4950 831.14623.0 (44 pages)
- WEBE34100 (23 pages)
- WESY74090 (27 pages)
- WESY86301 (33 pages)
- club 4870 WESY3906.0 (36 pages)
- WEBE05930 (15 pages)
- 831.150471 (24 pages)