Battery information, Installation, Continued) – Wayne 352205-001 User Manual
Page 2
Battery Information
(Continued)
Be certain that the area around the
batteries is well ventilated. Before
servicing the batteries, blow away
gasses by waving a piece of cardboard
near the batteries.
Dangerous hydrogen gas can be
released from batteries while charging.
Sparks can ignite the gas in an
enclosed space. Wear safety goggles
when connecting batteries. Battery
connections should be made in a well-
ventilated area.
Working in the vicinity of lead acid
batteries can be dangerous. Before
making connections or servicing the
batteries, read and follow instructions
in all applicable instruction manuals. To
reduce the risk of battery explosion,
follow the instructions in this manual
and those published by the battery
manufacturer, as well as those of any
other equipment used in the
surrounding area.
An assistant should be present or close
enough to come to your aid in the
event of an emergency. Have a reliable
source of fresh water and soap nearby
in case battery acid contacts clothing,
skin or eyes.
Wear eye and clothing protection
when working around lead acid
batteries.
Avoid touching your eyes when
working around lead acid batteries.
If battery acid contacts your eye(s),
flush with cold running water for 10
minutes and seek immediate medical
attention. If acid contacts your skin or
clothing, wash immediately with soap
and water.
Never smoke or allow a spark or flame
in the vicinity of the battery.
Avoid dropping metal tools on the
battery posts because they may spark
or short-circuit the system or battery,
causing an explosion.
Installation
Installation of this unit may take
several hours. Before disabling your
main pump, have ready an appropriate
means of evacuating the sump.
1. Turn power to main pump off.
2. Pump must be installed using 1
1
/
4
”
or 1
1
/
2
” rigid PVC piping.
Pump Installation
The ESP25 can be installed as a back up
system with a separate dedicated
discharge line (Method 1), or tied into
an existing sump pump line (Method 2,
page 3).
Unplug the existing AC pump. Failure to
follow this warning could result in fatal
electrical shock.
1. Verify that the existing AC pump is
in good working order. If the AC
pump is questionable, it is typically
recommended that the unit be
replaced with a 1/3 or 1/2 HP pump.
2
Operating Instructions and Parts Manual
2. Remove any silt or accumulated
debris from the sump pit and
surrounding area.
Method 1 (Preferred)
1. Locate the ESP25 on a solid, level
surface in the sump pit. Do not
place the pump on a loose or sandy
surface. Small stones or sand may
damage the pump resulting in
potential pump failure.
2. This pump has a 1
1
/
2
” NPT discharge.
If a 1
1
/
4
” discharge pipe is desired, an
adapter (not included) will be
necessary. Smaller diameter piping
will reduce pump flow, rate and
performance.
3. Cut a 4’ section of 1
1
/
4
" or 1
1
/
2
"
diameter rigid PVC pipe. Cement
1
1
/
4
" pipe to a threaded fitting.
Cement 1
1
/
4
" pipe into pipe
coupling. Attach 1
1
/
4
" pipe section
to the ESP25 discharge adapter.
4. Screw on to pump discharge.
www.waynepumps.com
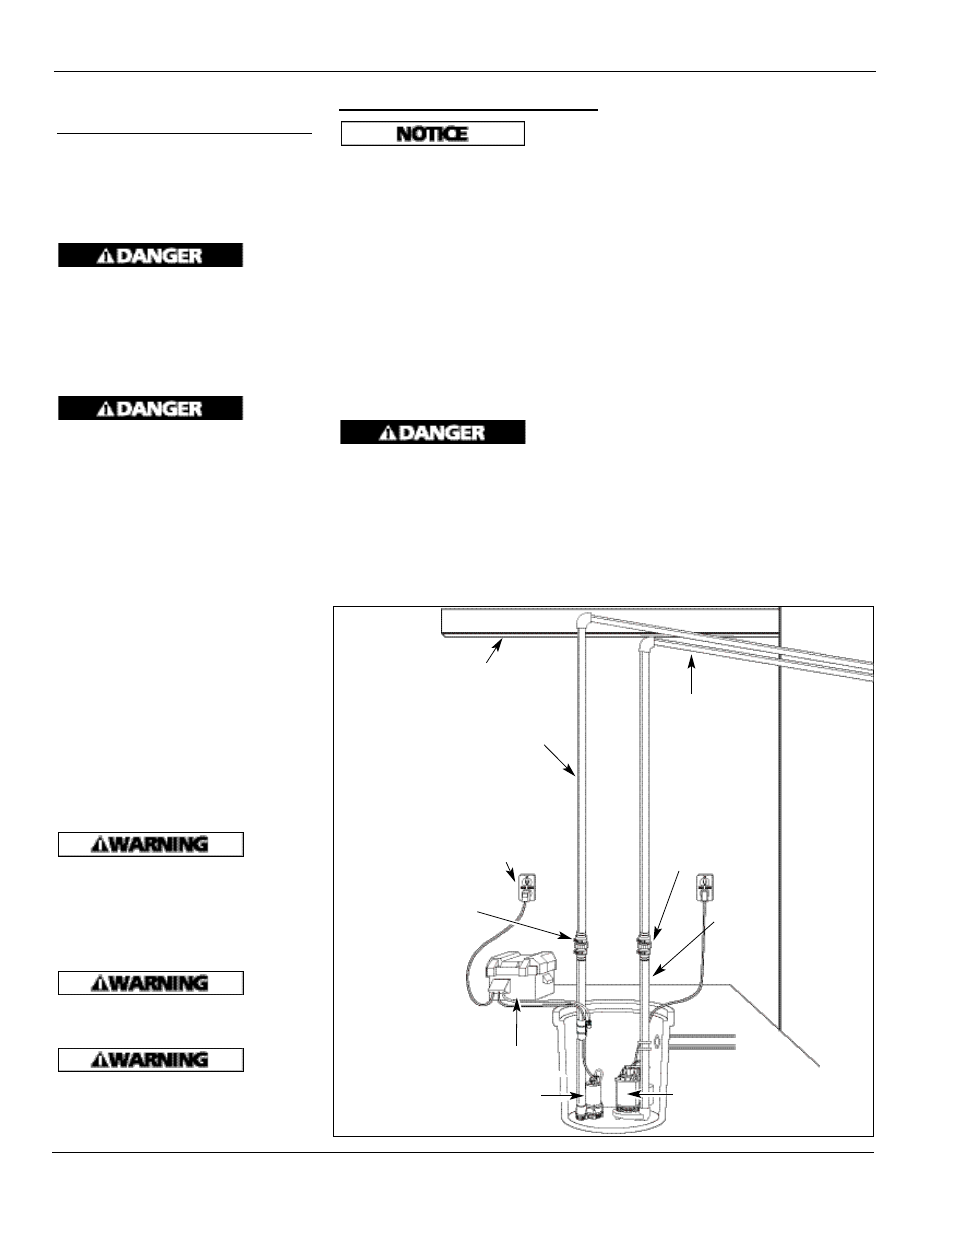
Figure 1 - Method 1
Floor
Joist
Charger
Ridgid
PVC
Pipe
Check Valve
(See Step 6)
1
1
/
4
” or
1
1
/
2
”
PVC Pipe
ESP25 Pump
Existing Pump
Check Valve
(See Step 6)
Slope
Pipe
Down
Battery Box