Dealer service 25 – Woods Equipment RD6000-2 User Manual
Page 27
Dealer Service 25
MAN0180 (Rev. 1/7/2005)
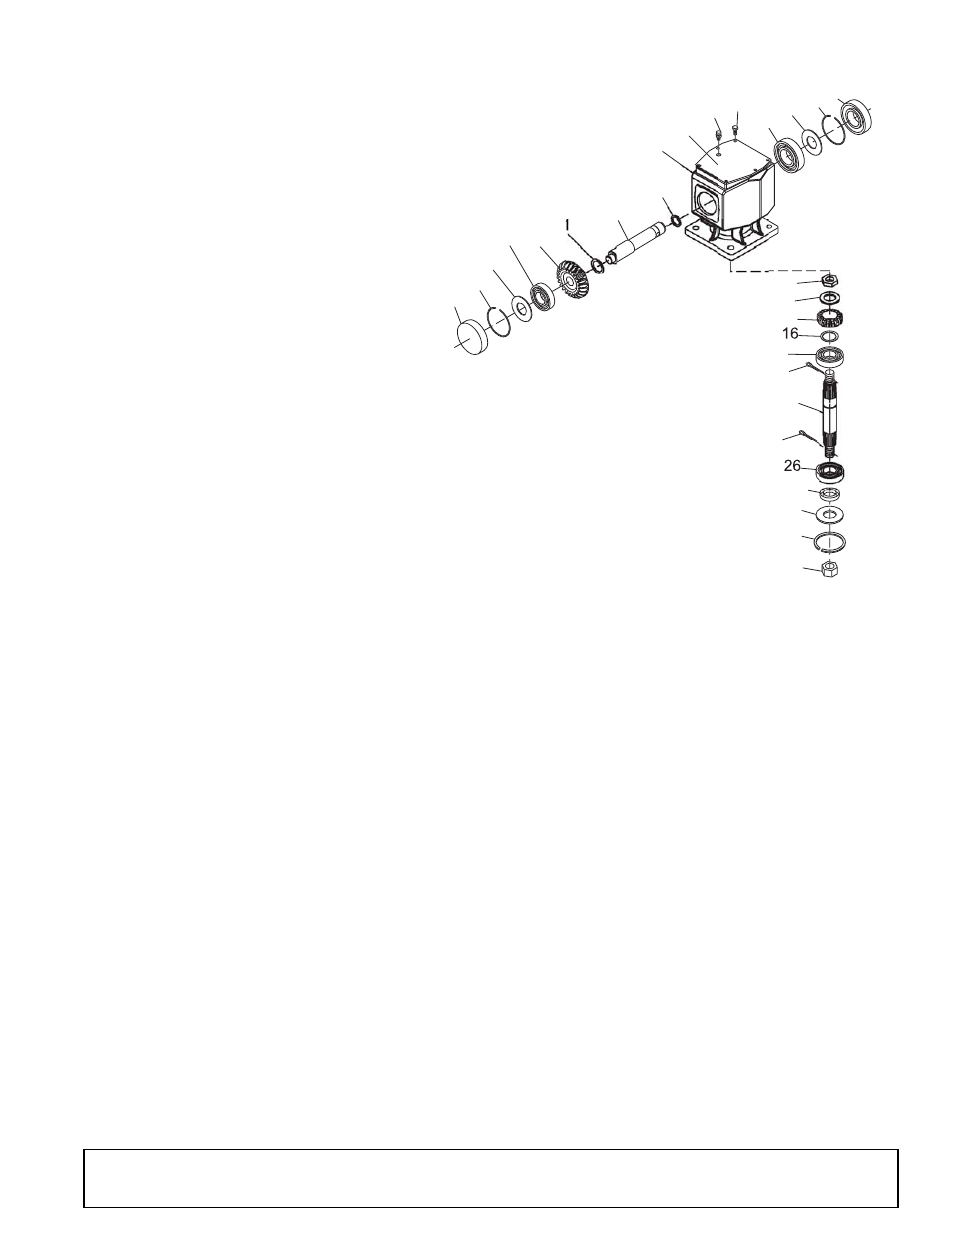
Figure 23. Gearbox Assembly
6. Press gear (5) onto output shaft (4) and secure
with washer (17), castle nut (14), and cotter pin (9).
7. Apply grease to lower seal lips (18) and press seal
over output shaft (4), using a tube of the correct
diameter. Be sure not to damage the seal lip. Press
in housing so that seal is recessed.
8. Insert protective washer (8) by hand. Install snap
ring (21) and position it together with dual lip seal
(18) by pressing it into position. Verify that snap
ring is seated correctly.
9. Press bearing (7) into the housing, using a round
tube of the correct diameter and a hand press.
Secure with shim (13) and snap ring (10).
10. Secure snap ring (11) on input shaft (3) if not
already secure.
11. Place gear (1) through top of housing and align
gear (1) and gear (5) so that gear teeth are a
match.
12. While holding gear (1) in place, slide input shaft (3)
through gear (1) and bearing (7). Align splines on
shaft (3) and gear (1).
13. Slide spacer (12) over input shaft (3) and press
bearing onto input shaft (3), using a round tube of
the correct diameter and a hand press.
14. Slide shim (13) over input shaft (3) and secure with
snap ring (10).
15. Check input shaft end float by moving the input
shaft (3) by hand. If end float is higher than 0.012”,
insert shim between input shaft (3) and rear
bearing (7). Repeat until end float is less than
0.012”. Check rotational torque by hand. The
torque should be less than 2.2 lbs.-inch.
16. Check that the gear backlash is between 0.006”
and 0.016”. You should not have to adjust the
backlash.
17. Press in input oil seal (19), using tube of correct
diameter. Be careful not to damage seal lip.
18. Press oil cap (20) on to cover the rear of housing,
using a tube of the correct diameter.
19. Check gearbox housing for leaks by plugging all
holes except one. Apply 4 psi compressed air and
immerse the gearbox in water to verify that there
are no leaks.
20. Remove gearbox from water and dry off with
compressed air. Add SAE 80W or 90W EP oil until
it runs out of side level hole. Tighten all plugs.
13 10
19
1
3
12
7
10
20
14
17
5
6
9
4
18
8
22
24
13
2
23
11
255
15
21
CD6090
27
1. Crown gear
2. Gearbox housing
3. Input shaft
4. Output shaft
5. Gear pinion
6. Bearing
7. Bearing
8. Protective flat washer
9. Cotter pin
10. Snap ring
11. Snap ring
12. Spacer
13. Shim kit
14. Castle nut
15. Castle nut M24 x 2
16. Shim kit
17. Flat washer
18. Oil seal (40 x 80 x 12)
19. Oil seal (35 x 72 x 10)
20. Cap
21. Snap ring
22. Top cover
23. Bolt M8 x 14mm
24. Breather level plug
25. Cotter pin
26. Bearing
27. Ball bearing