VIEWSONIC CD4220 User Manual
Page 11
ViewSonic CD4220
9
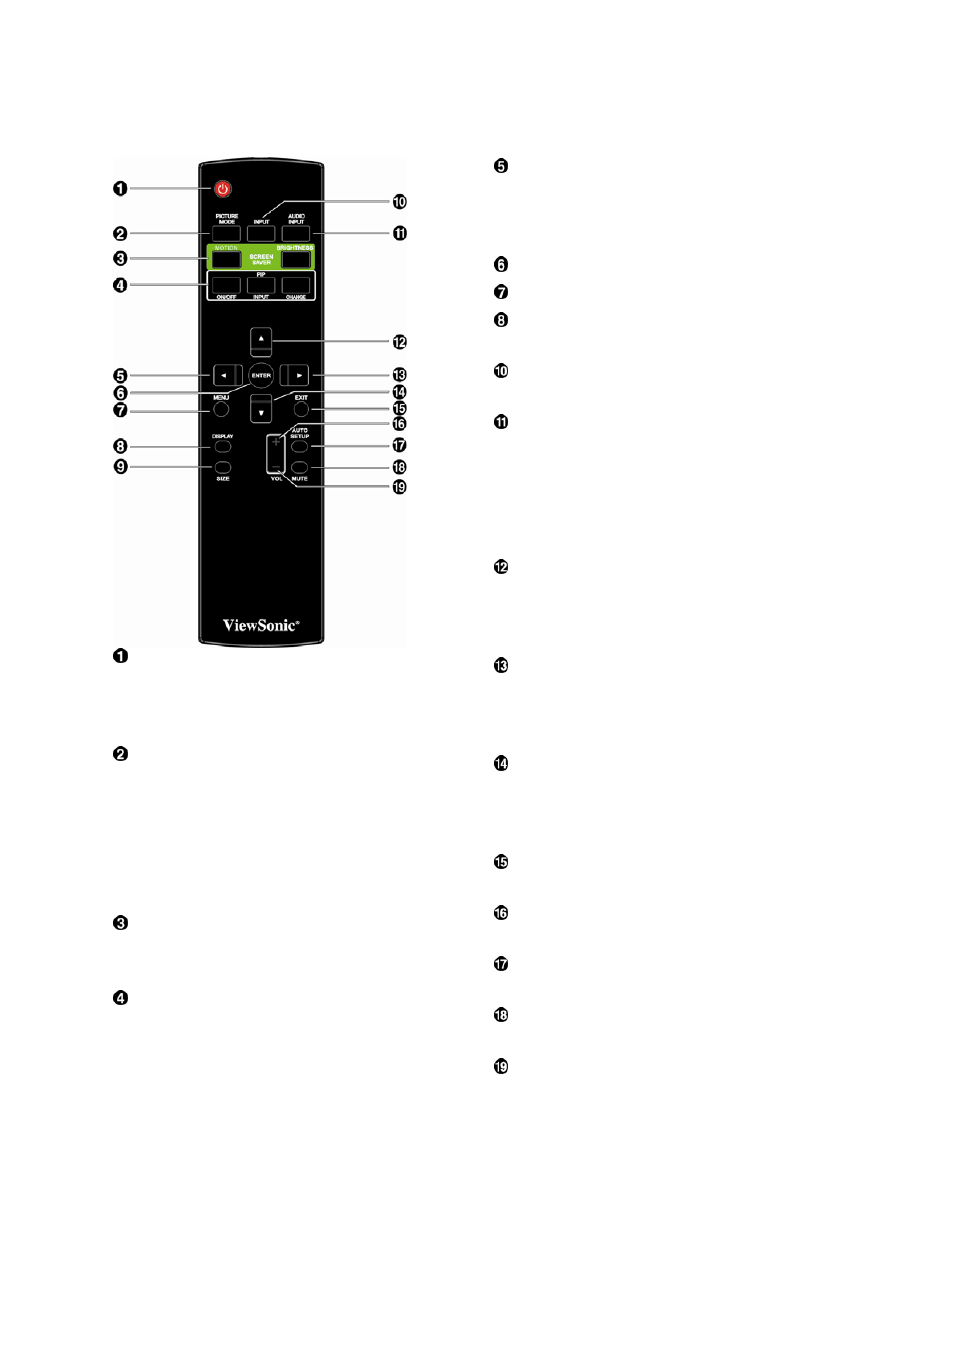
Wireless Remote Control
POWER button
Switches the power on/off.
* If LED Power Indicator on the monitor is not glowing,
then no controls will work.
PICTURE MODE button
Selects from picture mode, [STANDARD], [VIVID],
[CINEMA], [SOFT].
STANDARD: for images (Factory setting)
VIVID: for moving images
CINEMA: for movies.
SOFT: for text based images.
SCREEN SAVER button
MOTION: To switch the MOTION setting.
BRIGHTNESS button: To switch the brightness setting
PIP (Picture In Picture) button
ON/OFF button: PIP-ON/OFF.
INPUT button: Select the “picture in picture” input signal.
CHANGE button: Replaces to the main picture and sub
picture.
Note:
The “PIP” and “POP” modes do not function when the
screen size is “CUSTOM” or “REAL”.
LEFT button decrease
Acts as (
W) button to decrease the adjustment with OSD
menu. Small screen which adjusted “PIP” mode moves
left.
ENTER button
Acts as SET button with OSD menu.
MENU button
To switch the menu mode on/off.
DISPLAY button
To switch the information OSD on/off.
INPUT button
Selects from input signal, [RGB1],
[RGB2], [RGB3], [DVD/HD], [VIDEO] and [VIDEO].
AUDIO INPUT button
Press to change the audio
source for each video source. The audio source is
changed from [AUDIO1] to [AUDIO2], [AUDIO3] and
[HDMI] in order. Note that you cannot select the audio
source for [VIDEO] or [VIDEO]. [HDMI] is selectable
only when the video source is [RGB 1].
UP button
Acts as
S button to move the highlighted area up to
select the adjustment with OSD menu. Small screen
which adjusted “PIP” mode moves up.
RIGHT button increase
Acts as (
X) button to increase the adjustment with OSD
menu. Small screen which adjusted “PIP” mode moves
right.
DOWN button
Acts as
T button to move the highlighted area down to
select the adjustment with OSD menu. Small screen
which adjusted “PIP” mode moves down.
EXIT button
Turn to previous menu with OSD menu.
VOLUME + button increase
Increase the audio output level.
AUTO SETUP button
To enter the auto setup menu.
MUTE button
To switch the mute function on/off.
VOLUME - button decrease
Decrease the audio output level.