U-Line WH95 User Manual
Page 11
U-Line Door Reversal
10
WH95TP, BI95BTP, BCM95 & SP18
Reversing The Door
All units may be left- or right-hand opening.
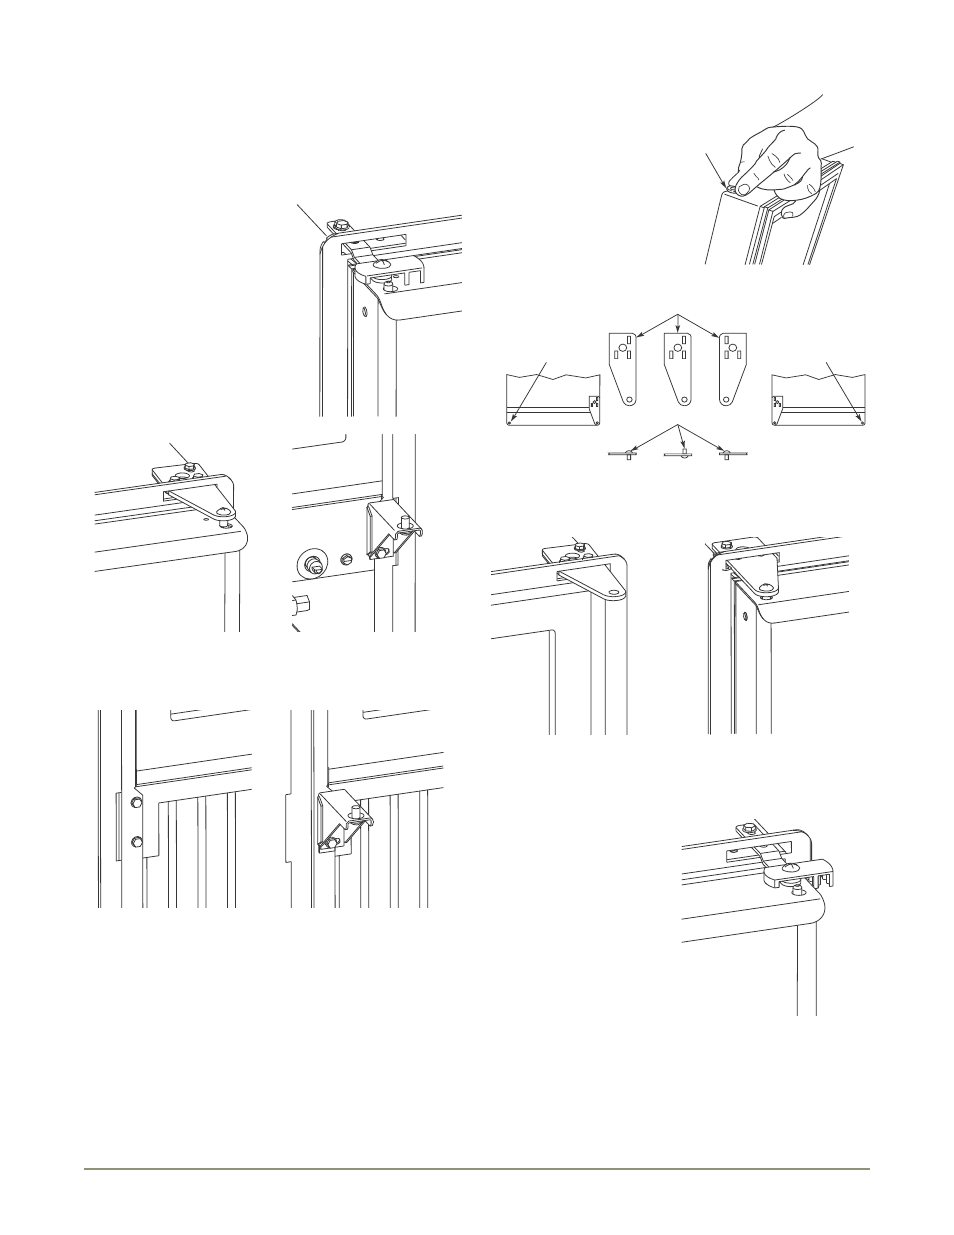
To reverse the door:
1. Remove travel pin from cabinet
(two screws). See Figure 9.
Slide assembly through flange
and set aside to be used later.
2. Remove top hinge from cabinet
(three screws). See Figure 10.
Hold door to keep it from
falling. Slide hinge through
flange.
3. Lift the door off the bottom
hinge.
4. Remove bottom hinge from
cabinet (two screws). See Figure 11. Remove screws on
opposite side of cabinet (Figure 12). Note that there may be a
nut behind one or both screws on either side.
5. Install hinge on opposite side, bottom of cabinet. See Figure 13.
Replace nut on back side where installed. Align hinge outer edge
with cabinet before tightening screws.
6. Relocate plastic spacer/
bushing on bottom of door to
opposite side, and place door
on bottom hinge pin. See
Figure 14. Clean out bushing
hole in door bottom with a
screwdriver if necessary.
7. Remove plastic travel pin
from door handle and
relocate on opposite side.
See Figure 15.
8. Remove pivot screw from top hinge, invert screw and reinstall
pivot screw in top hinge. See Figure 16.
9. Gently slide upper hinge through flange and fasten upper hinge
to unit (three screws). Partially tighten screws. See Figure 17.
10. Place door on lower hinge pin.
11. Align door pivot hole with
pivot hole in upper hinge and
insert pivot screw into upper
hinge and tighten securely.
See Figure 18.
12. Adjust door to assure proper
seal. Tighten upper and lower
hinge screws securely.
13. Gently slide travel pin
assembly through flange and
then fasten to unit. Make sure
travel pin in door engages the closer in the assembly, then
tighten screws on travel pin assembly securely.
9
10
11
12
13
Bushing
14
Travel
Pin Hole
Travel
Pin Hole
Hinge
Screw
Right Side
Door Swing
Right Side
Hinge
Invert
Screw
Invert
Hinge
Left Side
Door Swing
15
16
17
18