Sleep vol. auto dst time zone clock adj. on off – Timex T617 User Manual
Page 6
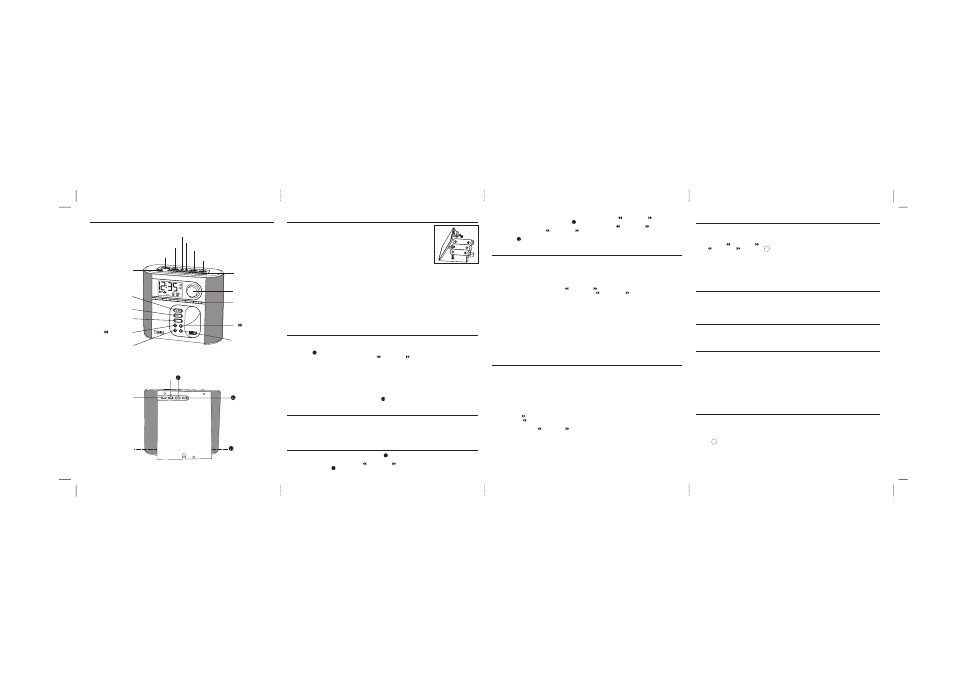
Battery Backup Installing
1. Gently turn the unit over and open the battery compartment door.
2. Install 3 AA (LR6) batteries. We recommend using an alkaline battery for
longest dependable life. The battery will maintain the correct time in the
event of power failure or accidental line cord disconnection, even though
the display is darkened.
3. Close the battery compartment door, turn the unit right side up, and plug
in the AC cord.
Battery Backup System
The backup batteries will maintain the time and alarm settings in the event of a temporary power interruption.
If the power goes out, the CD, nature sounds and radio will not play but the clock will continue to run. All
set alarms will default to buzzer alarm during power interruption.
If a power failure occurs and backup battery is not installed or dead, all settings will be lost. When the power
is restored the display will read "12:00" and continue to run.
Maintenance
1. Place the unit on a level surface away from direct sunlight or sources of excessive heat.
2. Protect your furniture when placing the unit on natural wood or wood with a lacquered finish. A cloth
or other protective material should be placed between the unit and the furniture.
3. Clean the casing with a soft cloth moistened only with mild soap and water. Stronger cleaning agents,
such as thinner or similar materials, are not recommended as they may damage the surface of the case.
4. If the unit is not to be used for a prolonged period, such as a month or longer, remove the batteries to
prevent possible corrosion. Should the battery compartment become corroded or dirty, clean the
compartment thoroughly and replace the battery.
Controls and Indicators
Installation and Maintenance
5
6
7
8
Daylight-Saving Time and Leap Year Adjustments
When the
ƿ Auto DST Switch (located on the back of the unit) is set to ON, this unit automatically advances
the time one hour at the start of Daylight-Saving Time (the first Sunday of April), and moves it back one
hour at the end of Daylight-Saving Time (the last Sunday of October). During Daylight Savings Time, "DST"
will be displayed on screen. If you live in an area that does not observe Daylight-Saving Time, turn the
ƿ Auto DST Switch to OFF. This unit will also automatically adjust the month/day display for leap year.
Listening to the Radio
Note: Extend FM wire antenna fully for best FM reception. Rotate radio as required for best AM reception.
1. Press the
ᕤ Radio Button. After ON is displayed briefly, Radio will appear on the display, along with
the current AM or FM radio frequency and an AM or FM indicator icon.
2. Press the
ᕡ AM/FM/Play Mode Button to select AM or FM radio band.
3. Press the
ᕢ Button or ƻ Button to tune the radio to the desired station. Press and hold the
ᕢ Button or ƻ Button to seek for the next clear station.
4. Adjust the volume by turning the Smart Knob.
5. To turn the radio off, press the
ᕧ Alarm Reset/Power Off Button.
Setting Station Presets
You can preset 12 stations (six AM, six FM) into memory.
1. Press and hold a radio preset button when the desired station is tuned in. A single beep indicates
the station has been entered. Repeat until you've stored all your stations.
Auto-Set and Manual Time and Date Settings
3. The date display will flash. Turn the Smart Knob or press the
ᕢ Button or ƻ Button until the
correct date is displayed, then press the
Clock Adjust Button.
4. The time display will flash. Turn the Smart Knob or press the
ᕢ Button or ƻ Button to set the
correct time. Hold the
ᕢ Button or ƻ Button to advance the time forward or backward more
quickly. Watch the PM Indicator icon at the right of the display to set the correct AM/ PM time.
5. Press the
Clock Adjust Button again or wait a few seconds to return to normal mode. Two beeps
will indicate that you have finished setting the calendar and time.
Setting and Operating the Alarms
Setting and Operating the Alarm
This unit has two separate alarms, Alarm 1 and Alarm 2. These operate independently, allowing you to set
different wake times and alarm sounds. You can chose to wake to the radio, the CD player, an alarm buzzer,
or a selection of four soothing nature sounds.
To set an alarm
1. Press the
ᕩ Alarm 1 Set Button until the current alarm time display flashes.
2. Turn the Smart Knob or press the
ᕢ Button or ƻ Button to set the desired time for Alarm 1. The
Alarm 1 icon will appear on the display. Hold the
ᕢ Button or ƻ Button to advance the time
forward or backward more quickly. Watch the PM Indicator icon at the right of the display to set the
correct AM/ PM alarm time.
3. Press the
ᕣ Sounds/Wake To Button to select the type of alarm sound you want to wake to: radio,
various nature sounds, buzzer or CD.
4. Press the
ᕩ Alarm 1 Set Button to confirm your alarm settings. Two beeps will indicate that you have
finished setting Alarm 1.
5. To set Alarm 2, follow the steps above using the
µ Alarm Set 2 Button.
6. When an alarm sounds, the associated alarm icon will flash. Press the
ᕧ Alarm Reset Button to stop
the current alarm sound. The alarm will be automatically set to turn on at the same time the following
day. If you do not want the alarm to turn on again the next day, press the
ᕨ Alarm On/Off Button once.
The alarm icons will disappear, indicating that no alarms are on. Press the
ᕨ Alarm On/Off Button
again to turn Alarm 1 back on, and again to turn Alarm 2 on, and once more to turn both Alarm 1 AND
Alarm 2 on.
7. Alarms sound for roughly an hour. During this time, pressing the
Ƹ Snooze/Dimmer Bar will silence
the alarm source for 9 minutes.
Listening to a CD
1. Press the
ᕦ Open Button located on the top left of the unit. The CD door will open forward.
2. Place a CD on the spindle with the label facing towards you.
3. Close the CD door.
4. Press the
ᕥ CD Play/Pause Button to begin CD play. After ON is displayed briefly, a CD icon will appear
on the display, along with the track number. The first track will play.
5. Adjust the volume by turning the Smart Knob.
6. To pause the CD, press the
ᕥ CD Play/Pause Button again. The CD icon will flash, indicating the
current CD track is in pause mode. To resume play, press the
ᕥ CD Play/Pause Button.
7. To stop CD play, press the
ᕧ Alarm Reset/Power Off Button.
CD Track Skip, Search and Repeat Functions
1. Press the
ƻ Button to skip to the next track.
2. Press the
ᕢ Button to skip to the beginning of the current track. Press again to go to the beginning
of the previous track.
3. Press and hold the
ᕢ Button or ƻ Button while a track is playing to search backwards or forwards
rapidly through the track.
4. To Repeat a track, press the
ᕡ AM/FM/Play Mode Button. Repeat will flash on the display, indicating
the current track will be repeated once. To repeat the entire CD, press the
ᕡ AM/FM/Play Mode Button
again. The Repeat message will stop flashing, indicating the entire CD will repeat once.
5. To play the CD tracks in random order, press the
ᕡ AM/FM/Play Mode Button again. Random will
appear in the display, indicating the CD tracks will play once through in random order.
6. To Repeat the random order play, press the
ᕡ AM/FM/Play Mode Button again. Repeat Random will
appear, indicating that the CD will play twice through in random order.
7. Pressing the
ᕡ AM/FM/Play Mode Button again (the fifth button press) will cancel the repeat function.
Listening to Nature Sounds
This unit plays four different soothing sounds of nature.
1. Press the
ᕣ Sounds Button. After ON is displayed briefly, Nature will appear on the display, along
with the number of the current nature sound. To change sounds, press the
ᕣ Sounds Button.
2. To turn the Nature Sounds off, press the
ᕧ Alarm Reset/Power Off Button.
Listening to MP3/Line in Source
1. Connect a line-level audio source such as an MP3 player, &c, to the MP3 Line In Jack located on
the rear right side of the unit using the cable provided. Press the
Ƽ MP3/Line In button to turn on
the unit. Make sure to adjust the volume level on both this unit and the line-level unit to avoid distorted
sound or damage to speakers.
Sleep Operation
1. While listening to any sound source, press the
¸ Sleep Button to enter sleep mode. The unit will
automatically turn off after the selected time.
2. You can adjust the sleep timer from 90, 60, 30 or 15 minutes by pressing the
¸ Sleep Button again.
Pressing the Sleep Button while sleep is set to 15 minutes will turn off the unit.
3. When the display changes back to show the real time, pressing the
¸ Sleep Button once will show
the sleep time remaining. Pressing it again will change sleep time to the next lowest increment.
4. You can also adjust the sleeping volume without affecting the alarm volume by pressing the
ƾ Sleep
Volume Button located on the back of the unit.
5. To stop listening at any time, press the
ᕧ Alarm Reset/Power Off Button.
Manual Time and Date Setting
1. To change the time and date settings, press the
Clock Adjust Button located on the back of the
unit. The year display will flash.
2. Turn the Smart Knob or press the
ᕢ Button or ƻ Button to select the correct year. When it is
displayed, press the
Clock Adjust Button.
Quick Nap
1. While listening to any sound source, press the
¹ Quick Nap Button to enter Nap mode. The alarm
buzzer will automatically come on after the selected time.
2. You can adjust the nap timer from 90, 60, 30 or 15 minutes by pressing the
¹ Quick Nap Button
again. Pressing the
¹ Quick Nap Button while nap is set to 15 minutes will turn off the nap function.
Headphones
To listen to the unit privately, insert headphone cable into the headphone jack located to the rear left
side of the unit. The headphone jack can also serve as line-out jack.
Snooze/Dimmer Operation
1. Press the
Ƹ Snooze/Dimmer Bar after the alarm sounds. The alarm will go off and will come on
again in approx. 9 minutes. You may repeat this cycle several times during the 1 hour alarm cycle.
2. During normal operation, press the
Ƹ Snooze/Dimmer Bar to control the brightness of the LCD
display.
Auto Daylight Savings Time Switch
ƿ
This model is equipped with the Auto-Set feature, meaning that the time and date have been programmed
at the factory and will already be set when you first plug the model in. Auto-Set is programmed for Eastern
Standard Time. To change your time zone setting, perform steps below.
1. Press the
Time Zone Button,located on the back of the unit. The current Auto-Set Time Zone will
flash.
Turn the Smart Knob or press the
ᕢ Button or ƻ Button to select your time zone. The
display will show each zone's current time setting. There are seven zones:
Auto-Set Time Zones
ZO1: Atlantic Standard Time
ZO2: Eastern Standard Time
ZO3: Central Standard Time
ZO4: Mountain Standard Time
ZO5: Pacific Standard Time
ZO6: Alaska Standard Time
ZO7: Hawaii Standard Time
3. Once you've selected your time zone, press the
Time Zone Button to confirm.
AM/FM/ Play
ᕡ
Mode Button
Reverse
ᕢ
Button
Sounds/
ᕣ
Wake To Button
Radio Button
ᕤ
CD Play/
ᕥ
Pause Button
Open CD
ᕦ
Door Button
Alarm Reset/
ᕧ
Power Off Button
Alarm On/Off Button
ᕨ
µ Alarm 2 Set Button
Alarm 1 Set Button
ᕩ
¸ Sleep Button
ƺ Radio Preset
Buttons
ƹ Smart Knob
Ƽ MP3 Line In
Select Button
ƻ Forward
Button
Ƹ Snooze/
Dimmer Bar
¹ Quick Nap Button
MP3 Line In Jack
ƽ
Headphone Jack
Sleep Volume
ƾ
Button
Time Zone Button
Clock Adjust
Button
SLEEP VOL.
AUTO DST
TIME ZONE
CLOCK ADJ.
ON
OFF
ᕃ
ᕄ
ᕅ
WAKE-TO
LINE-IN
MP3
SOUNDS
RADIO
CD
1
2
3
4
5
6
AM/FM
PLAY MODE
T617 I/B_back Print color : Black May 26, 05.