Features & setup, Bridge operating mode & dip switch settings – QSC Audio ISA 500T User Manual
Page 12
FEATURES & SETUP-
BRIDGE OPERATING MODE & DIP SWITCH SETTINGS
BRIDGE MODE OPERATION-
Note that speaker connection for bridge mono mode is
different than other modes. See section on Connections:
Outputs for proper bridge mode output connections.
SETTING THE DIP SWITCHES FOR BRIDGE MODE-
Bridge mode combines both output channels into one output.
This mode is for driving a single, high-power-rated load with
twice the “normal” voltage swing. This results in about 4 times
the peak power and about three times the sustained power of a
single channel. It is also common to call this bridge
mono mode.
When to use BRIDGE mode: Use BRIDGE mode when you
need to deliver the power of two channels to a single 8 or 4 ohm
load, such as a subwoofer. Do not use less than 4 ohm loads in
bridge mode. Refer to the CONNECTIONS section of this manual
for details.
Constant voltage drivers rated at 140 volts or 200 volts can be
accommodated by bridging the high impedance output terminals
of the ISA 300T, ISA 500T or ISA 800T. Refer to the CONNEC-
TIONS section of this manual for details
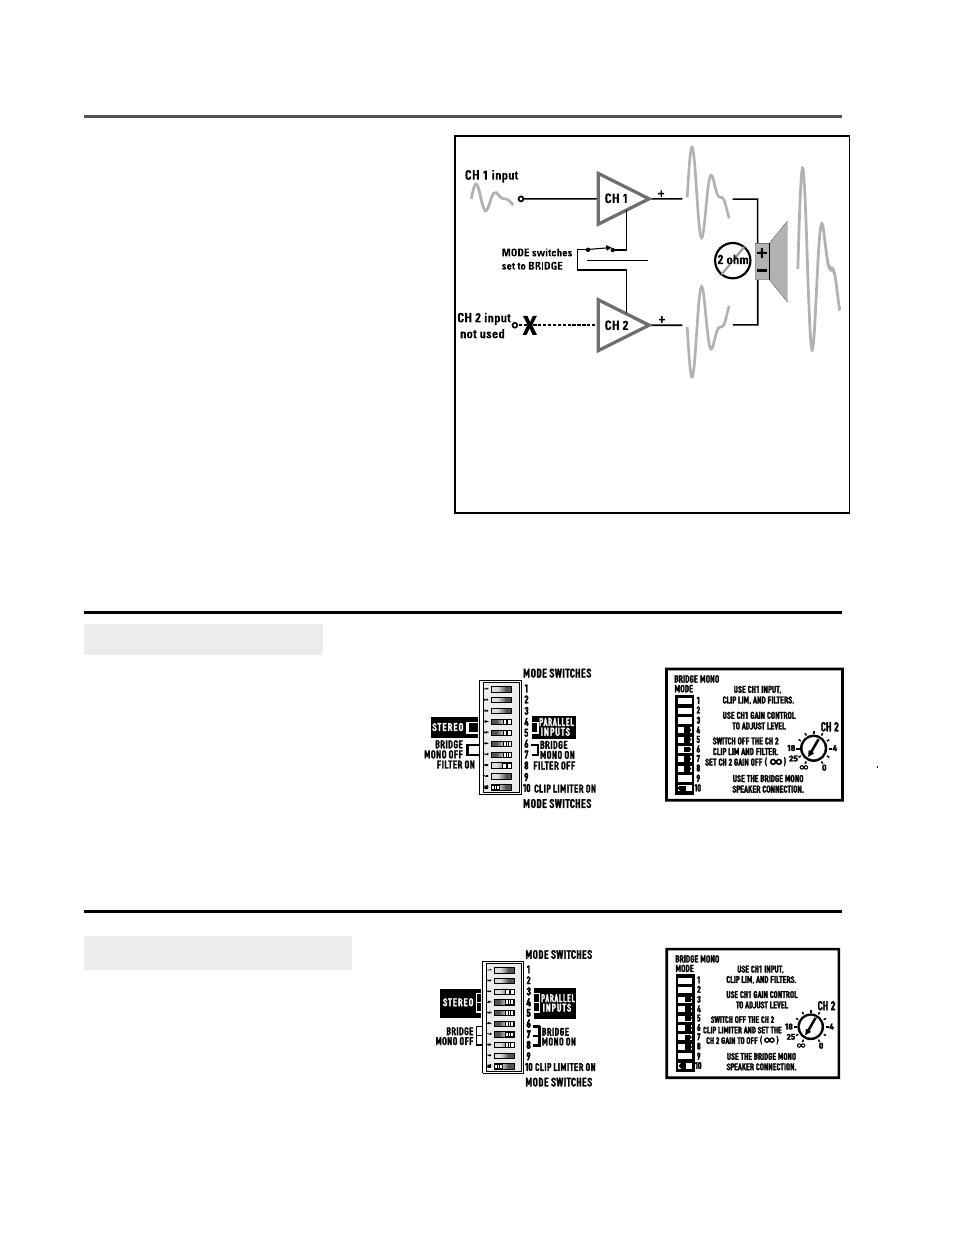
How to use BRIDGE mode:
1- Set the DIP switches for bridge mode (see below).
2- Connect the one input signal to CH1’s input (XLR or terminal-
block).
3- Connect the one speaker load to the bridge output terminals
4- Use channel 1’s gain control, clip limiter and filter.
ISA 300T, ISA 500T and ISA 800T models: switches #3, 4, 5, 6, 7 and #8
must all be set to the right-side position. Switch #10 should be set to its
left-side position. See chart, above.
ISA 280, ISA 450 and ISA 750 models: switches #4, 5, 6, 7 and #8 must all
be set to the right-side position. Switch #10 should be set to its left-side
position. See chart, above.
ISA 280, ISA 450 and ISA 750:
1- Switch #4, 5, 6 and #7 must all be switched to the
right.
2- Switch #8 must be switched to the right to disable
channel 2’s low-frequency filter.
3- Switch #10 should be switched to the left so that
channel 2’s clip limiter is off. Channel 1’s clip limiter
controls both channels in bridge mode.
4- Set switch #1, 2 and #3 as required. Channel 1’s
settings determine the bridge mode clip limiting and low-
frequency filtering.
ISA 300T, ISA 500T and ISA 800T:
1- Switch #3, 4, 5, 6, 7 and #8 must all be switched to
the right to operate in bridge mode.
2- Switch #10 should be switched to the left so that
channel 2’s clip limiter is off. Channel 1’s clip limiter
controls both channels in bridge mode.
12