Orion SKYVIEW PRO 7817 User Manual
Page 5
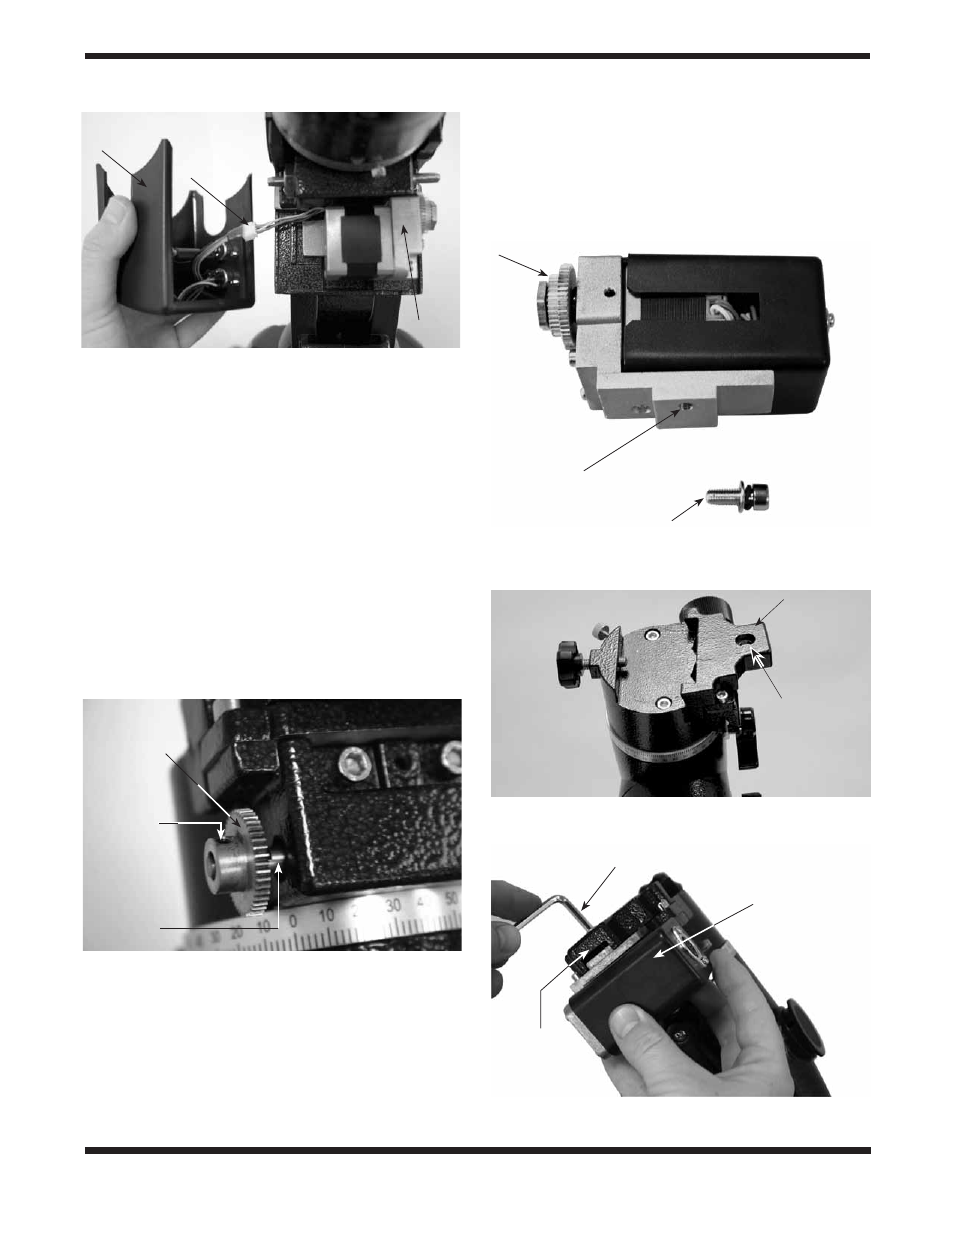
5
attaching the Dec. Goto Motor
Before attaching the Dec. GoTo motor drive, the telescope
tube must be removed from the equatorial mount.
1. Remove the Dec. slow-motion control knob from the Dec.
worm gear shaft. The Slow-motion knob will not be usable
once the SkyView Pro GoTo system has been installed.
All slow-motion adjustments will be made using the GoTo
hand controller.
2. Slide the geared end of the remaining small brass gear
onto the Dec. worm gear shaft of your SkyView Pro mount
so it resembles Figure 8. Rotate the small brass gear so
that one of the setscrews will press against the flat part of
the Dec. worm gear shaft. Secure the small brass gear
by tightening the setscrews with the included 2mm hex
key, but do not overtighten. You may have to make small
adjustments to the gear’s position in the following step to
ensure proper gear engagement.
3. The Dec. GoTo motor assembly is identified by its black,
rectangular body (Figure 9). It is attached to the equato-
rial mount using the Dec. GoTo motor attachment screw
that goes through the hole in the flange at the top of the
equatorial mount (Figure 10). The motor assembly should
attached so that it is oriented as shown in Figure 11. Hold
the motor assembly so that its threaded hole lines up with
the hole in the top of the mount. Place the lock washer and
then a flat washer onto the Dec. GoTo motor attachment
screw. Use the 4mm hex key to thread the attachment
screw into the motor assembly attachment hole until it is
secure, but do not overtighten.
Figure 8. Correct orientation of brass gear for Dec. axis
Brass gear
Setscrew
Dec. worm
gear shaft
Figure 9. The Dec. GoTo motor assembly
Figure 10. The location of the flange on the mount
Flange
Hole
Figure 11. Attaching the Dec. GoTo motor
Dec. GoTo motor
4mm hex key
Flange
Dec. GoTo motor attachment screw
Attachment hole
Smaller gear
Figure 7. R.A. GoTo motor wiring
R.A.
GoTo
motor
R.A. GoTo
motor cover
Connected
4-pin
rectangular
connectors