Orion ED EQ User Manual
Page 11
11
the polar axis finder from the mount. Look through the polar
axis finder at a star (at night) or distant object at least 1/4 mile
away (during daylight). Use the eyepiece focus ring to bring
the reticle into sharp focus. Now, loosen the focus lock ring
(Figure 11a) and thread the entire objective end of the finder
inwards or outwards until images appear sharp. Re-tighten
the focus lock ring. Once the polar axis finder’s objective lens
is focused, it should not need to be adjusted again.
use of the right ascension and Declination Slow-
Motion Control Knobs
The right ascension (R.A.) and declination (Dec.) slow-motion
control knobs allow fine adjustment of the telescope’s posi-
tion to center objects within the field of view. Before you can
use the knobs, you must manually “slew” the mount to point
the telescope in the vicinity of the desired target. Do this
by loosening the R.A. and Dec. lock levers and moving the
telescope about the mount’s right ascension and declination
axes. Once the telescope is pointed close to the object to be
viewed, retighten both lock levers.
Note: If you have an optional motor drive attached, you
will need to loosen the manual clutch on the R.A. (and
Dec. for dual-axis drives) worm gear shaft before using
the slow-motion control knob.
The object should now be visible somewhere in the tele-
scope’s finder scope. If it isn’t, use the slow-motion knobs to
scan the surrounding area of sky. When the object is visible in
the finder scope, use the slow-motion knobs to center it. Now,
look in the telescope’s eyepiece. If the finder scope is prop-
erly aligned, the object should be visible somewhere in the
field of view. Once the object is visible in the eyepiece, use
the slow-motion knobs to center it in the field of view.
tracking Celestial objects
When you observe a celestial object through the telescope,
you’ll see it drift slowly across the field of view. To keep it in
the field, if your equatorial mount is polar aligned, just turn
the R.A. slow-motion control knob clockwise. The Dec. slow-
motion control knob is not needed for tracking. Objects will
appear to move faster at higher magnifications, because the
field of view is narrower.
optional Motor Drives for automatic tracking
An optional DC motor drive can be mounted on the R.A.
axis of the equatorial mount to provide hands-free tracking.
Objects will then remain stationary in the field of view without
any manual adjustment of the right ascension slow-motion
control knob.
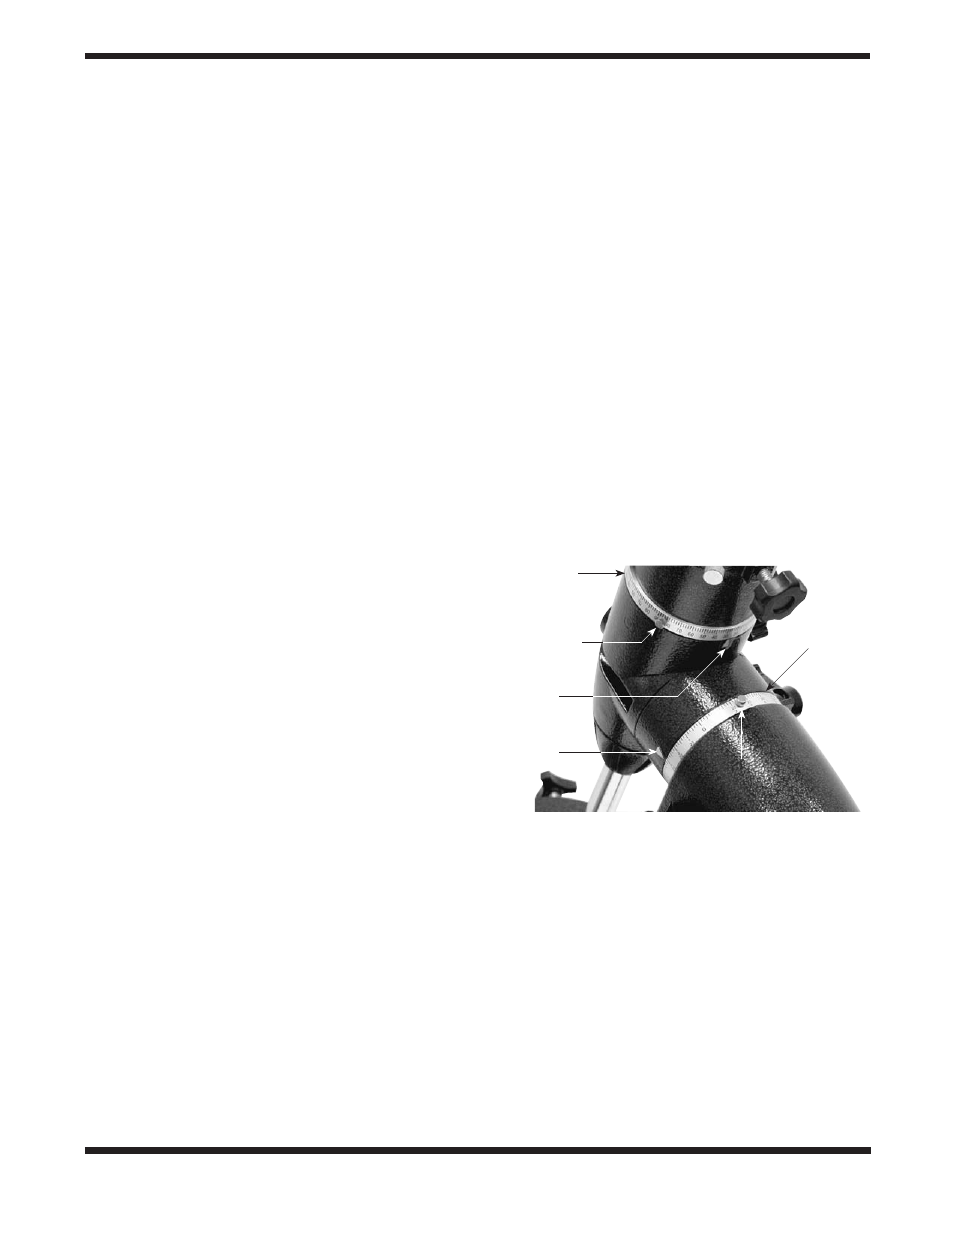
understanding the Setting Circles
The setting circles on an equatorial mount enable you to
locate celestial objects by their “celestial coordinates”. Every
object resides in a specific location on the “celestial sphere”.
That location is denoted by two numbers: its right ascension
(R.A.) and declination (Dec.). In the same way, every loca-
tion on Earth can be described by its longitude and latitude.
Right ascension is similar to longitude on Earth, and declina-
tion is similar to latitude. The R.A. and Dec. values for celestial
objects can be found in any star atlas or star catalog.
The R.A. setting circle is scaled in hours, from 1 through 24,
with small marks in between representing 10-minute incre-
ments (there are 60 minutes in 1 hour of right ascension).
The lower set of numbers apply to viewing in the Northern
Hemisphere, while the numbers above them apply to viewing
in the Southern Hemisphere. The location of the right ascen-
sion coordinate indicator arrow is shown in Figure 13.
The Dec. setting circle is scaled in degrees, with each mark
representing 2° increments. Values of declination coordinates
range from +90° to -90°. The 0° mark indicates the celestial
equator. When the telescope is pointed north of the celestial
equator, values of the declination setting circle are positive;
when the telescope is pointed south of the celestial equator,
values of the declination setting circle are negative.
So, the coordinates for the Orion Nebula listed in a star atlas
will look like this:
R.A. 5h 35.4m Dec. - 5° 27'
That’s 5 hours and 35.4 minutes in right ascension, and -5
degrees and 27 arc-minutes in declination (there are 60 arc-
minutes in 1 degree of declination).
Before you can use the setting circles to locate objects, the
mount must be accurately polar aligned, and the setting cir-
cles must be calibrated.
Calibrating the Declination Setting Circle
1. Loosen the Dec. lock lever and position the telescope as
accurately as possible in declination so it is parallel to the
R.A. axis as shown in Figure 1. Re-tighten the lock lever.
2. Loosen one of the thumb screws on the Dec. setting circle,
this will allow the setting circle to rotate freely. Rotate the
Dec. setting circle until the pointer reads exactly 90°. Re-
tighten the setting circle thumb screw.
Figure 13.
The R.A. and Dec. setting circles.
Dec. setting
circle
Dec. setting
circle
thumbscrew
(2)
Dec.
indicator
arrow
R.A.
indicator
arrow
R.A. setting circle
thumbscrew (2)
R.A.
setting
circle