Orion PARSEC 8300M User Manual
Page 15
28
29
3. Select
Orion Parsec High Quality
in the
Select Camera pull down
menu (Figure 24).
4. Click
OK and the image should
appear in color. You can make
several adjustments to the
Color
Balance if needed (see “Color
Balance”).
5.3. Stacking –
Combining Images
Combining individual deep sky images
enhances the detail in the deep sky
object by improving the signal to noise
ratio.
We will demonstrate stacking LRGB
images; however, a similar process
works for monochrome, one-shot color,
and RGB image sets.
1. Select the
Process menu Stack
command (Figure 25)
2. On the
Select tab, turn on
Classify by OBJECT and FILTER.
3. Click the
FILTER button to set
up the filter mapping. This will
determine what filters are mapped
into which LRGB color channels.
To change a row,
click once on
the
row, then click once on the
Filter Color item, and enter a new
value. This will make sure that your
filters are automatically assigned
to the correct group (Figure 26).
4. If your images have not yet been
calibrated, turn on
Mark added
images as Auto Calibrate. Each
image will automatically be calibrated as it is needed, using the settings from
the
Set Calibration command.
5. Click the
drop list on the multi-function button and select Add Folder.
Browse to a folder on disk where your images are located. This folder may
contain images of several different targets, as long as the OBJECT FITS
keyword is set in each image (during imaging, this is automatically obtained
from the Observatory Control window if a telescope is connected).
6. The
Tree View on the left side of
the Stack dialog will now show all
the image files you have selected,
arranged into groups according to
their FITS header. You can open
the groups to view the files by
clicking on the + sign. If you would
like to view an individual file,
right-
click it and select Display Image.
Alternatively, using the right-click
menu select
Auto Display, and
any image you click on will be
automatically displayed.
7. If necessary, you can move images
or entire groups by
dragging
them. You can set properties for
groups or individual files using the
right-click menu.
8. Select the
Quality tab (Figure
27). If you would like to eliminate
images with out-of-round stars
caused by bad tracking, turn on
the
Roundness check box. The
Threshold should be set to limit
how far out of round the star can
be; for example, 0.1 will throw out
any image with stars that are more
than 10% out of round. Click the
Measure All button, and any bad
images will automatically receive
an X in the enable box. You can
manually override this decision if
you like, by changing the enable
box.
9. Select the
Align tab (Figure 28).
If your images have been solved
using PinPoint Astrometry you may
wish to use the
Astrometric align
mode, which is extremely accurate.
Alternatively, the
Auto Star
Matching mode is fully automatic
and quite accurate. There are a
variety of other alignment modes
available, including manual
alignment.
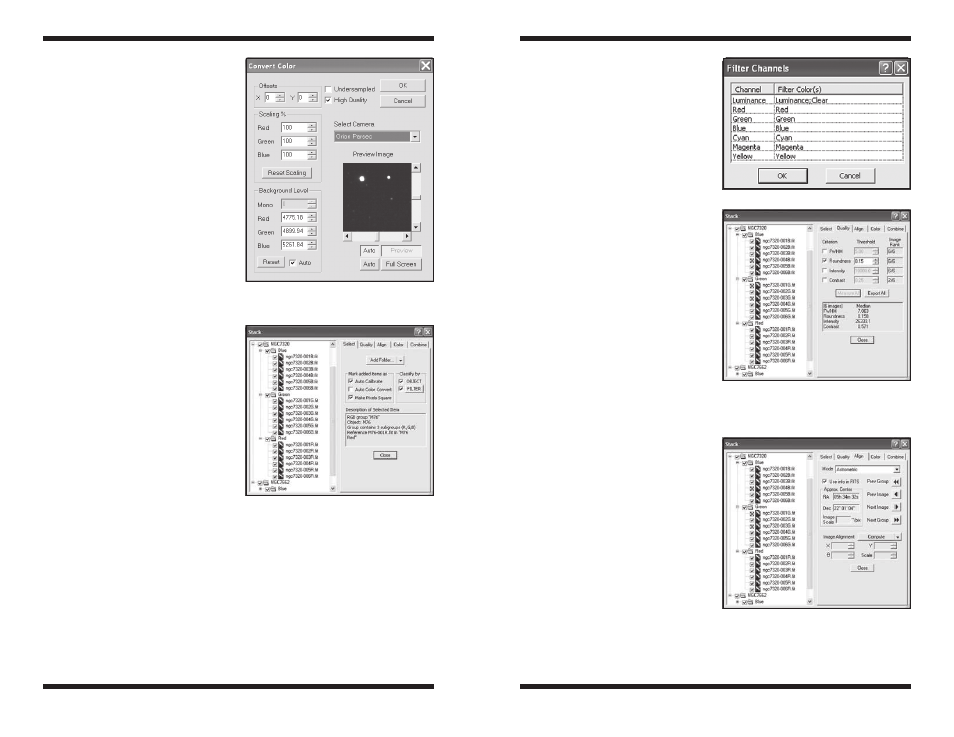
Figure 24.
The
Convert Color window
converts raw images taken from the Parsec
8300C to color.
Figure 25.
The
Stack window is a
powerful feature which automatically
calibrates, sorts LRGB filtered images, and
combines your astroimages.
Figure 27.
The
Stack window
can measure the image quality and
automatically reject the ones which are not
good enough to combine.
Figure 26.
Filter Channels.
Figure 28.
The
Align tab can
automatically align (register) your
images by using
Auto Star Matching or
Astrometric functions.