Connecting the av receiver —continued, Video connections, Audio connections – Onkyo TX-SR502 User Manual
Page 25: D-vhs vcr connect one or the other
25
Connecting the AV Receiver
—Continued
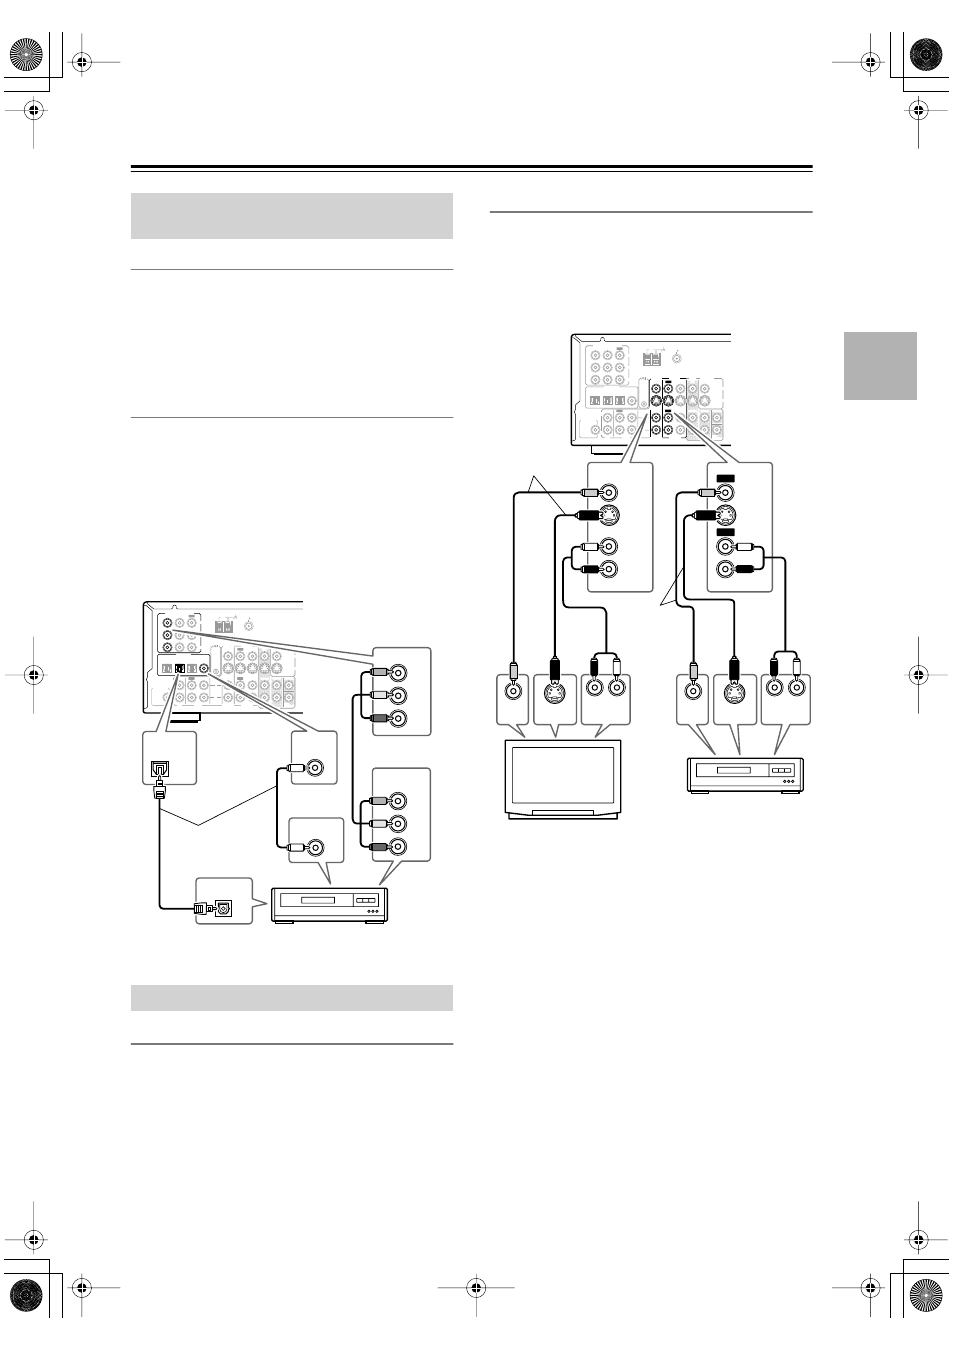
Video Connections
Use a component video cable to connect the AV
Receiver’s COMPONENT VIDEO 1/2/3 IN to the com-
ponent video output on your D-VHS VCR, as shown.
Your TV must also be connected via component video.
A component video connection provides better picture
quality than an S-Video connection.
Audio Connections
• Use an optical digital audio cable to connect the AV
Receiver’s DIGITAL IN OPTICAL 2 to the optical
output on your D-VHS VCR, as shown.
OR
• Use a coaxial digital audio cable to connect the AV
Receiver’s DIGITAL IN COAXIAL to the coaxial
output on your D-VHS VCR, as shown.
You might need to change the digital input assignments
(see page 31).
Video Connections
• Use an S-Video cable to connect the AV Receiver’s
S VIDEO VIDEO 1 OUT to an S-Video input on your
recording VCR.
OR
• Use a composite video cable to connect the AV
Receiver’s VIDEO VIDEO 1 OUT to a composite
video input on your recording VCR.
Audio Connections
• Use an analog audio cable to connect the AV
Receiver’s AUDIO VIDEO 1 L/R OUTs to the audio
inputs on your recording VCR.
This illustration shows how to connect a VCR for record-
ing from a TV or another VCR.
Notes:
• The AV Receiver must be turned on for recording.
Recording is not possible while it’s in Standby mode.
• If you want to record directly from your TV or play-
back VCR without going through the AV Receiver,
connect your TV/VCR’s audio and video outputs
directly to your recording VCR’s AV inputs. See the
manuals supplied with your TV and VCR for details.
• Video signals connected to composite video inputs
can only be recorded via composite video outputs. If
your TV and video playback components are con-
nected via composite video, you must connect your
recording VCR via composite video as well. Similarly,
video signals connected to S-Video inputs can only be
recorded via S-Video outputs. If your TV and video
playback components are connected via S-Video, you
must connect your recording VCR via S-Video as
well.
Connecting a D-VHS VCR for
Playback
Connecting a VCR for Recording
L
R
ANTENNA
FM
75
AM
OPTICAL
COAXIAL
1
2
3
DIGITAL IN
REMOTE
CONTROL
IN
IN
IN
IN
IN
IN
IN
IN
FRONT
SURR
CENTER
SUB
WOOFER
OUT
OUT
OUT
VIDEO 2
VIDEO 1
DVD
MONITOR
OUT
VIDEO
S VIDEO
DVD
TAPE
CD
L
R
VIDEO 2
VIDEO 1
SUBWOOFER
PRE OUT
VIDEO 1
/ 2 / 3IN
DVD IN
COMPONENT VIDEO
Y
P
B
P
R
OUT
L
R
OPTICAL
2
VIDEO 1
/ 2 / 3
IN
Y
P
B
P
R
COAXIAL
Y
P
B
P
R
DIGITAL OUT
OPTICAL
DIGITAL OUT
COAXIAL
COMPONENT
VIDEO OUT
D-VHS VCR
Connect one
or the other
L
R
ANTENNA
FM
75
AM
OPTICAL
COAXIAL
1
2
3
DIGITAL IN
REMOTE
CONTROL
IN
IN
IN
IN
IN
IN
IN
IN
FRONT
SURR
CENTER
SUB
WOOFER
OUT
OUT
OUT
VIDEO 2
VIDEO 1
DVD
MONITOR
OUT
VIDEO
S VIDEO
DVD
TAPE
CD
L
R
VIDEO 2
VIDEO 1
SUBWOOFER
PRE OUT
VIDEO 1
/ 2 / 3IN DVD IN
COMPONENT VIDEO
Y
P
B
P
R
OUT
L
R
VIDEO 1
VIDEO
S VIDEO
VIDEO
S VIDEO
IN
IN
VIDEO 2
VIDEO 1
VIDEO 2
L
R
L
R
OUT
OUT
S VIDEO
OUT
VIDEO
OUT
AUDIO
OUTPUT
S VIDEO
IN
VIDEO
IN
AUDIO
INPUT
TV or
playback VCR
VCR
Connect
one or the
other
Connect one
or the other