Important safeguards, Save these instructions, Save and read these instructions – Oster 6230 User Manual
Page 2: Safety, Welcome, Features of your toaster oven, Learning about your toaster oven
English-1
English-2
IMPORTANT SAFEGUARDS
SAVE AND READ THESE INSTRUCTIONS
When using electrical appliances, basic safety precautions should always be followed
including the following:
• READ ALL INSTRUCTIONS, PRODUCT LABELS AND WARNINGS
BEFORE USING THE TOASTER OVEN.
• Do not touch hot surfaces. Always use oven mitts when handling hot materials and allow
metal parts to cool before cleaning. Allow the unit to cool thoroughly before putting in
or taking off parts. Always use the oven handles when moving the unit.
• When the unit is not in use and before cleaning, unplug the toaster oven from the
wall outlet. Note: Make sure the oven is turned off before unplugging.
• To protect against risk of electrical shock, do not immerse the appliance in water or any other liquids.
• Close supervision is always necessary when this or any appliance is used near children.
This appliance is not for use by children.
• Do not operate this or any appliance with a frayed or damaged cord or plug
or after the appliance malfunctions or is dropped or has been damaged in any manner.
• Do not use attachments not recommended by the manufacturer; they may cause fire,
electric shock or personal injury.
• Do not use outdoors or for commercial purposes.
• Do not use this appliance for other than its intended use.
• Do not let the cord dangle over the edge of a tabletop or countertop
or to touch hot surfaces.
• Do not place the appliance near a hot gas or electric burner or in a heated oven.
• Extreme caution should be used when using containers constructed of other than metal
or glass.
• A fire may occur if the toaster oven is covered or touching flammable materials, including
curtains, draperies, walls, etc., when in operation. Do not store any items on top of the
appliance when in operation.
• When using toaster oven, pull the unit out a minimum of 6 inches away from the wall
or other cords.
Safety
• Do not store any materials, other than manufacturer’s recommended accessories, in this
unit when not in use.
• Do not place any flammable materials in oven, such as paper, cardboard,
plastic or any materials that may catch fire or melt.
• Do not cover the oven tray with metal foil. This will cause overheating of the appliance.
• Oversize foods or metal utensils must not be inserted in the appliance as they may create
a fire or risk of electrical shock.
• Do not clean with metal scouring pads. Pieces can break off the pad and touch electrical
parts involving a risk of electrical shock.
• When broiling, use extreme caution when removing tray or disposing of hot grease.
• To turn this appliance off, return all controls to the “OFF” position.
T
HIS
U
NIT
I
S FOR
H
OUSEHOLD
U
SE
O
NLY
For Products Purchased in the United States and Canada Only
To reduce the risk of electrical shock, this appliance has a polarized plug (one blade is wider
than the other). This plug fits a polarized outlet only one way; if the plug does not fit
fully into the outlet, reverse the plug. If it still does not fit, contact a qualified electrician.
Do not attempt to defeat this safety feature.
SAVE THESE INSTRUCTIONS
Welcome
Congratulations on your purchase of an OSTER
®
Toaster Oven!
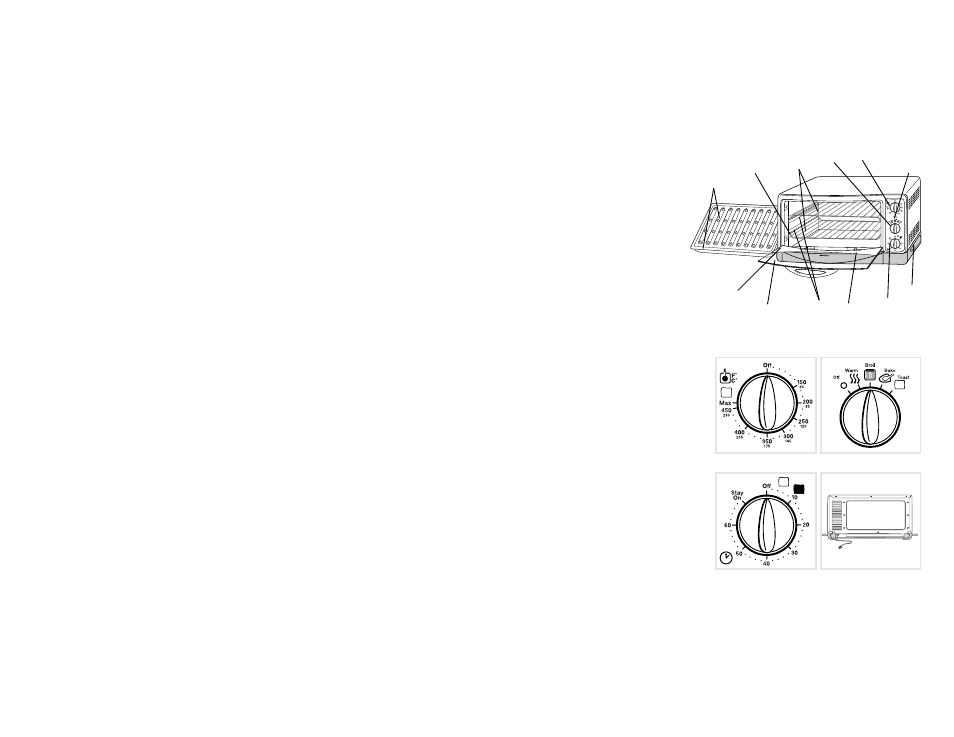
Features of Your Toaster Oven
1. Removable/Reversible Wire Racks
2. Function Selector Knob
3. Temperature Control Knob
4. Power Light
5. Cool-Touch
™
Side Handles
6. Timer Control Knob with Bell Signal
7. Removable Crumb Tray
8. Viewing Window
9. Continuous Clean Interior Walls
10. Baking Pan and Broiling Tray
11. Auto Advance Rack
12. Two Rack Positions
Learning About Your Toaster Oven
1. Removable/Reversible Wire Racks –
To accommodate a wide variety of foods
the oven has one or two reversible racks
and two rack positions.
2. Function Selector Knob –
Select
cooking function by turning knob to
desired setting. (See Figure 2)
3. Temperature Control Knob –
Adjust
the dial thermostat to the desired
temperature. (See Figure 1)
4. Power Light –
Indicates that oven is
plugged in and that the timer is set to
begin warming.
5. Cool-Touch
™
Side Handles –
For easy
movement of the oven.
6. Timer Control Knob with Bell Signal –
Set cooking time up to 60 minutes. Will
automatically turn the oven OFF at the
end of the cooking time. (See Figure 3)
7. Removable Crumb Tray –
For crumb or fallen food particles collection.
Pulls out for easy cleaning.
8. Viewing Window –
Allows you to see food cooking.
9. Continuous Clean Interior Walls –
Allows for easy cleaning.
10. Baking Pan and Broiling Tray –
Use for all your baking, broiling and grilling needs.
11. Cord Storage Bracket –
Brackets located on the back of the unit allow for convenient
cord storage. (See Figure 4)
12. Power Cord
F
I G U R E
1
F
I G U R E
2
F
I G U R E
3
F
I G U R E
4
1
11
10
2
3
4
5
6
7
8
12
9
Models with 1 rack: 6234, 6236
Models with 2 racks: 6230, 6232, 6233, 6237
6238, 6260, 6261, 6262,
6265, 6268, 6269, 6270