RCA VS2000 User Manual
Page 12
MENU OPERATION
21
MENU OPERATION
20
4. B. 1 Channel Scan
Select the desired satellite using the
“
left/right
”
keys (
◀∙▶
).
Select the
“
Antenna Configuration
”
icon using the browse keys(
▲∙▼ ,◀∙▶
).
Press
“
OK
”
key, and set
“
LNB Power
”
,
“
LNB
Type
”
,
“
LNB Freq
”
,
“
22KHz
”
,
“
Search Option
”
, and
“
DiSEqC 1.0
”
fields to the appropriate value using
the
“
left/right
”
keys(
◀∙▶
) at each field. Check the
signal strength and press
“
Exit
”
key.
Select the
“
Search/Edit TP
”
icon using the
“
left/right
”
keys(
◀∙▶
). Press
“
OK
”
key, and select the
desiredtransponder using the
“
up/down
”
keys (
▲∙
▼
). Press
“
OK
”
key to start the manual searching for
selected transponder.
Freq.
S/R
PoI.
FEC
: Input the frequency of the transponder you want to find manually.
: Inputs the symbol rate of the transponder you want to find.
: Select the polarization of the transponder you want to find. In the case of
horizontal,18V and in the case vertical, 13V are output through LNB line.
: Select the FEC of the transponder you want to find. You can select the value of 1/2,
2/3, 3/4, 5/6, 7/8 or auto.
4. B. 2 ADD SATELLITE
You can add a new satellite. Select the
“
Add Satellite
”
icon using the
“
left/right
”
keys (
◀∙▶
),
and press the
“
OK
”
key.
Select the
“
Search/Edit TP
”
icon using the
“
left/right
”
key (
◀∙▶
). Press the
“
OK
”
key and add
a new transponder using the
“
F1
”
key. You should set various parameters of the transponder.
The default name of the added satellites is
“
UserSAT-No.
”
4. B. 3 RENAME SATELLITE
You can also change the satellite name. Select the
“
Rename Satellite
”
icon using the
“
left/right
”
keys (
◀∙▶
).
Press
“
OK
”
key and select the character which you want to edit using the browse
keys (
▲∙▼
,
◀∙▶
). Press the
“
OK
”
key to confirm. Save the character currently renamed using
the
“
F2
”
key.
4. B. 4 DELETE SATELLITE
You can also delete the user satellite. Select the satellite that you want to delete from the satellite list.
Select the
“
Delete Satellite
”
icon using the browse keys (
▲∙▼
,
◀∙▶
).
Press the
“
OK
”
key, and the selected satellite will disappear.
You can see the progressive status of channel searching.
If you cannot find the desired transponder from the transponder list, you can add it by inputting
appropriate parameter values for a new transponder using the
“
F1
”
key. When you want to
change the parameter of an existent transponder, select the parameter using the
“
F1
”
key,
change its value and press the
“
Exit
”
Key.Correctly set various parameters.
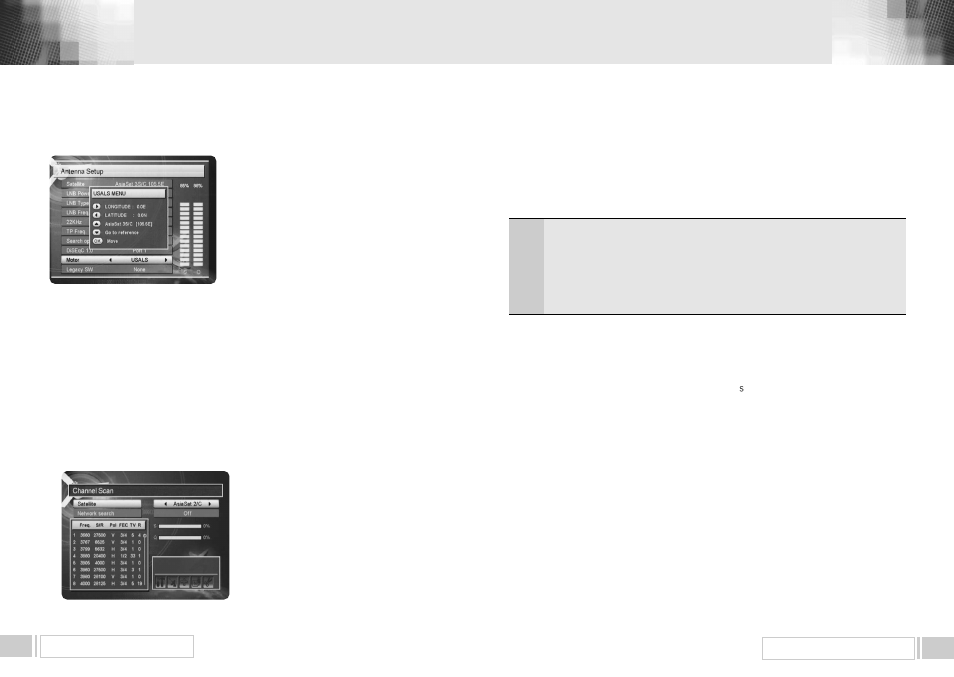
4. B. CHANNEL SCAN
It will be more convenient to use
“
Channel Scan
”
procedure when you want to search
channel for a specified transponder offered from the satellite. As in
“
Antenna Setup
”
,
“
Channel Scan
”
also searches all channels broadcasted over a specific transponder
using its predefined information. You can add a new transponder if you cannot find it on
the predefined transponder list.
Select
“
Channel Scan
”
menu in
“
Installation
”
menu, and the following screen will be
displayed.
4. A. 3 USALS
-Please go to Antenna Setup and select USALS
from motor.
-Press F1 then Pop-up will be appeared.
-Press arrow button to write Longitude
-Press arrow button to write Latitude, then OK to
work.