Radio Shack 63-987 User Manual
Page 2
2
below that range, the highest or lowest
temperature flashes.
To change the display language, see
“Manually Setting the Time, Date, and
Language” on Page 2.
To display either the seconds or the day of
the week, press
CLOCK
.
To view the time in another time zone, press
ZONE
until the desired time zone is
highlighted.
%
*'%-+0)
"
6*'
"5
+)0#.
"5
6#675
The clock displays these symbols to indicate
the current or last status of radio signal
reception.
/
#07#..;
"5
'66+0)
"
6*'
"
6
+/'
."&
#6'
."
#0&
".
#0)7#)'
Important: A strong radio signal overrides
the manual setting. If you do not want this to
happen, hold down
ZONE
until the time icon
disappears to turn off the automatic time
setting. To turn the automatic time setting
back on, hold down
8
for about 2 seconds
until
÷
appears, or reset the clock.
Note: If you do not press a button for about 1
minute, the clock returns to the currently set
time display.
1. Repeatedly press
ZONE
to select the
desired time zone.
2. Hold down
CLOCK
until the hour digits
flash.
3. Repeatedly press (or hold down)
8
or
9
to select the desired hour setting.
7C
7C
7C
7C
or
FC
FC
FC
FC
appears.
4. Press
CLOCK
. The minutes digits flash.
5. Repeat Steps 3 and 4 to set the minutes,
year, month, date, and language.
6. Press
CLOCK
to store your setting. Then
repeatedly press
CLOCK
to select the
weekday or second display.
4
'5'66+0)
"
6*'
"%
.1%-
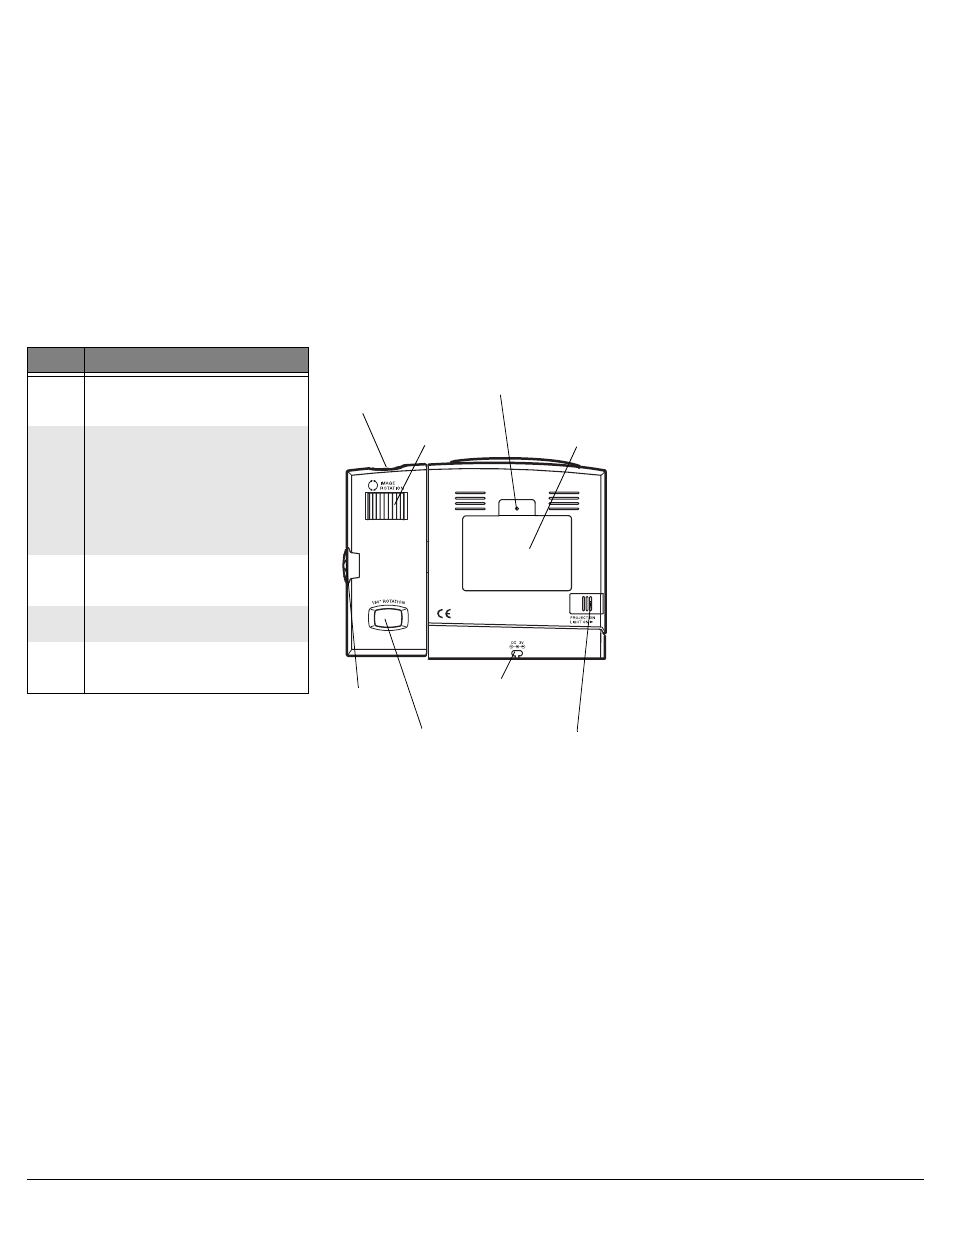
Press
RESET
on the back of the clock with a
pointed object such as a straightened paper
clip to reset the clock. All display segments
briefly appear, then the clock scans for a
radio signal.
75+0)"6*'"
241,'%6+10".+)*6
You can use the clock’s projection light to
project the time on a wall or ceiling.
To project the time, place the clock at least
18 inches from the desired surface and
adjust the projection arm to the desired
angle. Then slide
PROJECTION LIGHT ON
on
the back of the clock in the direction of the
arrow to turn on the light.
Caution: The projection arm moves about 90
degrees in either direction. Do not force it
further.
Note:
PROJECTION LIGHT ON
only operates
when the clock is connected to AC power.
To focus the image, adjust
FOCUS
on the
side of the projection arm.
To rotate the image, turn
IMAGE ROTATION
on the back of the clock.
To flip the image 180
°
, press
180° ROTATION
.
To turn off the projection light, slide
PROJECTION LIGHT ON
toward the projection
arm.
With the projection light off (or when
powering the clock using batteries only), you
can project the time by pressing
SNOOZE
.
The projector lights for about 5 seconds then
automatically turns off.
75+0)"6*'"#.#4/
5
'66+0)
"
6*'
"#
.#4/
"6
+/'
Note: If you do not press a button for about
30 seconds, the clock exits the alarm setup
mode. Start over at Step 1.
1. Hold down
ALARM
until the alarm hour
flashes.
é
(alarm on) and
û
(alarm
time) appear.
2. Repeatedly press or hold down
8
or
9
to select the alarm hour.
3. Press
ALARM
. The alarm minutes flash.
4. Repeatedly press or hold down
8
or
9
to select the alarm minutes.
5. Press
ALARM
to store the alarm setting.
The alarm time remains on the display.
To view the alarm display at any time, press
ALARM
. To return to the calendar display,
press
CLOCK
.
6
740+0)
"
6*'
"#
.#4/
"1
0
1
1
((
1. Press
ALARM
to turn on the alarm.
й
ээээ
appears.
At the preset alarm time,
é
flashes on
the display and the alarm beeps softly
every 2 seconds.
If you do not silence the alarm, after 20
seconds, two quick beeps sound every 2
seconds and the alarm volume
increases. After 20 more seconds, three
quick beeps sound every 2 seconds and
the volume increases to its maximum
level. After another 20 seconds, the
alarm beeps continuously (about four
beeps per second) for about 1 minute.
After 2 minutes, the alarm turns off
automatically. The first time this
happens, the snooze feature activates
and
é
continues flashing. In about 8
minutes, the alarm sounds again. If the
alarm turns off automatically a second
time,
é
remains on the display and the
alarm sounds again the next day at the
set alarm time.
5[ODQN
&GUETKRVKQP
øý
The clock received a radio signal
strong enough to set the date and time
within the last 72 hours.
öý
The clock has not received a radio
signal strong enough to set the date
and time within the last 72 hours.
Reposition the clock before the
designated signal check time, or set
the date and time manually.
Or, the displayed time has been
manually set.
No
Indicator
Automatic time setting is turned off.
Hold down
8
until
÷
appears, or
reset the clock.
-
The clock is receiving the radio signal
and the time/date sets shortly.
ùý
The clock is receiving a signal, but
reception is not strong enough to set
the clock.
RESET
Battery
Compartment
Cover
PROJECTION
LIGHT ON
DC 3V
Adapter
Cord Slot
IMAGE
ROTATION
FOCUS
180
°°°°
ROTATION
Projection
Light