Installation, Flue baffle & secondary air tube installation, Listed components for mobile home installation – Regency FREESTANDING WOODSTOVE2 F2400M User Manual
Page 16
Regency Freestanding Woodstove
16
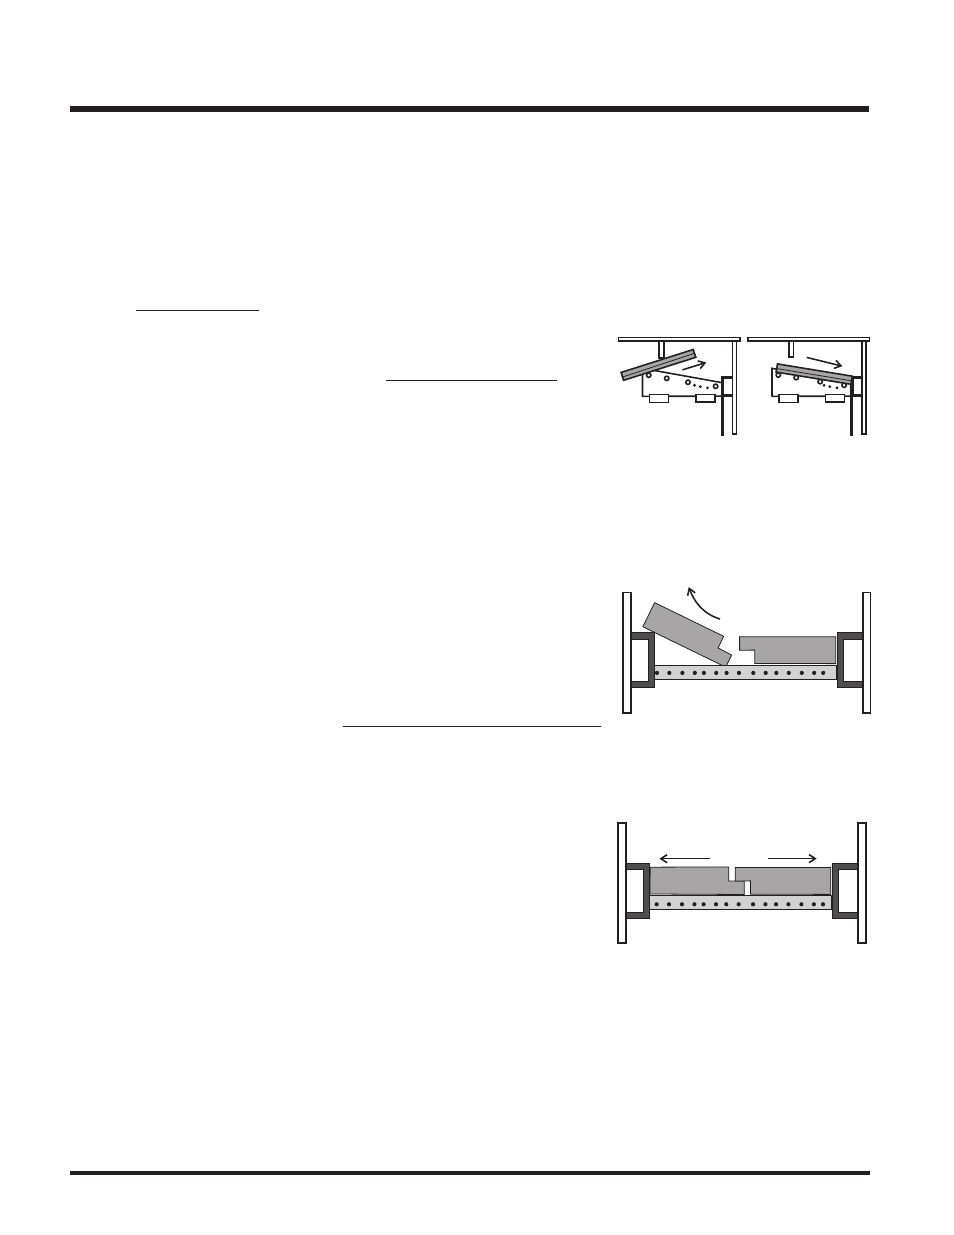
door. Slide the tube into the left hand side,
as far as possible and then bring it back into
the hole on the right hand side until it locks
into position. If the tube will not slide in
easily, simply use a pair of vise grips or
pliers and tap it into place with a hammer. A
tighter fit will ensure the tube will not move
when the unit is burning.
2) Slide the left baffle over the air tubes from
the front and then push it to the back.
SIMPSON DURA-PLUS
Qty.Part #
Description
1
6DVL8693
Connector Kit
1
6DP-MH9096 Mobile Home Kit
ICC EXCEL 2100
Qty.Part #
Description
1
6CL48
48" Chimney length (also in 12",
18", 24" lengths.
1
6RC
Rain Cap
1
6RCS
Spark Screen (for rain cap)
1
6RDS/SQS Round/Square support box
1
6VF
Flashing
1
6UBA
"Ultrablack" Close Clearance
Connector
Canadian Installations*
SECURITY S2100 (see above for details)
ICC EXCEL 2100 (see above for details)
SELKIRK SENTINAL CF
*The use of alternate pitch flashings, support
box extensions, additional chimney lengths, and
additional chimney bracing, may be used on
each of the previously listed systems. These
parts though must be from the same system as
listed, and must be a similar and/or complimen-
tary part.
CAUTION: At no time use unlabelled
parts, or substitute parts made for
another chimney system.
Install as per chimney manufacturer's
installation instructions.
FLUE BAFFLE &
SECONDARY AIR TUBE
INSTALLATION
The flue baffle system located in the upper area
of the firebox is removable to make cleaning
your chimney system easier. The baffles must
be installed prior to your first fire. Smoke
spillage and draft problems may occur if
the baffles are improperly positioned.
Check the position of the baffles on a regular
basis as they can be dislodged if too much fuel
is forced into the firebox.
Freestanding Stove
F2400M
The unit arrives with the 2 baffles on the floor
of the firebox.
1) If all 4 air tubes are installed continue on to
Step 2), if not, follow the instructions below.
Install the air tube into the holes in the side
channels. The notch goes on the right hand
side with the air holes facing toward the
LISTED COMPONENTS
FOR MOBILE HOME
INSTALLATION
The Regency F2400M and S2400M Freestand-
ing pedestal units are approved for installation
in a Mobile Home if one of the following pipe
systems is used.
U.S. Installation*
METALBESTOS SSII
Qty. Part #
Description
1
6DS-VK
Connector Kit
1
6TMH
Shield/Support
1
6TAF-6
Flashing
1
6T-36
Chimney Length
1
6T-18
Chimney Length
1
6T-CT
Rain Cap
PRO-JET 3103
Qty.Part #
Description
1
PV06-TK
Connector
1
CSB
Shield/Support
1
RRS
Radiation Shield
1
LFR03
Flashing
1
SL3
Chimney Length
1
SL1
Chimney Length
1
RCSA
Rain Cap
SECURITY ASHT
Qty.Part #
Description
1
DL42A-6
Connector Kit
1
6SS
Shield/Support
1
6FAMH
Flashing
1
6L3
Chimney Length
1
6L1
Chimney Length
1
CPE
Rain Cap
SECURITY S2100
Qty.Part #
Description
1
DL42A-6
Connector Kit
1
6XSF
Support
1
6XFA
Flashing
1
6XL3
Chimney Length
1
6XL18
Chimney Length
1
6XCPE
Rain Cap
METAL-FAB TEMP/GUARD 2100
Qty.Part #
Description
1
6DWBK
Connector
1
6TGRS
Roof Support
1
6TGG36
Chimney Length
1
6TGG12
Chimney Length
1
6TGF
Flashing
1
6TGC
Rain Cap
AMERI-TEC HS
Qty.Part #
Description
1
6DCC
Connector
1
6HSRS-12
Roof Support (6PLRS-12-BK)
1
6F
Flashing
1
6HS-36
Chimney Length
1
6HS-18
Chimney Length
1
6HS-RCS
Rain Cap (6PL-MPC)
INSTALLATION
3) Tilt the left baffle up on top of the side
channel and it will leave enough room to
position the right baffle in the same manner
as Step 1) above. Then reposition the left
baffle flat on the air tubes.
4) Important: push both baffles so they
are tight against the side walls.
Note: When getting the chimney cleaned,
push the baffles forward toward
the front of the stove, this should
leave sufficient access to the flue.
If it is not enough space then re-
move the middle air tube (reverse
the procedure in step 1) above),
and baffle and then replace every-
thing when cleaning is completed.
Side View
Front View
Front View