Glossar y – Napco Security Technologies GEM-P1664 User Manual
Page 39
L
NAPCO Security Systems
X
GEM-P1664 Installation Instructions
WI1424A 1/06
Page 39
installations, do not program more than one "D" before the telephone number. See Backup Report on Telco 2; Report Telco 3
(Double or Split Reporting). Also see Access Number for Outside Line; Telephone Numbers.
Print Module Support
The bus mounted GEM-PRINT will print all system activity. If the GEM-PRINT fails, it will cause an E27- 00 Printer Fail system
trouble.
Priority Area Arming
Prevents area arming if the alternate Priority Area has not yet been armed.
Priority Zone (Required for all zones in UL installations)
A zone that will prevent arming if faulted. If an attempt is made to arm, the sounder will come on and "
ZONES NOT NORMAL / CAN'T ARM
"
will be displayed for 4 seconds. The keypad may be reset by simply pressing the
C
button. The fault on a Priority Zone must
be corrected before the panel can be armed. Any zone may be selected as a Priority Zone. A zone in trouble that is neither a Priority
Zone nor an Auto-Bypass Zone will cause an alarm on arming.
Priority Zone with Bypass
A Priority Zone that will permit arming if the priority condition is bypassed. If the system is so programmed, the zone will auto-bypass
and (optional) the condition will be reported to a central station.
As above, if an attempt is made to arm, the sounder will come on and "
ZONES NOT NORMAL / CAN'T ARM
" will be displayed. To reset the
keypad, press the
C
button; the display will read "
ZONE FAULTS
". To arm the panel, press the
B
button, then enter the zone
number, then press the
U
or
D
button. Any zone not selected as a Priority Zone may be programmed as a Priority Zone with
Bypass.
Pulse Burglary Output See Alarm Outputs
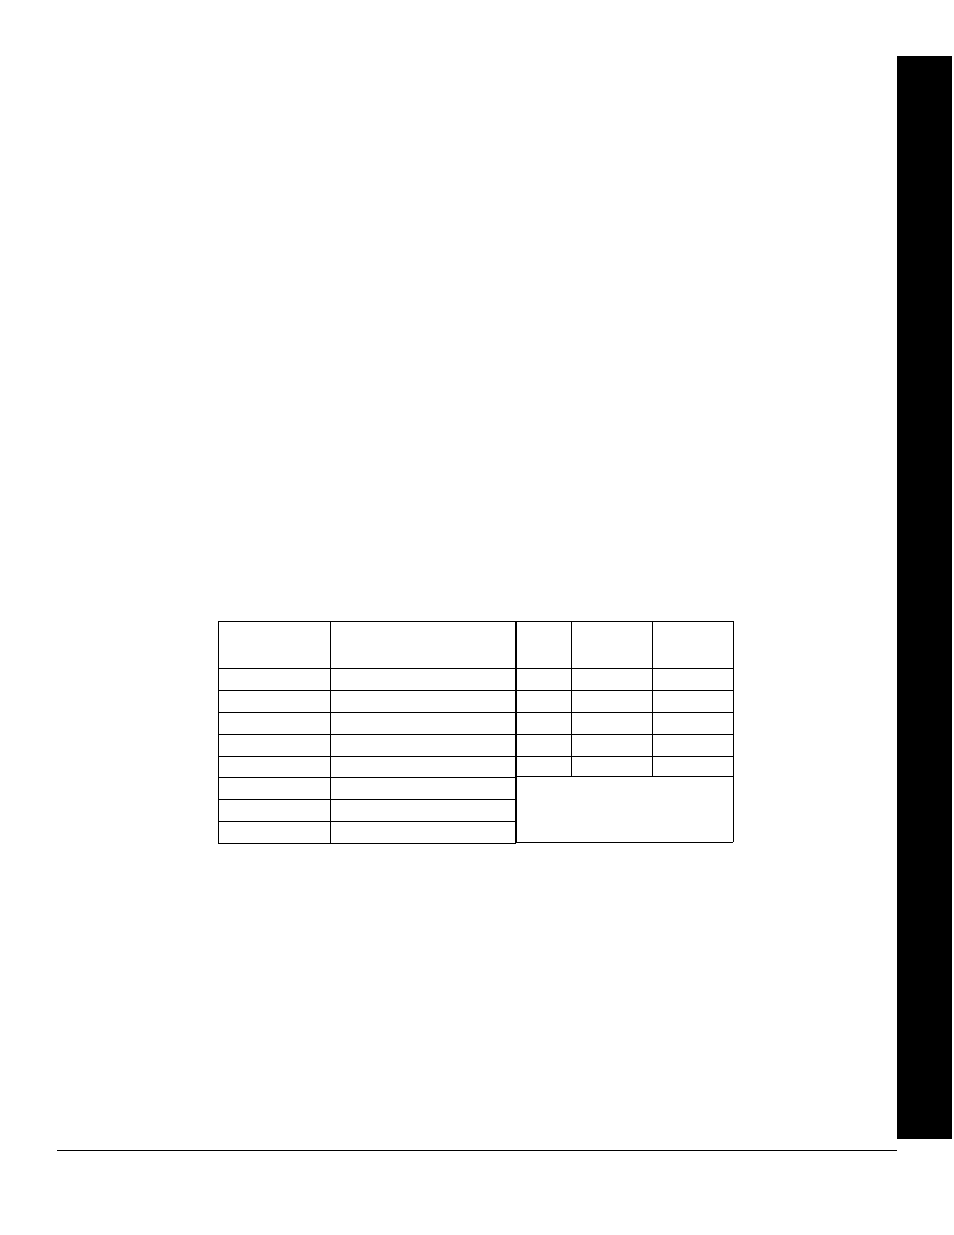
Receiver Format
The communicator can be programmed to transmit to any standard central-station receiver format. A receiver format must be
entered for each telephone number used, but a different format may be assigned to each. Refer to Backup Report on Telco 2 and
Report Telco 3 to determine whether or not Telephones 2 and/or 3 will be programmed. Call the central station for each telephone
number used to confirm the type of receiver in use. Select the receiver format entry for each telephone number from the following
table.
*These formats do not use programmable codes, but Event ID Codes to identify the type of zone and alarm as follows:
1 – Fire
2 – Panic
3 – Burglary
4 – Holdup
7 – Gas Alarm
8 – Heat Alarm
A – Auxiliary Alarm (keypad displays "0")
B – 24-Hour Auxiliary Alarm
Relay Control (Optional External Relays)
In addition to the three relay outputs (Alarm, PGM1 and PGM2) provided on the motherboard, up to 16 external relays can be
controlled from the keypad through the use of the RM3008 (self-contained) or the RB3008 (to be mounted inside housing). The
GEM-OUT8 is similar to the RM3008 but has open collector active low outputs in place of relays. The GEM-OUT8 is designed for
Glossar
y
ENTRY
RECEIVER FORMAT
blank (•)
Ademco, Silent Knight Slow
2
Radionics Fast
3
Silent Knight Fast
4
Radionics, DCI, Franklin Slow
5
Universal Hi-Speed
B
SIA*
C
Ademco Point ID*
E
Pager
DATA
FREQ.
(Hz)
DUTY CYCLE
(ON/OFF)
INTERDIGIT
TIME
1900
60/40mS
600mS
1850
13/12
400
1900
40/30
560
1800
60/40
600
1850
30/20
350
Modem formats