Ke yp ad configur ation mode, Napco security systems, inc – Napco Security Technologies GEM-P1664 User Manual
Page 19
L
NAPCO Security Systems
X
GEM-P1664 Installation Instructions
WI1424A 1/06
Page 19
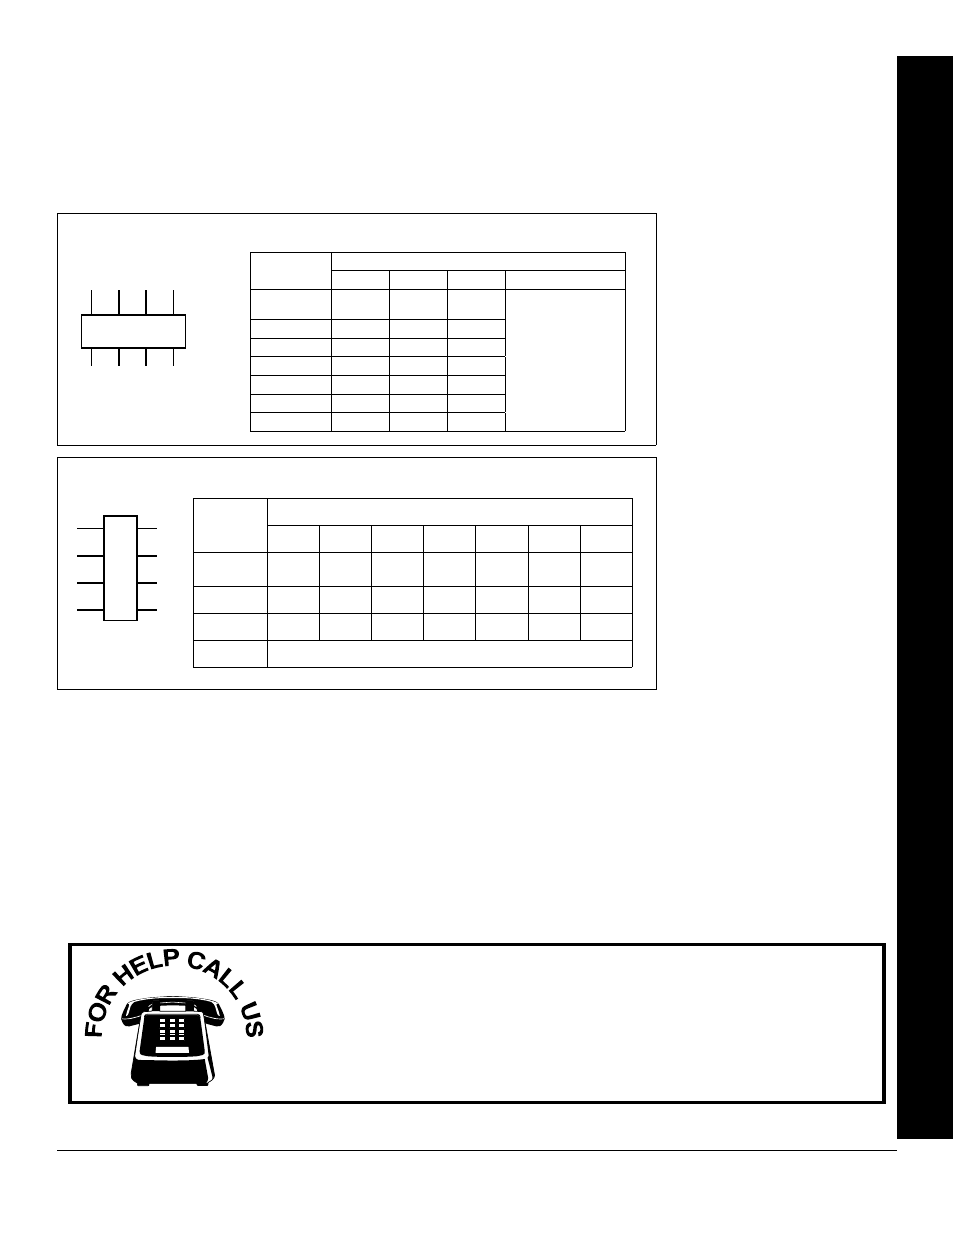
Configuring the GEM-RP2ASe2/GEM-K2AS and GEM-RP3DGTL/GEM-K3DGTL Keypads
Up to 7 GEM-RP2ASe2/GEM-K2AS keypads may be connected to the panel (Keypads 1–7). Each must be configured
for a keypad address. In addition, the keypad may be configured to disable (a) touchpad backlight; (b) LCD backlight;
and (c) entry sounder. Keypads are configured by the proper selection of jumpers. Refer to the label on the circuit
board "fishpaper" for jumper locations and a summary of settings. If you have a GEM-K2AS keypad, please see the
"Important Note" on page 5 regarding the differences between the GEM-RP2ASe2 and the GEM-K2AS keypad buttons.
The buttons displayed below will be for the GEM-K2AS keypad.
KEYPAD ADDRESS
If more than one keypad is
installed:
Each must be assigned a
unique address (that is, no
two keypads may be
numbered alike).
K e y p a d s m u s t b e
addressed consecutively
(that is, missing numbers are
not permitted).
Assign the keypad address
number by selecting Jumpers
J1–3 in accordance with the
table at left.
TOUCHPAD BACK LIGHT
Cut Jumper A to disable touch pad backlighting to conserve 11mA standby current.
LCD BACKLIGHT
Cut Jumper B to disable LCD backlighting.
DISABLE SOUNDER
Cut Jumper to disable the sounder. (Do not disable in UL applications).
Ke
yp
ad Configur
ation Mode
NAPCO Security Systems, Inc.
333 Bayview Avenue, Amityville, New York 11701
For Sales and Repairs, call toll free: (800) 645-9445
For direct line to Technical Service, call toll free: (800) 645-9440
Internet: http://www.napcosecurity.com
GEM-RP2ASe2 KEYPAD
P
3
2
1
P
3
2
1
Jumper 1
KEYPAD
NUMBER
ADDRESS JUMPER
1
2
3
PARK
1
OFF OR
ON
OFF
OFF
2
OFF
ON
OFF
3
ON
ON
OFF
4
OFF
OFF
ON
5
ON
OFF
ON
6
OFF
ON
ON
7
ON
ON
ON
MAY BE USED TO
HOLD SPARE
JUMPER
GEM-RP3DGTL KEYPAD
ADDRESS
NUMBER
KEYPAD NUMBER
1
2
3
4
5
6
7
1
OFF OR
ON
OFF
ON
OFF
ON
OFF
ON
2
OFF
ON
ON
OFF
OFF
ON
ON
3
OFF
OFF
OFF
ON
ON
ON
ON
P
MAY BE USED TO HOLD SPARE JUMPER
1
2
3
P
1
2
3
P
Jumper 1